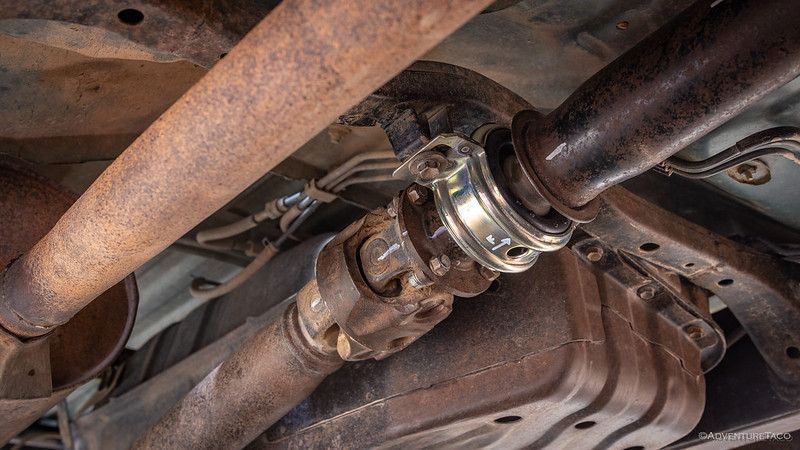
The rear driveshaft on a 1st gen Tacoma is broken into two sections in order to raise the front half of the drive shaft and provide more ground clearance. To achieve this, the shaft is supported, near its center, to a frame crossmember by means of a large bearing. Toyota calls this a center bearing, but it's also commonly referred to in the community as a carrier bearing.
This bearing can last hundreds of thousands of miles, but it's not uncommon for it to eventually need replacing, especially on trucks that have been lifted, thereby changing the angles of the driveline from the stock angles.
Luckily, it's an easy job that can usually be accomplished in a couple hours and requires no special tools.
Parts
Only one part is required to replace the center carrier bearing.
- 95-04 Tacoma
- Toyota OEM Center Carrier Bearing (37230-35130) - go with an OEM part here; they last so long that the cost is worth the peace of mind.
- (optional) Toyota OEM Stake Nut for Propeller Intermediate Shaft (90179-18009) - not usually needed, but if you'd rather replace the stake nut rather than reusing your original, this is the part to get.
- 93-98 T100
- Toyota OEM Center Carrier Bearing (37230-35130) - go with an OEM part here; they last so long that the cost is worth the peace of mind.
- (optional) Toyota OEM Stake Nut for Propeller Intermediate Shaft (90179-18009) - not usually needed, but if you'd rather replace the stake nut rather than reusing your original, this is the part to get.
- 00-06 Tundra
- Toyota OEM Center Carrier Bearing for Tundra (37230-34030) - go with an OEM part here; they last so long that the cost is worth the peace of mind.
- (optional) Toyota OEM Stake Nut for Propeller Intermediate Shaft (90179-18009) - not usually needed, but if you'd rather replace the stake nut rather than reusing your original, this is the part to get.

All you'll need to get this job done.
Tools
As with the parts, the tools for this job are straightforward.
- 2, 14mm box-end wrenches - two box-end wrenches are necessary to remove the bolts that join the two halves of the drive shaft; do not use standard wrenches, and sockets don't fit.
- 14mm socket - for removal of the center carrier bearing and torquing of the drive shaft nuts during reassembly.
- 24mm socket - for the stake nut.
- Paint Pens - to mark the drive shaft in order to maintain alignment/balance.
- Small chisel and hammer - to un-stake the stake nut.
- Bench vise - to hold the drive shaft while working on the center carrier bearing.
- Torque Wrench - capable of 25 - 150 ft-lbs.
- (optional) Milwaukee M18 mid-torque impact wrench (2861-22) - makes removal of the stake nut much easier.
- (optional) 2- or 3-jaw gear seal bearing puller set - may (or may not) be necessary to remove center carrier bearing from the drive shaft
- (optional) a single 6-ton Jack Stand - having one will make drive shaft removal/installation easier.

Not many tools are necessary; the optional tools make things easier, and you can use them again and again on other jobs!
Doing the Job
With the parts and tools in hand, doing the job is almost as simple as removing and reinstalling the drive shaft, so let's get started.
Remove the Drive Shaft
- Critical. Before removing anything, mark every joint in the drive shaft with a paint pen. A drive shaft is balanced at the factory, and must be kept aligned in order to maintain that balance. You will use these marks when reassembling the drive shaft to ensure that it goes back the same way it came apart.

Witness marks are critical when disassembling a drive shaft.
- Place a 6-ton jack stand under the drive shaft near the slip yoke. This will support the rear half of the shaft once it is disconnected from the rear differential.
- Use two (2) 14mm box-end wrenches to loosen and remove the four bolts that secure the drive shaft to the pinion flange on the rear differential.

Bolts enter through the drive shaft; nuts are behind the pinion flange.
- Separate the drive shaft from the pinion flange on the rear differential and set it on the jack stand.
- Use a 14mm box-end wrench to loosen and remove the four nuts that secure the drive shaft to the transfer case (or transmission in the case of 2wd). Note: once the nuts are removed, the drive shaft will remain in place as the bolts are pressed through the transfer case flange.
- Use a 14mm box-end wrench (or socket) to loosen and remove the two bolts that support the center carrier bearing. Note: be sure to support the center of the drive shaft as these are removed, so it can be safely lowered once it is free.

After removing 8 fasteners, the driveshaft is free!
At this point, I highly recommend inspecting all of the u-joints. They should rotate freely in all directions with no binding or crunchiness. If you notice any amount of non-smooth rotation, you should replace the u-joints.
By replace, I mean have them replaced. Because the outside surfaces of the drive shaft ears - which capture the u-joints - are not parallel, it is nearly impossible to press the joints out without special fixtures. This makes replacing stock Tacoma u-joints one of the worst jobs imaginable, and not easily accomplished with tools in an amateur shop.
Generally, a new Toyota OEM Rear U-Joint (04371-60070) can be installed by a driveline shop for around $50, if you supply the u-joint.
Remove and Replace the Center Carrier Bearing
- Critical - ensure that you have good witness alignment marks near the two halves of the drive shaft at the flange near the center bearing.
- Use two (2) 14mm box-end wrenches to loosen and remove the four bolts that secure the two halves of the drive shaft at the flange near the center bearing.

Bolts enter from the rear (double-cardan joint); nuts are adjacent to the center carrier bearing.

Use a hammer to carefully rap on the flange joint if it's difficult to separate the halves of the drive shaft.
- Use a small chisel and a hammer to unstake the nut that secures the flange and center carrier bearing to the drive shaft.

Carefully unstake the nut.

When using an impact wrench to remove the nut, unstaking the nut may not be necessary; the wrench will likely have enough torque to power the staked nut off, unstaking it in the process.
- Remove the stake nut, thick washer, flange, and two thin washers from the drive shaft. Note: the two thin washers between the flange and center carrier bearing may not be obvious, but you'll need to reinstall them later.
- Remove the center carrier bearing. Note: in many cases this will just slide off the driveshaft, but in corrosive environments, it may be necessary to use a puller.

All pieces removed.
- Clean up the mating surfaces of the drive shaft and flange to remove old grease and rust.
- Apply a small amount of grease to the bearing surfaces of the drive shaft, and a small amount of anti-seize to the splines that capture the flange.

A bit of grease will enable the center carrier bearing to slide more easily onto the drive shaft; anti-seize on the splines will reduce corrosion of the flange surface.
- Ensuring the correct orientation, slide the new center carrier bearing onto the drive shaft, ensuring that it engages correctly with the bearing surfaces.
- Slide the two thin washers onto the drive shaft.
- Slide the flange onto the drive shaft, ensuring that the witness marks are correctly aligned.
- Slide the thick washer onto the drive shaft.
- Thread the stake nut onto the drive shaft.

All parts reassembled.
- To seat the center carrier bearing, tighten the stake nut to 134 ft-lbs.
- Back off the stake nut and then re-torque it to 51 ft-lbs. After it is properly torqued, use the chisel and hammer to re-stake the nut.

Staking the nut will prevent it from loosening during use.
- Ensuring that the witness marks are correctly aligned, assemble the two halves of the drive shaft using two (2) 14mm box-end wrenches. Torque to 54 ft-lbs.
Reinstall the Drive Shaft
- Place the slip yoke onto the jack stand near the pinion flange on the rear differential.
- Supporting the center of the drive shaft, slide the front of the drive shaft onto the bolts protruding from the flange on the transfer case.
- Loosely secure the two (2) 14mm bolts that hold the center carrier bearing to the crossmember in order to support the center of the drive shaft.
- Loosely secure the four (4) 14mm nuts and washers that connect the front of the drive shaft to the transfer case.
- Loosely secure the four (4) 14mm bolts that connect the rear of the drive shaft to the pinion flange. Note: Bolt heads and lock washers are on the drive shaft side; nuts are on the flange side.
- Torque all 14mmm bolts that secure the drive shaft to 54-ft-lbs.
- Ensure that the center carrier bearing is properly aligned on its mount and torque the two (2) 14mm bolts to 27 ft-lbs.

Shiney and Done!


Hello, how did you know that your carrier bearing needed to be replaced? Is it possible to diagnose visually/audibly under the truck?
Hey Colman,
In my particular case, there wasn't anything that looked "wrong" with my carrier/center bearing, and in retrospect, I think it was probably fine.
In general, inspection is done in two ways:
Guess that's three things for the price of two! Good luck!