")
If you have your 1st gen Tacoma long enough, you'll most likely have to replace the steering rack. This is a job that intimidates a lot of people, but with the right tools - and there aren't many specialty tools needed - the job isn't actually all that difficult. In fact, I was able to get it done in the rain, though I'd recommend waiting for a dry day if you don't have a shop to work in. 
Let's take a look at the parts needed, as well as the tools, and then jump into the work.
Parts
- Steering Rack - This is the only part that you must replace when you're replacing the rack. It is highly recommended to go with a TOYOTA Genuine OEM Power Steering Rack (44250-35042), as aftermarket racks are known to leak after significantly less time, and then you're just doing the job again. But, if you want to go with an aftermarket rack, you can definitely get one cheaper.
- Outer Tie Rod Ends (OTREs) - if you want to replace your OTREs while you're in there replacing the rack, now is a good time to do it, but if your existing OTREs are in good shape, you can reuse them.
- Tacoma
- OEM: Right (45046-39295) | Left (45047-39175) or
- Aftermarket: Right (45A0833) | Left (45A0832)
- 4Runner
- Tacoma

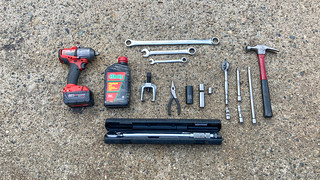
Tools
The tools for this project are reasonably straight forward. Only the front-end service set and 17mm flare nut wrench are in any way special.
- OTC 6295 Front End Service Set - the smaller pitman arm puller is used to disconnect the OTRE when removing the steering rack.
- Misc sockets (I recommend this set from Williams which contains all of the following)
- 12mm socket - sway bar mount, steering rack removal.
- 14mm socket - sway bar end link removal.
- 19mm shallow socket - steering rack removal.
- 19mm deep socket - steering rack removal.
- 21mm socket - to remove lug nuts.
- 22mm socket - OTRE castle nut removal, steering rack.
- Ratchet, Extensions, as necessary.
- Misc wrenches
- Hammer - to tap the rag joint off the old steering rack.
- Breaker Bar
- Torque Wrench.
- Optional - Milwaukee M18 mid-torque impact wrench.
Supplies
A few supplies make the job - and future service to the steering rack - easier:
- Power Steering Fluid (ATF) - Required to refill power steering system after the new rack is installed. Note: You can also use any Dexron III ATF from a parts store.
- Grease - to grease the rack bushings.
- Anti-seize - to make bolt removal easier in the future.
- Colored spray paint or a paint pen
- Penetrating oil/spray
Doing the Job
With everything gathered up, it's time to do the job. Generally, it entails removing the sway bar (if you still have one installed), then removing the steering rack. Installation is the opposite, and the key through the whole thing is to ensure that the new rack is installed without throwing the steering out of whack too much, so that any minor problems can be addressed through an alignment.
General Preparation
- Using a floor jack and jack stands, support the front of the truck on the frame with both front wheels completely off the ground.
- Remove the wheels.
- Lock the steering wheel. This is necessary in order to maintain correct steering wheel orientation once the steering rack is removed in order to access the bushings.
- Make sure the parking brake is on, and at least one rear tire is chalked.

Removing the Sway Bar to Access the Steering Rack
For photos of removing the sway bar, see Remove the sway bar and sway bar end links. If you will be reinstalling your sway bar, now may be a good time to replace your sway bar and end link bushings as well with an Energy Suspension kit:
- Tacoma - kit 8.5118 w/27mm bushings (black | red)
- 4Runner - kit 8.5117 w/26mm bushings (black | red)
- Use a 14mm socket to remove the nut on the top of the sway bar end link.
- Remove the washer and bushing and set them aside.
- Repeat for the opposite side.
- Use a 12mm socket to remove the two (2) bolts securing the sway bar brackets to the frame.
- Repeat for the opposite side.
- Remove the sway bar.

Removing the Outer Tie Rods (OTREs)
Removing the OTREs is important, but equally important is knowing how to reinstall them in the same position, in order to keep your alignment reasonably good once the new rack is installed.
- Using a paint marker or some colored spray paint, mark/spray the threads of the OTRE so that you can reinstall them with the same number of threads showing. Count the threads as well.

- After the paint dries, use two wrenches to loosen the lock nut that connects the OTRE to the Inner Tie Rod End (ITRE).
- Remove the cotter pin from the OTRE castle nut.
- Use a 19mm socket to loosen the castle nut securing the OTRE to the LBJ.
- Use the smaller Pittman Puller in the OTC 6295 Front End Service Set to separate the OTRE and LBJ. Note: leave the castle nut loosely threaded onto the OTRE when you do this, and it will keep the joint from exploding when it's pressed out.

- Unscrew the OTRE from the steering rack and set it aside for later.
Removing the Steering Rack Mounting Hardware
The steering rack is secured in three locations.

- Use a 19mm socket to remove the lower nut and upper bolt for the passenger-side bracket that secures the steering rack to the cross member. Then set the bracket aside.
- Use a 19mm socket and breaker bar to remove the center bolt securing the steering rack. Note: The bolt points towards the ground and is accessed from the above the steering rack. The lower nut is a welded nut and cannot be loosened.
- Use a 22mm socket and 22mm wrench to remove the driver side bolt and nut securing the steering rack. Note: This bolt does not need to be fully removed; it only needs to slide forward enough to remove the rack as the rack is moved toward the rear of the truck. If you have a diff-drop kit, you may or may not need to remove it in order to slide the rack off.
- Using a 12mm socket, remove the bolt securing a bracket that secures the power steering lines to the frame. This will allow more/easier movement of the steering rack for the next steps. Note: a wobble, and the necessary extensions can be used to access this from below the truck, or you can access it by feel through the driver side wheel well.
Disconnecting the Rag Joint
Now that the steering rack is loose, ensure that it is supported by the driver side bolt, and additionally by a floor jack on the passenger side.
- Use a 12mm socket and 12mm wrench to remove the two bolts that secure the lower half of the rag joint. Note: One bolt may be easier to access than the other, and the steering wheel can be turned to more easily access the second bolt, as long as you turn it back to the "centered" position after doing so.

- Use a 12mm socket to remove the bolt securing the upper half of the rag joint to the steering shaft. Once this bolt is removed, the upper half of the rag joint should be able to slide approximately 1" up the shaft, which is grooved. Note: you may need to use penetrating oil on the shaft/rag joint in order to be able to slide it up.

Note: You do not need to actually separate the rag joint - which will be indexed by two posts - at this point. However, it's now ready for separation.
Disconnecting the Power Steering Lines and Removing the Rack
The last connections to disconnect on the rack are the power steering lines. This is a dirty operation, and I recommend getting a large catch basin under the rack to catch the fluid that will leak out.
- Slide the rack toward the rear of the truck in order to expose the power steering lines.
- Use a 17mm flare nut wrench to loosen, and then disconnect each of the two power steering lines, allowing all of the fluid to drain into a catch basin.

- Optional: Once all of the fluid has drained out, use a plug to seal the end of the line. Note that this is only to prevent contaminants from getting into the line, not to save fluid.

- With both lines removed, slide the steering rack towards the rear of the truck and off of the driver side bolt that is supporting it, in order to remove it. Note that you'll need to maneuver it so the rag joint separates as well.

Preparing to Install the New Steering Rack
- Ensure that the steering rack has witness marks to show where it is centered, and that they are aligned. If there are none, assume that it is approximately centered and make your own. Note: my OEM rack came with witness marks, but they needed to be aligned for installation, which was surprising to me, and I didn't realize until after I'd installed it.

- Remove the 12mm bolt that secures the lower part of the rag joint to the old rack.

- Use penetrating oil and a hammer to tap the lower part of the rag joint off the old rack.

- Lift the new steering rack into position, and slide the driver side bolt into the rack to support it. Support the passenger side with a floor jack. Note: Do not push the rack all the way to the cross-member yet, as it will be more difficult to install the power steering lines.

Installing the Power Steering Lines
- Identify the two power steering lines to be installed. When looking from the driver side (left) of the vehicle, the line with the larger nut is installed first, to the hole closer to the center line of the truck. The line with the smaller nut is installed second, to the hole closer to the (left) outside of the truck.

- Install the (inside) power steering line with the larger nut by starting it with your fingers and then using a 17mm flare nut wrench. The torque spec on this connection is 26 ft-lbs, which is difficult to measure. Use the good-and-tight rule and check for leaks later.
- Install the (outside) power steering line with the smaller nut by starting it with your fingers and then using a 17mm flare nut wrench. The torque spec on this connection is 26 ft-lbs, which is difficult to measure. Use the good-and-tight rule and check for leaks later.
Reconnecting the Rag Joint
Note that this is a little bit of a trial-and-error process, and you may need to repeat this step if the steering wheel is canted too far left or right once the job is complete.
- Push the upper half of the rag joint as far up the shaft as possible and align the lower half using the two studs. Note: do not fit the lower half onto the steering rack at this time.
- Install the two, 12mm bolts that secure the two halves of the rag joint and loosely tighten them. Note that the bolt inserts from the bottom and has a flat washer on the bottom of the rag joint. A split washer and nut are installed from the top of the rag joint.
- Have a helper turn the steering wheel to the dead center position and hold it there.
- Verify that your witness marks for the steering rack dead center position are aligned.
- With the rag joint pushed as far up the steering shaft as possible, maneuver it over the indexed stud on the steering rack and then slide it down onto the stud. Note: to do this, manipulate the steering rack by pivoting it on the driver side bolt.
- Loosely install the 12mm bolt into the lower half of the rag joint that locks the rag joint to the steering rack. Note: do not tighten yet.

Mounting the Steering Rack
- Apply some grease to the passenger side (D-shaped ) bushing.
- On the passenger side, position the bracket over the bushing and hand tighten the 19mm nut and 19mm bolt to hold it in place.
- On the driver side, insert the 22mm long bolt from the front of the crossmember.
- Tighten the 22mm driver side nut/bolt and 19mm passenger side bracket until the steering rack is pulled closer to the crossmember and the center bushing is aligned with the mounting point on the crossmember.

- Insert the 19mm center bolt through the bushing and hand tighten it. Note: if you can't hand tighten this bolt, then adjust the driver and passenger anchor points until the center bolt moves easily.
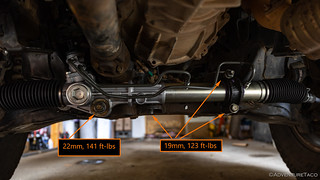
- Torque the 19mm passenger side bracket to 123 ft-lbs.
- Torque the 19mm center bolt to 123 ft-lbs.
- Torque the 22mm driver side nut to 141 ft-lbs.
- Using a 12mm socket, a wobble, and the necessary extensions, reinstall the bracket that secures the power steering lines to the frame. Torque to "tight."
Tightening the Rag Joint
Note that for each of these operations, you can turn the steering wheel to make access to the bolts as easy as possible. Even better, have someone else turning the wheel for you.
- Tighten the 12mm bolt that secures the top half of the rag joint to the steering shaft to good-and-tight, so the rag joint can no longer slide up and down the shaft.
- Tighten the two 12mm bolts that secure the top and bottom halves of the rag joint together to good-and-tight
- Tighten the 12mm bolt that secures the lower half of the rag joint to the steering rack to good-and-tight.
Reconnecting the Outer Tie Rod (OTRE) to the Lower Ball Joint (LBJ)
- Insert the OTRE post into the LBJ and thread on the associated 19mm castle nut.
- Using a 19mm socket, torque the castle nut to 67 ft-lbs, plus any additional to allow for insertion of the cotter pin.
- Insert and secure a new cotter pin.
Refilling the Power Steering Fluid

- Ensure the engine is off and the front wheels not touching the ground.
- Fill the power steering fluid reservoir with Dexron III ATF until it is full.
- Turn the steering wheel slowly from lock to lock several times.
- Reinstall the wheels and tighten, but do not torque, the lug nuts.
- Remove jack stands supporting front of vehicle.
- With truck supporting its own weight, torque lug nuts to 89 ft-lbs.
- Start the engine and run it at idle for a few minutes.
- With the engine idling, turn the wheel to left or right full lock and keep it there for 2-3 seconds, then turn the wheel to the opposite full lock and keep it there for 2-3 seconds.
- Check the fluid level and for foaming (bubbles). Note: The fluid level should be to the top of the "cold" line on the dip stick, and there should be no/minimal foaming.
- Check the power steering lines that enter the steering rack for leaks.
- Repeat steps 8-11 several times until the fluid level is correct, and there is minimal foaming.
Verifying Approximate Alignment
These steps help to ensure that the truck will be able to be aligned when you take it to the shop.
Turn the steering wheel so that the truck is driving in a straight line and drive straight for 30 feet. If the steering wheel is centered - or nearly centered - at this point, you are done! Otherwise, continue with the following steps:
- Turn off the truck, and inspect the witness marks on the steering rack that indicated that it is "centered," If they are not aligned, make new witness marks.
- Because the steering wheel is not centered - or nearly centered - at this point, you must reposition the rag joint on the steering rack.
- Follow the procedure for "Removing the Outer Tie Rods (OTREs)" to remove the driver side OTRE from the LBJ only. Note: you'll need to remove the driver side wheel to do this.
- Follow the procedure for "Removing the Steering Rack Mounting Hardware" to allow yourself some play with the steering rack.
- Remove the 12mm bolt that clamps the lower half of the rag joint to the steering rack.
- Remove the 12mm bolt that clamps the top half of the rag joint to the steering shaft, so the entire rag joint can slide up and down the shaft (and off of the steering rack).
- With the steering rack (not the steering wheel) centered, slide the entire rag joint up the shaft and off of the steering rack.
- Turn the steering wheel until it is centered.
- Slide the entire rag joint back down onto the steering rack.
- Follow the procedure for "Mounting the Steering Rack" to resecure the steering rack to the frame.
- Follow the procedure for "Tightening the Rag Joint" to resecure the rag joint.
- Follow the procedure for "Reconnecting the Outer Tie Rod (OTRE) to the Lower Ball Joint (LBJ)" to resecure the driver side OTRE.
- Repeat this procedure to Verify Approximate Alignment until the steering wheel is within 10-15 degrees on either side of center when the truck drives straight.
Reinstalling the Sway Bar, End Links and Wheels
It's always important to torque suspension components with the truck on the ground, so be sure to install the wheels prior to the final torquing of the lug nuts and sway bar end links.
- Use a 12mm socket to install the two (2) bolts securing the sway bar brackets to the frame. Repeat for other side. Do not torque.
- Install the bushing and washer on the sway bar end link before using a 14mm socket to secure the nut on the top of the sway bar end link. Repeat for other side. Do not torque.
- Torque the 12mm bolts securing the sway bar brackets to the frame to 19 ft-lbs.
- Reinstall the wheels and tighten, but do not torque, the lug nuts.
- Remove jack stands supporting front of vehicle.
- With truck supporting its own weight, torque lug nuts to 89 ft-lbs.
- Torque the 14mm nuts on the sway bar end links to 14 ft-lbs.
Done! Your new rack is installed and ready for service! Make sure to get an alignment.

Excellent job and description, very informative. Soon you are going to have a new/old pickup with all the replacement parts. Better done at home rather than out on a trip to the boonies.
My new oem rack only came with witness marks on rubber over shaft not extended to rack. Do I extend these marks and assume it's centered? Thanks Roland
Hi Roland, Unfortunately, I don't know. If your witness marks don't extend all the way down, it sounds to me like the "safer" option would be to figure out the center yourself and mark it prior to install (i.e. make your own witness marks where the center actually is). You can find the center by marking one of the teeth on the upper "gear." Then, turn the rack all the way to one side and note that tooth's location. Turn the rack all the way to the other side (counting rotations of the marked tooth), and then rotate it back until it's halfway between the two. So, if there are 10.5 rotations of the marked tooth, then the "center" is when it's gone 5.25 times from one of the ends.
Hope that helps!
Unfortunately, not all first generation Tacomas use the indicated steering rack and pinion. I ordered 44250-35042 only to have the supplier reach out after accepting the order that it didn't match my VIN. On closer inspection, the inner-outer tie rod interface is different- on my rack and pinion, the rubber cover is clamped directly over the outer tie rod, with no protruding socket to screw the outer tie rod to! Who knows what other substantive differences there may be?
Hey Christopher, Thanks for posting up that you ran into an issue. I've got a few questions that hopefully will help others, and let me update the guide:
I suspect that you might have a 2WD (5 lug nuts on each wheel) Tacoma, and that my guide is for a 4WD model (since that's what I've got). At any rate, if 44250-04010 is the right part number based on you VIN - then getting a remanned one from a reputable Toyota dealer (44250-04010-84 for the remanned part) will essentially be like getting a new one, I wouldn't worry at all.
Buying remanned somewhere else, or a 3rd party/aftermarket rack, I'd stay away from. At least, that's the guidance for the 4WD/Prerunner racks.
Thanks!
What's the torque specs on the rag joint top bolt and the lower bolt?
As noted in the write-up, those are reasonably small, so I just go by feel of "good and tight." The FSM suggests that something in the 26 ft-lbs range for the lower rag joint bolt, and they are all about the same size, so that's where I'd go for all the rag joint bolts if you're looking for a specific number.
Thank you so much for this detailed description, such a great help.
Glad it was helpful for you Chris!
Thanks for the clear explanation!
Sure thing, glad it was helpful!
Bless you Sir. May you achieve John Muir status.( Author of How to keep your Volkswagen alive), or the other more famous John Muir from Yosemite if you prefer. Both apply in this case.
Thank you sooo much for these awesome and well detailed DYIs! My 98 Taco drives like new now. I didn't realize how bad it had gotten (boiling the frog in the pot scenario) until I replace the pump & rack. God has given you a great talent for instruction. 😇
Awesome, glad the guide was helpful for you Toad!
Is there any o rings that go onto the steering lines or inside of the rack where the lines thread into. I have bought two new steering lines, oem ones were leaking. My new high pressure feed line leaks on the back side of the flare nut. I’m guessing there’s not a proper seal. O ring failure?
As I recall there are no o-rings. The whole point of those flared lines with the flare nuts is to create a seal between the line and the mating fitting on the rack.