
The transfer case on a 1st gen Tacoma is generally known to be a very reliable part - often lasting 300-500K miles. However, if yours does fail, replacement is relatively simple - the hardest part sometimes is finding a replacement case, since they are no longer available new.
This guide will walk through what to look for in a replacement case, as well as the parts and tools needed to swap that new case into a Tacoma. And, while the specifics apply to a 1st gen Tacoma, the process is generally the same for any vehicle.
Transfer Cases
There are several variants of basically the same transfer case for a 1st gen Tacoma. When searching, you'll see designations such as:
- Automatic (A/T) vs. Manual (M/T) Transmission
- J-shift vs. Electronic 2WD/4WD Button and actuator
- 23 vs. 26 spline input shaft
- Top vs. Front Shift (J-shift only)
- With (or without) Automatic Disconnection Differential (ADD)
- With (or without) Rear Diff Lock
- With (or without) ABS
- With (or without) a Neutral Sensor
As you can imagine, Toyota sold each variant of the case separately when they were available for purchase.

However, of these designations, the only three that really matter from a "will it fit" perspective are the first three - A/T vs. M/T, J-shift vs. Electronic shift, and 23 vs. 26 spline - so you'll want to find a case that matches your existing case in those regards. I've included a series of photos below to assist in identification.
A quick note about input shaft spline counts - Toyota used the A340F transmission with two different spline counts on the output shaft. When paired with the 5VZFE v6, the transmission has a 23-spline output shaft. When paired with the 4-cyl 2.7L engine, the A340F transmissions have a 26-spline count. So, there you go.


A quick note in transfer case identification. There was a variant of the transfer case for 3rd gen 4Runners that was a multi-mode (AWD/locking) transfer case. This case won't fit Xtra- or Double-Cab Tacoma's without making a custom rear drive shaft, but if you also acquire a 4Runner drive shaft, it may fit a Single-Cab Tacoma, since it has approximately the same wheelbase.

Once you find a transfer case that will bolt up to your transmission, the next thing to consider are the various sensors for ADD, Rear Diff Lock, ABS, Neutral, etc. If the replacement transfer case is missing one or more sensors compared to the original case, you have a couple of options:
- Assuming they work, reuse the sensors off of your original transfer case.
- Purchase new sensors to install in the new transfer case.
The first option is clearly less expensive, but if you plan to rebuild your original transfer case (which I recommend!) then scavenging parts from it means that you won't really have a working transfer case when you are done. The second option allows you to have two completely working cases, but may cost a bit more money.
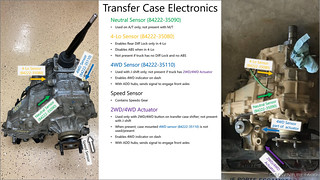
Whichever route you choose, I've included photos of the various sensors for identification.
- 4WD sensor (84222-35110) - needed for j-shift only, as 4WD sensor is in the electronic 2/4WD actuator on push-button shift trucks
- Neutral sensor (84222-35090) - needed for trucks with automatic transmission only
- 4-Lo sensor (84222-35080) - needed for trucks w/Diff Lock and/or ABS
Other Parts
In addition to picking up a transfer case and the applicable sensors, you may also want to service seals and other wear components on the transfer case prior to installation. Installation of these is not covered here, but is relatively straight forward should you choose to do so:
- Input shaft seal for transfer case (90311-40021) - if oil is leaking between the transfer case and transfer adapter, you should replace this.
- Input shaft seal for transfer adapter (90311-40007) - this seal is easy to rip/tear when removing the transfer case.
- Front output shaft seal (90311-41012) - replace if you notice that the transfer case is leaking where the front drive shaft connects.
- Rear output shaft seal (90311-41020) - replace if you notice that the transfer case is leaking where the rear drive shaft connects.
- Dust cover for front/rear output shafts, one per shaft (90312-23001) - replace if you are replacing one/both of the front/rear output shaft seal.
- Shifter bushing seat - while you can replace the OEM bushing (33548-30010), a better option is to get a more durable transfer case replacement from Marlin Crawler. Select the G52/54, R151/150 Triple set (White seat, Blue seat) option on their page.
- Crush washers - to replace any worn ones on the transfer case fill and drain plugs.
Supplies
You'll need a couple of supplies for this job:
- Gasket/Crush Washer Kit for Transfer Case + Diff Service - contains the crush washers for the fill/drain plugs on the transfer case, which should be replaced.
- Lucas 80W-90 Gear Oil or MT-90 Oil - Two (2) quarts in order to fill the new transfer case. Note: the transfer case uses 1.1 qt.
- Shop Towels - as necessary.
- Brake cleaner - as necessary.
Tools
Where the identification and acquisition of transfer cases - and the associated parts - may be difficult, the opposite is true of the tools needed for the job. You'll need the following:
- Floor jack.
- Low profile transmission jack - to support the transfer case as you remove/install it.
- (1) jack stand - either a 6 ton jack stand or 3 ton jack stand should work just fine.
- Misc sockets (I recommend this set from Williams, a Snap-On brand, which contains everything you need)
- 12mm socket - various bolts on the transfer case.
- 14mm socket - nuts/bolts on drive shafts.
- 24mm socket - fill/drain plug on transfer case.
- Ratchet, Extensions, Wobble adapters as necessary.
- Philips Screw Driver - removal of interior trim to access transfer case shift lever.
- Needle Nose Pliers (6-inch) - to assist in unclipping connectors from brackets.
- Breaker Bar.
- Torque Wrench.
- Dead Blow Mallet (3 lb) - to separate the drive shaft and transfer case flanges.
- Pick and Hook Set - helpful to clean rocks/dirt out of electrical connectors in order to disconnect them.

Doing the Job
With the parts and tools in hand, swapping the transfer case is a straight-forward operation, Let's get started! The first order of business is to drain the oil from the transfer case.
- Remove the 24mm fill plug, to allow the oil to drain more easily.
- Remove the 24mm drain plug, and drain all of the oil into a catch container.

If you're worried about components in your transfer case, drain into a clean container that you can look through later.
Disconnecting and Removing the Front Drive Shaft
While it is possible to swap transfer cases while leaving the front drive shaft connected to the front diff, it's much easier to do if you remove the drive shaft entirely, since it is slightly too long to remove from the studs on the transfer case flange without first removing the transfer case itself.
- Shift the transfer case into 4-Lo and put the vehicle into gear (or for a A/T, into park) in order to keep the front drive shaft from spinning while you disconnect it.
- Using a paint pen, make a witness mark on the slip joint of the front drive shaft. Note: It's important to keep the drive shaft aligned, as it is balanced prior to installation. You shouldn't need to separate the two halves, but the witness mark ensures that you can get them back together if you accidentally do.

- Using a paint pen, make a witness mark at each end, so that the flanges can be re-attached to the front diff and transfer case in the same orientation. Note: if you are swapping transfer cases, you won't be able to align that end of the drive shaft, which is OK.
- Using a 14mm socket, loosen and remove the four (4) nuts that secure the front drive shaft to the studs protruding from the transfer case flange. Note: to access all of the nuts, you may need to rotate the front drive shaft, by shifting the transfer case out of 4-Lo.

- Using a 14mm socket and 14mm wrench, loosen and remove the four (4) bolts that secure the front drive shaft to the front diff flange. Note: to access all of the bolts, you may need to rotate the front drive shaft, by shifting the transfer case out of 4-Lo.
- With all fasteners removed from both ends of the drive shaft, support the shaft while striking it from the bottom - as near the front flange as possible - with a rubber dead-blow mallet. This will free up the front end and allow you to lift the drive shaft up, then slightly forward to remove it from the studs on the transfer case flange.
- Set the front drive shaft aside.
Disconnecting the Rear Drive Shaft
With an extended cab or double cab Tacoma, the rear drive shaft has two pieces, supported in the middle by the center bearing. Rather than remove only the front piece, it's easier to drop the center bearing, leaving the two halves of the shaft connected. On a single cab (or 4Runner), the drive shaft is a single piece, and like the front drive shaft you must disconnect it from the rear diff, in order to remove it from the studs on the transfer case flange.
- Shift the truck into neutral.
- Using a floor jack under the rear diff, jack up the rear end until at least one of the tires can spin freely.
- Engage the emergency brake to keep the rear wheels - and rear drive shaft - from spinning as you work on it.
- Using a paint pen, make a witness mark on the slip joint of the rear drive shaft. Note: It's important to keep the drive shaft aligned, as it is balanced prior to installation. You shouldn't need to separate the slip joint, but the witness mark ensures that you can get it back together if you accidentally do.
- Using a paint pen, make a witness mark at each end, so that the flanges can be re-attached to the rear diff and transfer case in the same orientation. Note: if you are swapping transfer cases, you won't be able to align that end of the drive shaft, which is OK.

- Using a 14mm socket, loosen and remove the four (4) nuts that secure the rear drive shaft to the studs protruding from the transfer case flange. Note: to access all of the nuts, you may need to rotate the rear drive shaft, by releasing and then resetting the parking brake.
- With an Extended Cab or Double Cab Tacoma:
- Using a paint pen, mark the bottom of the center bearing, to make later installation easier.
- Set a jack stand under the center bearing, at the lowest height possible.
- Using a 14mm socket, loosen and remove the two (2) bolts that secure the center bearing to the frame crossmember. Note: be sure to support the drive shaft as you remove the second bolt, so it doesn't fall.
- Carefully place the center bearing onto the jack stand. Note: the slip joint should extend slightly at this point, but it should not come apart.

- Support the shaft while striking it from the bottom - as near the front flange as possible - with a rubber dead-blow mallet. This will free up the front end and allow you to pull the drive shaft slightly back, compressing the slip joint and removing it from the studs on the transfer case flange.

- With a Single Cab Tacoma or 4Runner:
- Using a 14mm socket and 14mm wrench, loosen and remove the four (4) bolts that secure the rear drive shaft to the rear diff flange. Note: to access all of the bolts, you may need to rotate the rear drive shaft, by releasing and then resetting the parking brake.
- With all fasteners removed from both ends of the drive shaft, support the shaft while striking it from the bottom - as near the front flange as possible - with a rubber dead-blow mallet. This will free up the front end and allow you to lift the drive shaft up, then slightly forward to remove it from the studs on the transfer case flange.
- Set the drive shaft aside.

Disconnecting Plugs and Sensors
There are several plugs and sensors that must be disconnected in order to remove the transfer case. Be careful as the plastic may brittle. Inspect each plug prior to removal and use a pick tool to clear any debris that may be caught in the plug and make it hard to release the locking tabs.

- On the driver side of the transfer case, disconnect the plug for the 4-Lo indicator and the Neutral indicator, as applicable.
- On the passenger side of the transfer case, disconnect the plug for the 4WD indicator.
- On the passenger side, pull off the rubber breather hose from the transfer case and transfer adapter nipples; set it aside.
- On the passenger side, use a 12mm socket to remove the bolt that secures the speedo gear.
- Use a small pry bar or screwdriver to pry the speedo gear assembly out of the transfer case. Note: as the assembly is removed, a bit of gear oil will spill out; be ready to catch it.

- On the passenger side, use a 12mm socket to remove the bolt that secures the speedo gear bracket to the transfer case; replace the bolt and torque to 21 ft-lbs once the bracket is removed.
- On a vehicle with an electronic 2WD/4WD selector, disconnect the plugs for the 2WD/4WD actuator. Note: there are generally several (2-3) plugs on the 2/4WD selector.
- Inspect the transfer case of any additional electrical connections, and if there are any, disconnect them.
- Inspect the transfer case for any attached wire looms. If there are any, separate them from the transfer case. Note: it may be easier to access some of the wire loom clips by first unbolting (using a 12mm socket or wrench) brackets in which they are secured.
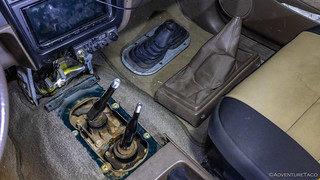
Removing the Shift Lever
It is possible to remove just the shift lever from the top of the transfer case, by releasing a snap ring that retains the bushing, but it is easier to remove the entire shift lever assembly - the method described here.
Note: This procedure varies based on A/T vs. M/T transmission, but the flow is generally the same. Covered here are the steps for a Manual Transmission.
- Remove the clips securing the center lower cover by pressing in on the center to release them.

- Pull the cover out just far enough to unplug the 12v outlets, and then remove and set aside the cover.
- Use a Philips screwdriver to remove the four screws that secure the shifter assembly trim and lift the trim up and out of the way, being careful not to break the center console trim tabs.

- Use a Philips screwdriver to remove the four screws that secure the rubber boots covering the shifter assembly, then lift the rubber boots up and out of the way.
- Use a 12mm socket to remove the four (4) bolts that secure the transfer case shift lever to the top of the transfer case.

- Remove the shift lever assembly - making sure to remove the gasket between the assembly and transfer case as well - and set it aside.
- Clean the surface of the transfer case where the shift lever assembly was installed, and tape the opening in order to keep things cleaner in the coming steps.

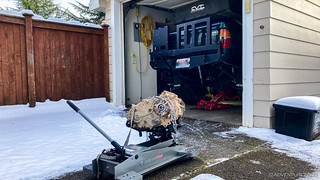
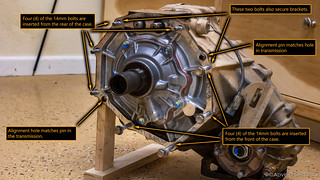
Removing the Transfer Case
The transfer case isn't too heavy - it weighs about 50lbs - but it is an awkward shape, which can make removal tricky, since you don't want to have the input shaft rip the seal - by dragging over it - between the transfer case and transmission.
There are eight (8) aluminum bolts that secure the transfer case to the transmission. Four (4) of the bolt heads face the front of the truck; four (4) face the rear.

- Using a 12mm socket and the necessary extensions and wobble adapters, remove the two top-most bolts that secure the transfer case to the transmission. Note: these bolts are accessed from the rear of the truck. Set the bolts aside.
- Using a 12mm socket and the necessary extensions and wobble adapters, remove the four bottom-most bolts that secure the transfer case to the transmission. Note: three (3) of these bolts are accessed from the front of the truck, one (1) is accessed from the rear. Set the bolts aside.

- Position a transmission jack under the transfer case, and ensure that the transfer case is supported - and secured with straps - in the position that it is bolted to the transmission, so that it will not shift when the last two bolts are removed, and the transfer case is pulled backward to separate it from the transmission.

- Using a 12mm socket and the necessary extensions and wobble adapters, remove the two remaining bolts that secure the transfer case to the transmission. Note: the driver side bolt is accessed from the front of the truck; the passenger side bolt is accessed from the rear. Set the bolts aside.

- At this point, the transfer case is indexed into the transmission by two alignment pins, and supported by the transmission jack.
- Carefully slide the transfer case toward the rear of the vehicle until it separates from the transmission.
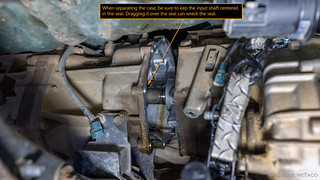
- Check for any remaining plugs, sensors, or wire looms that are connected to the transfer case that will prevent it from being removed entirely.
- Once you've confirmed that the transfer case is completely free, lower the transmission jack and roll the transfer case out from under the vehicle.

Comparing Transfer Cases

With both transfer cases out of the truck, it's important to compare them to ensure the following:
- Do the input shafts have the same number of splines? If not, you have the wrong transfer case.
- Are the input shafts the same length? If not, you've likely got a transfer case for an A/T rather than M/T or vice versa.
- Do both transfer cases have (or not) the electronic actuator to switch between 2WD/4WD? If they are different, you'll need to get a matching case, as this component is non-transferrable.
- Does the replacement transfer case have all the same sensors, and are the plugs the same? If not, you can either purchase additional sensors, or use the sensors from your original transfer case.
- Does the replacement transfer case have the same shift lever? If not, you can use your existing lever if the rest of the case is identical
Readying for Installation
Once you've verified that your new transfer case will work,
- Install (or remove) any necessary sensors onto the new transfer case so that it matches the configuration of the original transfer case.
- If you are replacing the input shaft seal at the rear end of the transmission, remove the original seal and replace it now. Note: this procedure is not covered in this write-up.
- If you are replacing any of the seals on the new transfer case before installation, remove the originals and replace them now. Note: this procedure is not covered in this write-up.
- Ensure that the transfer case is not in the Neutral position; any other position will work. Note: You can verify this by turning one the rear output shaft flange. If the input shaft spins, you are good to go.
- If it hasn't already been removed, remove the shift lever from the replacement transfer case and place tape over the opening.
Installing the Transfer Case
When installing the new transfer case, it's important to get it aligned properly before mating it to the transmission so that the input shaft does not rest on or ruin the input shaft seal in the transmission.
- Place the transfer case on the transmission lift and support it in the approximate orientation that it will be installed. Note: this should be approximately the same position that the original transfer case was in when it was removed.

- Slide the transfer case under the vehicle and use the transmission lift to lift it approximately into location. Ensure that the input shaft is aligned with the seal and mating shaft from the transmission, and that the alignment studs on the transfer case and transmission are aligned.

Align the input shaft with the center of the seal, first. 
One of the two alignment studs; one is on the transfer case and the other is on the transmission. Each seat into a recess on the mating surface. - Slide the transfer case and transmission together until the alignment studs engage. Note: you may need to rotate the rear output shaft flange in order to rotate the input shaft splines so that they line up with the splines in the transmission.

Alignment studs engaged. - Install the eight (8), 12mm aluminum bolts that secure the transfer case to the transmission until they are finger tight. Note: when installing the eight (8) transfer case bolts, two of them also secure brackets for sensor plugs; be sure to install the brackets when installing the associated bolts.

- Once all bolts are finger tight, torque in a star pattern to 17 ft-lbs.
- Remove the transmission jack once the transfer case is supported, and as necessary to torque the bolts.
Connecting Plugs and Sensors
With the transfer case installed, the next order of business is to hook it all up so that it will work once the truck is running again.

- On the driver side of the transfer case, connect the plug for the 4-Lo indicator and the Neutral indicator, as applicable.
- On the passenger side of the transfer case, connect the plug for the 4WD indicator.
- On the passenger side, install the rubber breather hose between the the transfer case and transfer adapter nipples.
- On the passenger side, use a 12mm socket to remove the bolt that secures the speedo gear bracket to the transfer case.
- Install the speedo gear bracket and replace the bolt. Torque to 21 ft-lbs.
- On the passenger side, carefully insert the speedo gear into the new transfer case
- Use a 12mm socket to secure the bolt that secures the speedo gear. Torque to 8 ft-lbs.
- On a vehicle with an electronic 2WD/4WD selector, connect the plugs for the 2WD/4WD actuator.
- Inspect the transfer case of any additional electrical connections, and if there are any, connect them.
- Inspect the transfer case for any detached wire looms. If there are any, reconnect them from the transfer case. Note: it may be easier to access some of the wire loom clips by first unbolting (using a 12mm socket or wrench) brackets in which they are secured.
Installing the Shift Lever
- Remove the tape (if present) and clean the surface of the transfer case where the shift lever assembly will be installed.
- Place the shift lever assembly gasket on the machined surface of the transfer case so that the four (4) bolt holes are aligned.
- Please the shift lever assembly on the gasket so the four (4) bolt holes are aligned.
- Use a 12mm socket to secure the shift lever assembly to the transfer case, torquingthe bolts to 53 in-lbs.
- Place the rubber boots over the shifters and secure it with four (4) Philips screws.
- Place the shifter assembly trim over the rubber boots and secure it with four (4) Philips screws.
- Place the center lower cover nearly in place and reconnect the 12v power receptacles.
- Clip the center lower cover into place.
- Insert the two clips into the sides of the center lower cover, and secure them.

Connecting the Rear Drive Shaft
Before installing the rear drive shaft, ensure that the witness marks on the slip yoke are aligned.
- If your truck has a center bearing:
- Place a jack stand under the center bearing when the slip yoke of the rear drive shaft is completely collapsed.
- Place the front end of the rear drive shaft over the studs on the transfer case flange and secure loosely with four (4) 14mm nuts and washers.
- Raise the center bearing into position and secure loosely with two (2) 14mm bolts and washers. Note: ensure correct orientation of the center bearing bracket.
- Engaging the emergency brake as necessary, torque the four (4) 14mm nuts at the transfer case flange to 54 ft-lbs.
- Torque the two (2) 14mm bolts securing the center bearing to 27 ft-lbs.
- If your truck has no center bearing:
- Support the rear end of the drive shaft approximately 12" off the ground with a jack stand.
- Place the front end of the rear drive shaft over the studs on the transfer case flange and secure loosely with four (4) 14mm nuts and washers.
- Align the rear end of the rear drive shaft with the rear diff flange and secure loosely with four (4) 14mm bolts, nuts, and washers.
- Engaging the emergency brake as necessary, torque all eight (8) 14mm fasteners to 54 ft-lbs. Note: when torquing nuts to studs, tighten the nuts. When torquing bolts with nuts, tighten the bolts.
Installing the Front Drive Shaft
Before installing the front drive shaft, ensure that the witness marks on the slip yoke are aligned.
- Place the rear end of the front drive shaft over the studs on the transfer case flange and secure loosely with four (4) 14mm nuts and washers.
- Align the front end of the front drive shaft with the front diff flange and secure loosely with four (4) 14mm bolts, nuts, and split washers.
- Engaging 4-Lo as necessary, torque all eight (8) 14mm fasteners to 54 ft-lbs. Note: when torquing nuts to studs, tighten the nuts. When torquing bolts with nuts, tighten the bolts.
Finishing Up

- Ensure that the 24mm drain plug on the new transfer case has a new crush washer and is torqued to 27 ft-lbs.
- Remove the 24mm fill plug and fill the new transfer case with oil until oil begins to seep out of the fill hole.
- Secure the 24mm fill plug with a new crush washer and torque to 27 ft-lbs.
Congratulations, you're done! Drive the truck - albeit gingerly at first - to make sure that everything is OK. Test out 2WD, 4-Hi and 4-Lo. If you have a rear e-locker, try it out too in order to make sure that the various dash lights illuminate (and things like ABS - again, if so equipped - are disabled). Ideally, flush the gear oil after your first hundred miles or so, just in case there were contaminants in your new transfer case.
Thanks for the in-depth t-case write-up. By chance, did you come across any information on swapping a j-pattern for a push button t-case? I’m interested in getting away from push button. Thanks!
Hi Donald, I did not come across anything in that regard. My guess is that it would be relatively straight forward since there are no electronics in the j-shift itself, and the only sensor that changes between the push-button and j-shift version is the 4WD sensor. I would guess that the process would be:
That doesn't sound too bad, but of course, the devil is likely in the details!
Another great and priceless write up. Just swapped T-cases after following the clutch replacement write up. Wish I would’ve know my t-case was bad while I had it all out at the same time lol thank you again for the info. ?
Awesome, glad you found the two write-ups helpful. I've gotta pull my t-case again to fix a leaky seal on the transmission (the one that accepts the input shaft from the t-case), but I'm waiting until it warms up a bit to do that bit of work. For now, I'm just making sure to top off any oil the seeps out! ?
Hey man appreciate all the great documentation you have here. I am wondering if you have a photo or can describe the orientation of the wires on the passenger side 4wd sensor. I had the harness side pull out on me unfortunately and want to get the polarity correct on installation. It’s just the blue 2 wire plug. It’s a j shift style manual trans. Thanks
I just took a look through my photos and don't have one of the passenger side connector (from the transmission). Unfortunately, now that I store the Tacoma down in Las Vegas now, I can't get one easily until I visit next time.
Do you have a photo of what you're working with? If you can include that, I might be able to tell just from the photo on your end...
Dan!
i have an OG '97 5VVZFE with the R150F 4wd
on my rig's transfer case there is a bracket on passenger side that holds the wire harness connector plugs for the downstream O2 sensors
I browsed your pics here and looked twice again and did not see if you also have this setup under your rig. If you do can you point me in the proper direction and how the connector is removed properly from the transfer case bracket.
I have pics of mine if you need them
Thanks!
J
Seriously the best write ups ever.
Thanks so much Jason, glad you found them useful! I've gotten a ton of help from folks over the years, so it's always nice to be able to give back a bit. By all means, reach out if you need anything or have any questions! 👍
What length drive shaft if using the multimode on an excab it’s 31” so 28.5?
Not sure; I've never done it! I think folks get custom drive shafts made (usually) for this mod (which I've only seen done once or twice), and you probably just get the t-case in / mocked up and then measure for the new drive shaft. There's enough "other" work after getting the t-case in that you have plenty of time for the custom shaft to be manufactured before you really need it.
If you do one, I'd love to hear for future folks who want to go that route! (and super cool that you're thinking of trying it!)
Well I got it in and 4L &4h work. Can’t get it in 2wd and front drive shaft splines show. I should have went with 28 1/4 but it looks like a front 4Runner DS from a 4 runner will work.
Hey man, awesome write up. Do you happen to know if the input shaft for a manual trans can be bought online, and if so, do you know the part number?
Gathering parts to manual swap my double cab but going to use the same transfer case and need the longer input shaft.
Pretty sure you can't purchase just the input shaft anymore (t-cases in general are discontinued). Also, the input shaft works its way all the way through the t-case, and is the output shaft for the rear drive shaft. That means you'd have to press off all of the gears and press them onto the new shaft in order to get it to work. WAY easier to just get a new t-case if you're swapping to a manual transmission from an automatic trans.
Alternatively, you can use the auto t-case, even though it has a shorter input shaft, as long as it has the same number of splines. No one really knows exactly why the manual t-case input shaft is longer than the auto, because both engage the transmission just fine (the manual just engages a little longer distance). Personally though, I'd just find a used manual transmission t-case. They can generally be had for a few hundred dollars from car-part, or even less if you pull one yourself at a junkyard.