
In the last post, I outlined the Materials and Prep necessary for sound deadening a 1st gen Tacoma. This time, we'll walk through the specifics on how to do the actual deadening.
As a reminder, all you really need to do this job are the following:
- Sound Deadening Mat and Foam (below is the "most worth it" option - bang for the buck, really - but there are others that are better, and others that are cheaper)
- Dynamat Xtreme - Sound Deadening Mat - 1 kit @ 48sqft
- Dyaliner - Sound Deadening Foam - 4 kits @ 12sqft ea
- 3/8" split loom - you only need about 2' to house the interior door handle rods.
- A sharpie, utility knife , and scissors to cut the material.
- A screwdriver with a plastic handle to push the material into some of the contours of the sheet metal.
What's Our Goal Here?
Sound Deadening Mat - For the best results, you will want to aim for at least 50-60% coverage. Focus your time and effort behind speakers, in the middle of larger surfaces (outer door skins, back wall, side walls, and roof), and sealing up access holes to block the noise from getting into the car. From there, look to the floor, or doubling up Sound Deadening Mat in critical areas.
For those wanting to go all out - for instance if you are installing a competition level audio system with lots of power, etc. - more coverage and some doubling up will be needed.
Sound Deadening Foam - This works in higher frequency ranges by reducing reflections and diffusing the energy. It also decouples surfaces, reducing vibrations, and is a superb thermal barrier. For the best results, you want 100% coverage on nearly everything you can access. The only place to limit the use is behind speakers, just use a patch 8x8" or so to break up the back wave. Sound Deadening Foam is so effective that putting more behind the speakers will just kill off the mid-bass response which is not what you're looking for.
So, with that, let's get started!
Cleaning Surfaces
The first thing I did was to clean all the surfaces where material would be applied. No point in spending all the time to apply this stuff if dust and grime is going to keep it from being effective.
Use denatured alcohol to wipe down every metal surface you can. Don't forget to clean the inside surface of the outer skin of the truck as well - reach into all the door holes, quarter panel holes, etc. I found it interesting during this process to see which parts of the truck had been only primed, primed and painted, and primed, painted and clear coated!


While cleaning things up, I was sure to not forget the carpets. It's not often that all the carpets are out of the truck and easy to clean - so I used a pressure washer on everything, leaving them out in the sun to dry for the next couple of days.

With everything cleaned, I knew I could procrastinate no longer - it was time to start sound deadening!
The Doors
Note: you'll want to make sure the windows are up during this process.
When dealing with the doors, I knew I was dealing with two distinct surfaces that needed to be addressed - the outer skin of the door, and then the inner structure. Focusing on the outer skin first, I placed a 12"x12" square of Sound Deadening Mat behind the speaker, and then a second 8"x8" layer on top of that. The idea is to really deaden that area for the backwave from the speaker.

Next, I covered close to 78% of the remainder of the outer door skin with Sound Deadening Mat. You can do more if you'd like, and you're likely to have to cut pieces to fit through the various access holes. While doing this, I evaluated the placement of each piece to ensure that I wasn't inhibiting any of the door functionality - I wanted my windows and locks to work when I was done, and I didn't want to block any of the drainage that takes place inside the door. I also made sure to get good adhesion around any ridges and depressions.

The last component to adhere to the exterior door skin is a bit of Sound Deadening Foam. Too much can be a bad thing here, so I put an 8"x8" square directly behind the speaker. That's it!

With the door skin addressed, I moved on to the interior structure. This was a bit more complicated given the need for the door to still function and the door panel to snap into place when I was done. The idea though was simple - one, 100% coverage layer of Sound Deadening Mat to seal up the door, and then one, 100% coverage layer of Sound Deadening Foam over that.
I found that using tape to hole material in place while I drew various cut lines on it was extremely helpful. I made cuts for all wires that needed access to the cab, for the rod that connects to the interior door handle, and to leave a 1" reveal around any attachment points (screws or clips). Also - I used the plastic handle of a screw driver to ensure good adhesion around any ridges and depressions.
Of note: I did NOT cut around the mounting holes for the speaker or for the interior door lever itself; I'd deal with those later.
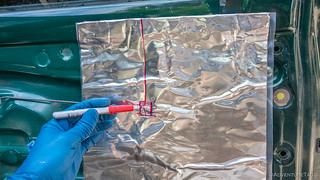
One thing to note is that the rod that connects to the interior door handle needs to continue to move once the (sticky) mat is installed. As such, I wrapped it in 3/8" split loom with a little hole cut out for the plastic clip. This meant that I could apply the Sound Deadening Mat and Sound Deadening Foam without worrying that they would interfere with the operation of that rod.


After covering the entire door with Sound Deadening Mat, it was time to re-install the speaker. First, I held the speaker mount in place and traced the location of the speaker itself, since it would need to protrude through the Sound Deadening Mat. I then used a utility knife to cut away that part of the mat. Then it was a simple matter of screwing in the speaker mount and plugging in the connector.


Finally - or nearly - it was time for the Sound Deadening Foam. Again, I used some tape to hold the foam in place and trace where it needed to be cut. Then, I was able to remove it from the door and cut it on the ground - a much easier proposition than cutting it in place.
Note: the door shapes are mirror images of each other. After tracing and cutting the Sound Deadening Foam for one door, I flipped it over and used it as a template for the other.


At this point, it made sense to reinstall the door panel - just to make sure the functionality of the door was still in tact. Plus, I knew that I still needed to cut some of the mat where the door lever would go, and figured this was a good time to do that.
The door panel slips over and installation is largely the reverse of removal. Once all of the clips are secured, I used a utility knife to cut out all of the Sound Deadening Foam and BXT Mat where the door lever installs. This is necessary because the lever clips behind the sheet metal and any amount of mat in this area impedes its ability to do so. By cutting out the mat at this point, I was sure to cut it in exactly the right location.

The Rear Wall (and Storage Cubbies)
This is generally the noisiest area of the truck. I went for as much coverage as I could, and used the knock test to determine when I'd covered "enough." Shoot for at least 80% coverage with the Sound Deadening Mat - focused in the middle, flexibible areas; add enough to make is have a nice solid thud when you give it a good thump with your fist. If it still resonates when you do that, add 25% more mat - or a second layer - right in the middle, across the area.
Then cover every sq inch with Sound Deadening Foam.


Once the rear wall was done, I realized it would be a lot easier to address the storage cubbies if I took out the sheet metal tops before applying Sound Deadening Mat and Sound Deadening Foam foam. Coverage of these is similar to the back wall - use as much as you can of both products.


The Rear Quarter Panels
The rear quarter panels are similar to the front doors in that they have both an outer skin and inner frame, as well as serving as the enclosures for speakers. As such, two layers of mat on the outer skin, directly behind the speaker and 75% coverage of the remainder of the outer skin, using the knock test from outside the vehicle. Then, install one 8"x8" square of Sound Deadening Foam directly behind the speaker.
The interior sheet metal is a bit stiffer due to the fact that it secures the seat belts. Here, I aimed for 50% coverage with Sound Deadening Mat and covered as much as I could with Sound Deadening Foam. The biggest problem is working around all of the clip holes and seatbelt mounting points. Still, the more Sound Deadening Foam in this area, the better - to absorb the high ambient noise from the cabin.

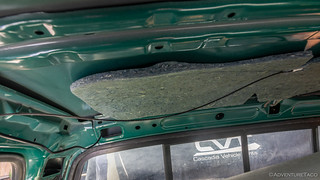
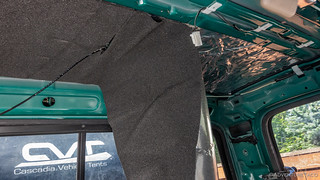
The Roof
I went to all the trouble to release the headliner, so I was definitely going to do the roof. The process was simple enough - first, remove the existing padding and adhesive strip (this is the hardest part). Then - since the roof is essentially one big flat piece of noisy sheet metal - cut to fit and go for full coverage with Sound Deadening Mat and Sound Deadening Foam.

The Floor
Compared to the rest of the project, the floor is relatively easy given how easy the surface is to access. Start with a single layer of Sound Deadening Mat, being extra careful to press it into the various bends and crevices throughout the floor. The knock test can help you determine which areas give the most "bang for the buck." Shoot for 60-80% coverage with Sound Deadening Mat, and then cover with a full layer of Sound Deadening Foam.
Note: When installing Sound Deadening Mat and Sound Deadening Foam on the floor, mark any grommets and drain plugs and cut their perimeters now. The can remain covered, but by cutting them out, they'll be easier to access in the future. Additionally - and as with all other areas - make sure to leave the area around attachment points for the seats, etc. clear of material.

The Kick Panels
It's very difficult to access any sheet metal behind the kick panels, so I simply applied a layer of Sound Deadening Foam to the back side of the kick panels themselves. This helps absorb the high ambient noise from the cabin.

And with that, I was done!
Putting It All Back Together
Well, I wasn't really done - there was still the work of re-assembling the interior of the cabin and then testing out the entire system. For me - given the care I'd taken to ensure that holes that recieved interior trim panel clips were not covered by Sound Deadening Mat - everything went back together reasonably easily. I think I only found one hole that I'd inadvertently covered for a clip in the rear quarter panel.
I won't go into all the details here - installation is essentially the reverse of removal - but the order of operations is as such:
- Headliner - and the dome light, sun roof if applicable.
- Carpet - and storage cubby trim. Don't forget to fish any wires through that you'll need later.
- Rear Quarter Panels - and seat belts, xtracab window latch.
- Rear wall lower, middle, and upper trim.
- Front kick panels.
- Door threshold.
- Center console - this is important to do before seats, to access anchor points.
- Seats.


And with that, the truck looked the same as before I'd started... gotta love those invisible mods! But, all it took was shutting the door once for me to know that this mod was a huge success. It was so rewarding to hear a dull thunk as the door closed.

Nice job on deadening your Tacoma.Thanks, another future project for me to do on my Tacoma. The link for RaaMat Audio is dead and appears they no longer exist. I did research on deadening materials and KilMat offers the best bang for the buck.
Appreciate you putting all the shots and details into this! How do you like it after having it in the truck for a while?
Love it. Make a huge difference, both on the highway and on the trail. Highly recommend.
Looks Great! I really like your seat covers. Do you have a link where I can buy one?
Hey Ben, I really love my seat covers as well, and they have held up great over the years. You can read more about my install and how to get your own, here: The @mrs.turbodb Mod - Custom Wet Okole Seat Covers
By all means, let me know if you have any questions about them!
Does this interior work also contribute to the insulation of the cab both with heating and cooling? Perhaps the window area is too big to notice a difference but I'd be curious to know..
Nice work BTW
To an extent, yes, but probably not enough to call it out as one of the primary benefits, especially if one doesn't go to the trouble to completely remove the dash and put a layer or two of material on the firewall (which no one does)! That said - especially on my truck with the sun roof - there is a ton of glass to contend with. I've heard that a good tint can reduce temperatures in the cab by more than 15°F on a hot day, but with all the exploring we do, I really like to have clear views of my surroundings, so I've never seriously considered tinting the front windows.
Also, heating is never a problem, though I'm rarely in temperatures below the teens. Plenty of extra heat off the engine to keep the cab nice and toasty.
Nice work, I’m between phases of the same project. I have the doors, floor and rear done on my doublecab, taking a small sanity break before I tackle the roof. I didn’t pull apart the dash but had some good luck insulating the firewall from the engine side, even with the 3.4. I cut small pieces of the butyl’s sound deadener so they’d fit when I reached between wires and hoses and brackets and just covered as much of the exterior firewall as I could reach, then did a second layer of pieces on top to make sure the first layer pieces all connected and could distribute vibration among themselves as needed. There is a factory heat shield that I just said to hell with foam, and let it do it’s job, while I did put closed cell foam on whatever I could reach that’s bare metal (now covered in butyl) from factory. I’m sure doing the interior firewall would be more effective but this way does pretty good and you don’t have to pull apart the dash.
That's a great idea on the firewall CJ. My only concern would be how it will hold up to the heat/environment in there, but no matter what, it has to be better than nothing!
I recently had big chunks of the dash apart as I was chasing a mouse that got in while we were camping one night, and I found myself thinking... "sure wish I had some sound deadening mat out here in the middle of nowhere" as I was putting everything back together. 🤣 Good luck as you tackle the roof, I'm sure that when you're done and reaping the reward of the quieter cab, you'll be super happy you did it! 👍
LOL! You don't travel with your handy box-o-butyl? Kidding =D
I had the same concern as you with engine heat, so I ordered some foam with an aluminum foil top layer and put it over the uninsulated foam. Type of product sold on Amazon as an upgrade to OEM hood liners, or sometimes placed on the body right where a catalytic convertor is putting out heat. So far it's held up perfectly, so fingers crossed!
Hi,
Great write up! One thing I'm trying to pin down was whether or not you used the original speaker brackets on the doors? Trying to get a better handle on the audio part of your project, so I can tackle that a the same time I do the sound deadening.
Thanks!
Hey TJ, those speaker brackets were not the original speaker brackets. They are Metra 82-8140 Speaker Adapter for 96-00 Toyota Tacoma. They fit great, and to this day, anchor my JBL Concert Series 521 5-1/4" 2-Way Speakers. In the rear, I installed KICKER CS Series CSC65 6.5" speakers, with Scosche SAC656 6.5-6.75” Speaker Adapters.
Doing all of this at the same time as the deadening is totally the right way to go! Good luck and have fun!