Over the last couple years, I've learned - mostly from others experience - that it's a good idea to keep an eye on 1st gen Tacoma lower ball joints (LBJs). If you do lots of bumpy, off-road style driving, every 30-50,000 miles is a reasonable interval to change this part of your truck, in order to prevent a catastrophic failure.
So, today I headed out to the shop to check my LBJs, and here's what I found. This time, it's been 15 months, and it's definitely time for replacement. Before you do this test, you want to jack up the front truck of course.
Parts
The first step in any project like this is gathering the parts and tools. Parts are straight forward - you need ball joints and bolts. I always use and recommend OEM LBJs, since other brands are known to have premature failure.
Tacoma
When purchasing OEM LBJs, you have several choices on a 1st gen 4WD Tacoma (or Prerunner). Each of these options include exactly the same Lower Ball Joints. Personally, I tend check prices on all of these and then purchase the cheapest L and R option, depending on whether I am replacing the bolts as well.
- If you also need 4 bolts, then you have two choices:
- Best: If you'd like to use the (better) "Black" bolts (w/washer) to secure the LBJ to the lower control arm (LCA), purchase LBJs and bolts separately:
- LBJs - L: 43340-39436; R: 43330-39556.
- "Black" bolts - 8 of 90119-10933
- Good: A kit that includes "Green" flanged bolts to secure the LBJ to the lower control arm (LCA), are sold as part numbers - L: 43340-39585; R: 43330-39815.
- Best: If you'd like to use the (better) "Black" bolts (w/washer) to secure the LBJ to the lower control arm (LCA), purchase LBJs and bolts separately:
- If you plan to re-use your 4 existing LBJ bolts (generally only OK with the "black" bolts), then you can usually save a bit of money and get - L: 43340-39436; R: 43330-39556.
- Toyota has a recall on some model year Tacoma LBJs. If you can find Lower Ball Joint TSB Kit (Left+Right: 04005-03235), it is sometimes cheaper. However, note that it does not come with LBJ bolts or castle nuts.
4Runner
Unlike the Tacoma, there's really only one choice of LBJ for the 4Runner, making things easy.
- For a 4Runner, bolts are always sold separately. You should purchase
- LBJ part numbers - L: 43340-39465; R: 43330-39585.
- "Black" bolts - 8 of 90119-10933
- Toyota has a recall on some model year 4Runner LBJs. If you can find 4Runner Lower Ball Joint TSB Kit (Left+Right: 04005-02235), it is sometimes cheaper. However, note that it does not come with LBJ bolts or castle nuts.
Bolts
There are several options on bolts, and @SpikerEng did a great analysis of each option. This is recommended reading due to the importance of LBJs, but if you'd rather not read it, the conclusion was that the best bolts are properly torqued (37 ft-lbs) black bolts (90119-10933) that were introduced for later models (01-04 Tacoma, 01-02 4Runner) when the LBJ dust boot was added.
If you need bolts and don't purchase the LBJs that include them, then you also have two options:
- If you do not have a rubber dust covers on your LBJs, you need
- best - eight (8) "black" (washer) or
- good - eight (8) "green" (flanged) bolts.
- If you do have a rubber dust covers on your LBJs, you need eight (8) of "black" (washer) bolts.
Note: You will end up with a stronger LBJ - regardless of rubber dust cover use - by using the black bolts. That is because they create a tighter joint when torqued to 37 ft-lbs than the older, "green" flanged head bolts (which were torqued to 59 ft-lbs).
Additionally, the "green" flanged head bolts should only be used once, while the "black" bolts can be reused several times.
- "Green" Flange Head LBJ Bolt (90105-10406). These bolts are torqued to 59 ft-lbs.
- "Black" Washer LBJ Bolt (90119-10933). These bolts are torqued to 37 ft-lbs.

Tools
From a tools perspective, I mostly ended up using several sockets, a ball joint separator, and my impact and torque wrenches:
- Misc sockets (set)
- 22mm socket (19mm for 4Runner) to remove the castle nut on the outer tie rod
- 24mm socket to remove the castle nut on the LBJ
- 14mm socket to remove the four bolts holding the LBJ to the spindle
- OTC 6295 Front End Service Set
- pliers for the various cotter pins (cutting) (needle nose)
- Milwaukee mid-torque impact wrench
- A torque wrench for re-installation of critical components.
- A floor jack and jack stands.
- A bit of blue Loctite (242)
- New cotter pins (this assortment is good)
Doing the Job
With everything in hand, the replacement process is reasonably straight forward. First, jack up the front of the truck and support it securely on jack stands. Remove the wheels. Now, with access to the hub assembly, remove the 4, 14mm bolts that secure the LBJ to the hub.

Next, remove the cotter pin and loosen - but do not remove - the 24mm castle nut that secures the LBJ to the lower control arm (LCA).
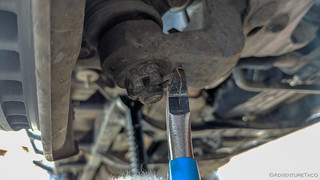
By loosening, but not removing the castle nut, you can keep the joint from jumping too much in the following step. This is the point at which you want to use a pitman arm puller to push the stud of the LBJ out of the LCA.

Next, repeat the cotter pin, castle nut, and pitman arm puller process on the 22mm castle nut that secures the steering (outer tie rod) to the LBJ. (Note: this is 19mm castle nut on a 4Runner.)

At this point, you can simply lift the hub assembly up and out of the way, in order to remove the old LBJ from the LCA.
Installation of the new LBJ is also straight-forward and essentially the reverse of removal. In fact, it all went so quickly that I only snapped a couple photos. However, the steps and torque specs were:
- Position the new LBJ between the spindle and LCA, careful to use the side-appropriate part. At this point, you can set the hub assembly back in place to relieve a bit of the stress the CV axle boots are likely experiencing.

- Install the new 24mm castle nut that secures the LBJ to the LCA and hand tighten. Don't torque it yet.
- Install the old 22mm castle nut (19mm on a 4Runner) that secures the outer tie rod end to the LBJ and hand tighten.
- Install four new 14mm bolts through the LBJ and into the spindle. Tighten them reasonably tight to ensure everything is aligned correctly
- Back out one 14mm bolt at a time to apply some blue Loctite and torque to 59 ft-lbs (flange head w/o dust cover) or 37 ft-lbs (washer-based w/dust cover).
- Torque the castle nut that secures the LBJ to the LCA to 103 ft-lbs (plus any additional necessary to allow installation of the cotter pin).
- Torque the castle nut that secures the tie rod end to the LBJ to 67 ft-lbs (plus any additional necessary to allow installation of the cotter pin).
And then it's done! Reinstall your wheel and pull the jack stands. You don't generally need an alignment after a LBJ replacement, but if you've replaced other components as well (OTRE, LCA, etc.), then you'll definitely want to get one.

Hey, anyone interested in purchasing some low-mileage, never-seen-dirt, OEM lower ball joints for a great price before they go on Craigslist as "like new"? I'll even throw in four bolts, a couple castle nuts, and one cotter pin for the same low, low price! 
Relax internet, I'm kidding.

Replace those LBJs!
 on a 1st Gen Tacoma (or 3rd Gen 4Runner)") Step-by-Step Replacing Lower Ball Joints (LBJ) on a 1st Gen Tacoma (or 3rd Gen 4Runner) - Over the last couple years, I've learned - mostly from others experience - that it's a good idea to keep an eye on 1st gen Tacoma lower ball joints (LBJs). If you do lots of bumpy, off-road style driving, every 30-50,000 miles is a reasonable interval to change this part of your truck, in order to prevent a catastrophic failure. So, today I headed out to the shop to check my LBJs, and here's what I found. This time, it's been 15 months, and it's definitely time for replacement. Before you do this test, you want to jack up the…
Step-by-Step Replacing Lower Ball Joints (LBJ) on a 1st Gen Tacoma (or 3rd Gen 4Runner) - Over the last couple years, I've learned - mostly from others experience - that it's a good idea to keep an eye on 1st gen Tacoma lower ball joints (LBJs). If you do lots of bumpy, off-road style driving, every 30-50,000 miles is a reasonable interval to change this part of your truck, in order to prevent a catastrophic failure. So, today I headed out to the shop to check my LBJs, and here's what I found. This time, it's been 15 months, and it's definitely time for replacement. Before you do this test, you want to jack up the… Bolts") Choosing Lower Ball Joint (LBJ) Bolts - The content in this guide was originally created by Leon @SpikerEng on TacomaWorld as a series of posts over several months. I've captured it here for two reasons: I want to make sure that, should anything happen to Leon's post, that we all still have access to this amazingly useful information. As happens in forums, the information Leon posted (over time) is interspersed with a bunch of commentary from others. By consolidating it here, it becomes easier to read. Note: I've slightly edited certain bits of content in order to make the "flow" easier to consume as a single post…
Choosing Lower Ball Joint (LBJ) Bolts - The content in this guide was originally created by Leon @SpikerEng on TacomaWorld as a series of posts over several months. I've captured it here for two reasons: I want to make sure that, should anything happen to Leon's post, that we all still have access to this amazingly useful information. As happens in forums, the information Leon posted (over time) is interspersed with a bunch of commentary from others. By consolidating it here, it becomes easier to read. Note: I've slightly edited certain bits of content in order to make the "flow" easier to consume as a single post…
Thank you for putting this information into a clear concise format. I've been reading forums all day, didn't know what to buy for LBJs. Also just purchased your Tacoma to Tundra brake line kit and it works great. Thank you for being an invaluable member of the community!
Oh man, thanks for the kind words, I really appreciate them. I’ve learned so much from the community as I got into my Tacoma that it’s been nice to be able to give back a bit.
If you have a chance, I'd love a positive review on Google, it turns out they help with search results lot more than I originally realized they do!
And as always, please feel free to reach out any time with questions - I'm always happy to help with this stuff!
Thank you so much for this write up brother really means a lot. To clear some things up, this means that no matter if I have the 99 Tacoma I can use the “newer” ball joint with cover and black bolts and have no issues? When I plug in the pn to toyota websites it states it wont fit on my 99 assuming its because it “originally” didnt come with the newer ones so hopefully thats the only reason.
Hey Justin, As long as you have a 4wd/Prerunner 1st gen Tacoma (6-lug), you can use any of the ball joints / bolts listed and they will fit just fine (regardless of what the VIN check tells you). They won't work on the 5-lug Tacomas, but you probably realize that already! 👍
Thanks a lot man, unfortunately I ordered the dust boot cover lbj’s and the person who placed the order sent the green bolts and now Im not sure they will fit the dust boot lbj’s from what I read on your post they dont..
Those LBJs with the rubber boots can be used with the green bolts, you just need to remove (don’t install) the rubber boots. The LBJs themselves are the same.
Okay perfect I actually ended up ordering the bolts (black) anyways so I guess Ill just have some extras lol. I’ll put in the black since they are considered better. Great write up, the amount of dedication to all these write ups is insane lol. Props.
Ahh, that's great. A tip, depending on your driving situation: I personally like to discard that lower rubber boot anyway (even when using the black bolts) because it tends to trap mud and water when off-roading, but if I were to drive mostly on pavement, I'd probably leave them installed, since mud won't be a common occurrence.
Back out one 14mm bolt at a time to apply some blue Loctite and torque to 59 ft-lbs (flange head w/o dust cover) or 37 ft-lbs (washer-based w/dust cover).
In this step you only refer to the lbj and not the 1.5” thick rubber skirt extra piece that goes around the lbj boot right?
Thank you
In that step, you're doing the final install, so if you're installing the rubber boot, you'll want to have it in place already, before you back out and install (with loctite) each bolt individually.
Note: I personally like to discard that lower rubber boot anyway (even when using the black bolts) because it tends to trap mud and water when off-roading, but if I were to drive mostly on pavement, I'd probably leave them installed, since mud won't be a common occurrence.
I am installing new lower OEM BJ's and LCA's on my 2002 Tacoma. The BJ dust covers that came off are no longer usable. Do I need to replace them on the new BJ's? I will be using the black bolts that are for the dust covers and torqued to 37 ft-lbs. They will protude a little more if the dust covers are left off but I do not think it will be enought to hit anything.
Hey Bobby, you do not need to reinstall the dust covers (in fact, I think it’s better to not reinstall them), and it is actually good to have a little extra length on the black bolts so that they reach all the way through the bottom of the spindle. You’ll get better clamping pressure that way. 👍
Hey there! Thanks for the write up! Curious why you don't think the dust covers are necessary. I have a 1999 without them and was waffling on whether to add them.
In general, I think they risk more harm than good. I suppose if you run only on pavement, in areas that are reasonably dry (and don't salt the roads) then the dust covers probably don't hurt any more than they help. On the flip side, if you find yourself in dirty, muddy, or wet environments on a regular basis, the dust covers can actually hold mud and moisture up around the LBJ, hastening its demise.
My guess is that Toyota added them because the majority of Tacoma owners - when the trucks were new - were driving them on pavement. Now though, with 1st gens becoming less and less common, a higher percentage of them are enjoyed off-road. And in that situation, I think no dust covers is better. 👍
Big props for the excellent and thorough DIY! Us less-regular wrenchers really appreciate guys like you who take the time to detail these repairs. I, unfortunately, didn't get to my LBJs in time. Had it on my list of things to do, but "missed it by that much" 😉 Thanks to the good Lord I walked away from this with no injuries (70+mph on the freeway and Taco slid down the highway coming to rest in the perfect spot on a wide section of shoulder 🙌✝️). I guess 350K+ miles was a little too much for them 🤦♂️Anyway, I have to replace at minimum the driver's side UBJ. Any tips on that?
Glad you're OK! For replacing the UBJ, check out this post where I installed SPC Upper Control Arms. Part of that is removing the OEM Upper Ball Joint, which isn't all that difficult (there are a few photos there to show you the tools/process. The step-by-step instructions (though without photos in this case) are available here. Install is the reverse of removal
Hope that helps! Shout if you have questions!
Awesome! I was right in the middle of ordering parts (U&LBJs) when your reply came through. The parts you have listed in 1a show as a non-match on Amazon for my 1998 Taco Limited V6. Is that to be expected, or should I go with those that show a match on Amazon? The latter are more expensive. Thanks again for your quick response and great info. You rock!
Those LBJs that I have listed in 1a will fit your truck just fine!
I really appreciate your help, and hope God blesses your socks off for your kindness!
Do u have a recommendation which LBJ's & UBJ's brand I should use?
I'd recommend only OEM for both lower and upper ball joints.
The lower ball joints you choose will be based on whether you have a Tacoma or 4Runner and are listed in the parts list of this step-by-step guide.
For upper ball joints, the part is shared across Tacoma and 4Runner: Toyota OEM UBJ Upper Ball Joint Assembly (left or right) (43310-39016).
Hope that helps!
Thank you for the write-up! I found it super useful. I bought the LBJ's directly from the link in your parts list on Amazon. Now that I am sitting here thinking about it, I'm kind of worried (especially since LBJ failures can be such a huge deal on these trucks) about the possibility that I could have wound up with counterfeit OEM from Amazon. Have you ever wound up with anything iffy buying the OEM parts from Amazon? And is there a good way to check to make sure that the LBJ's are genuine OEM? Thanks!
Hey AJ, Getting counterfeits on amazon used to be more of an issue than it is today, as long as you're careful. Amazon used to do something called "comingling," which is where they would take all the inventory for a specific item (like LBJs) from all sellers, and mix up the inventory. Then, they'd distribute the mixed inventory across their warehouses, and ship you whatever was closest to you. Some of that mixed up (comingled) inventory could have been genuine, and some could have been counterfeit, and there was no way for you or amazon or the seller to know which part you got.
However, starting last fall, and completing at the end of March this year (2026), they entirely stopped that practice. Now, if you buy a product from a specific seller on amazon, you get the product from that seller. This is great because it means that if you buy a LBJ from amazon or a Toyota Dealer, then you know you're getting a legit OEM part. Of course, you still have to look to see who the seller is, but at least you can do that now.
I just checked, and the LBJ links in the guide (currently) take you to parts sold by a Toyota Dealer in most cases (elmhursttoyota), so in that case, you should be golden. Of course, you can always check your order history to see who the seller was.
Hope that helps!
PS - if you're curious about reading a bit more about comingling, here are a couple of links, and you can find a lot more with a quick search: