
Replacing the fuel filter on a 5VZFE Tacoma or 4Runner is an easy project, and one that I'd put off for way too long before doing for the first time recently. Personally, I'd recommend changing your fuel filter at the same time you do your timing belt - every 90K miles or so - just as preventative maintenance, and to keep your fuel pump and engine running as smoothly as possible. Of course, if you're in a very dusty environment, every 30K may be a better interval.
The process is straight forward - remove the old filter and replace it with a new one - but there is one nuance worth mentioning.
The Toyota FSM recommends disconnecting the fuel pump, running the truck until the engine stalls (due to lack of fuel) and then removing the filter. This releases the pressure in the fuel lines prior to disconnection. I have found this to be unnecessary. Instead, I carefully disconnect the lines from the filter and allow the fuel to leak out into a catch basin.
If you do decide to disconnect the fuel pump, it's easier to do on the 4Runner than the Tacoma, but both can be done without lowering the gas tank, and the steps are covered below.
Parts
The only part you'll need to do this job on a 5VZFE, 3.4L V6 s a new Toyota Fuel Filter. While nearly the same on 1st gen Tacomas and 3rd gen 4Runners, the brackets are different, so you'll want to make sure you get the appropriate filter:
- 96-04 Tacoma: 23300-62010
- 96-02 4Runner: 23300-62030
Tools
As with the parts, you won't need many tools for this project either.
- 14mm flare nut wrench (this is a good set) - for the two flare nut fittings on the fuel lines
- 19mm open end wrench (this is a good set) - to hold the fuel filter steady while loosening/tightening the flare nuts
- 10mm socket (deep preferred) (good set) - to remove the nuts securing the fuel filter to the truck
Doing the Work
With the parts and tools in hand, let's get to it.
Disconnecting the Fuel Pump (optional, I'd recommend skipping this)
If you plan to disconnect the fuel pump, now is the time to do it. On a Tacoma, the connector/plug for the fuel pump is located on the top of the tank, near the front of the tank.
- From below the truck look over the top of the fuel tank just in front of the fuel tank filler neck and you will see the connector.
- Using your hand - or if your hand won't work, a pair of 90° needle nose pliers - to depress the clip holding the connector to the tank. Note: the tab you need to depress faces the right (passenger) side of the truck.
- With the connector clip depressed, separate the two halves of the connector.
- There's plenty of room to get your hand in the there and maybe you could depress the power plug with just your finger and be able to remove the plug.
On a 4Runner, the process is easier.
- Open the driver side rear door.
- Fold the rear seat bottom forward.
- Remove the two philips screws that secure the rear door threshold trim, and then remove the trim.
- Pull the carpet and carpet pad forward to reveal a small cap under the driver side rear passenger seat.
- Remove the three (3) philips screws securing the cap.
- Disconnect the fuel pump connector using a pair of needle nose pliers.
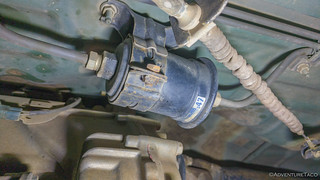
Removing the old fuel filter
- Using a 10mm socket, completely remove the nuts that secure the fuel line to the underside of the vehicle. Remove three (3) to the rear of the filter, and two (2) in front of the filter. Note: this will make the fuel lines more flexible, which will assist in removing the filter.
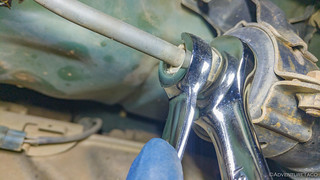
- Using the 14mm flare nut wrench on the fuel line nut, and the 19mm open end wrench to provide back-pressure on the fuel filter, loosen the forward and rear flare nuts that secure the fuel lines to the fuel filter. Note: only loosen these nuts, do not remove them completely.
- Using a 10mm socket, completely remove the two nuts securing the fuel filter to the truck.
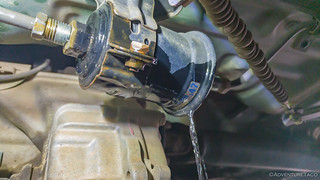
- Using the 14mm flare nut wrench, loosen the flare nuts on the front and rear of the fuel filter until gasoline starts leaking out of the connections. Carefully continue to loosen and allow fuel to drain, until no more fuel is draining from the filter.
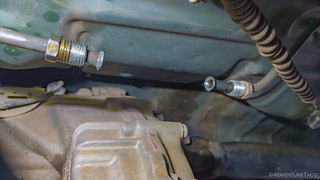
- Back the flare nuts completely out of the fuel filter, and remove the fuel filter from the lines. Note: this is where having flexibility in the lines can be helpful.
Installing the new fuel filter
- Orient the new fuel filter in the same orientation as the old.

- Insert the rear fuel line into the rear of the fuel filter, then the front line into the front of the fuel filter. Note: Do not start threading the flare nuts yet.
- Ensure that the fuel filter bracket fits over the mounting studs, and start the two 10mm nuts onto the studs to hold the fuel filter in place. Note: Do not tighten these nuts yet.
- Using your fingers, start threading the flare nuts into the fuel filter. Tighten until finger tight. Note: you may need to wiggle the filter and/or lines at this point to get the thread alignment correct. Be careful to not cross-thread these connections.
- Using a 10mm socket, replace the five (5) 10mm nuts that were removed to loosen the fuel lines in front and rear of the fuel filter. Tighten snugly.
- Using a 10mm socket, tighten the two (2) nuts that secure the fuel filter bracket snugly.
- Using the 14mm flare nut wrench and 19mm open end wrench, tighten the fuel lines to the filter. Torque to 21 ft-lbs.
Checking for leaks
After you have completed your work, start the truck and immediately check for leaks where the fuel line connects to the filter. If you have any leak at all, immediately turn off the truck and tighten the connections until no leaks are present. Be careful not to over-tighten here, as it is easy to strip the threads.
And that's it - you've now got clean fuel headed from your tank to the engine! Good Job!
I love your tutorials. Gonna replace mine for the first time tonight - God only knows the last time it was replaced, and I never realized how dirty they can get, or just how adversely they can affect function.
I've replaced my fuel filter before but is there an easier way to get the old filter out and the new one in, from in between the fuel lines? I don't see any way to get any slack in the fuel lines besides the brackets that are bolted on from inside the cab. The bolts are under the carpeting and I'd rather not pull up the carpeting. Any suggestions help.
Hi Larry, you definitely don't need to pull up the carpet. The key is in "Removing the old fuel filter" > step 1 of the instructions above.
The fuel lines that come out of the front and rear of the fuel filter are secured to the underside of the vehicle with some nuts (on studs). From the underside of the vehicle, remove those nuts, so that the fuel lines are no longer attached to the cab (the clips slide off the studs that are left once the nuts are removed).
The nuts are 10mm, and I like to remove 3 sets of clips to the rear of the filter, and 2 sets of clips to the front.
I did this and now it won’t start, not even turning over, any ideas?
If it's not turning over, the first thing to check are the electrics. Make sure the battery is hooked up and that you're getting (enough) power to the starter when you turn the key. There's nothing electric in the fuel filter (as you know), so it won't affect turning over. Also, don't forget that once you have electrics working, you may have to crank a little longer to start the first time, while the fuel pump fills the line, which drained when you replaced the filter.
Thanks, I actually just forgot to plug a connector for the ignition back in from another project…..total face palm moment when I remembered
Best kind of fix man - I wish they were all face-palm fixes, hahahaha! Enjoy the new filter and shout if you have any other questions. 👍
Great article
Thanks! Glad it was helpful! 👍
Should the fuel tank need to be empty or almost empty to prevent having to drain so much gas prior to breaking the filter fittings?
No need to drain the fuel tank. The only fuel that leaks out is the pressurized fuel in the line. Since the fuel pump isn't pumping, nothing else comes out of the tank.
I guess you weren't concerned of CORRECTLY INSTALLING NEW BANJO WASHERS, EINSTEIN!
Hi Andrew, I don’t follow your comment. Can you elaborate on what banjo washers you are referring to?
have a 2002 2.7 prerunner (2wd).they come with two banjo washers on EACH SIDE of fuel filter, placed on the inside of 17 mm bolt. My original had this, so does the dealer replacement. Banjo washers are thin copper or brass wavy washers used for compression. More commonly used on brake lines where flexible hose meets metal line.
Ah, yes, this guide is for the fuel filter on a 5VZFE (3.4L V6). The guide mentions that in a couple places, because as you noted the process is different on a 4-cyl truck.
There are no crush washers on the V6 fuel filter.
Additionally, your fuel filter is in the engine bay, whereas the filter on aV6 is under the driver side of the cab.
Hope that clarifies for you, and next time you comment on a guide where someone is providing free help, I recommend doing so with a little more respect and explanation. 👍
noted
The gas filter location seems to be different for each year between 96 - 04. All of the tutorials are for the easiest to replace model with the filter mounted under the driver's seat. The 02 model has the filter mounted to the engine block under the intake manifold. That is an entirely different process and level of effort.
Hey Kendall, What you're running into is the difference between the 5VZEF V6 (where the fuel filter is under the cab) and the 2.7L v4 (where the filter is mounted under the intake manifold). This guide (obviously) is for the V6, since that's the vehicle that I have. I tried to mention that in a couple of places in the guide, but I know that sometimes those details can be easy to gloss over.
I've heard you can just disconnect the relay under the dash to cut power to the fuel pump. that seems easier than unplugging it directly. has anyone tried this method?
Hey Chris, as I noted, I recommend skipping the whole "disconnect the fuel pump" portion, because there's little to no chance that the fuel pump is going to turn on while you are doing the job (unless you do something really weird and try to start up the truck while the filter is out, or have some sort of short somewhere... in other words, bigger problems).
If there's a relay you could pull, and you have easy access to it, that would work just fine. Likewise, you can always just disconnect the battery, which is probably the easiest thing to do in order to power down the system.