")
Well, as I mentioned previously, our last family camping trip was both a success and a failure. I mean, the camping part was all success, but noticing that my rear axle seals were leaking when we got home - that part was definitely a failure.

My first order of business was to address what I hoped was what caused the seals to leak in the first place - by relocating the rear diff breather. With that out of the way, it was time to address the actual problem - so I procrastinated.
See, I was worried that this was going to be a huge, complicated job - and let me be the first to assure you - it's not! I mean, you need a few special tools and such, but with a bit of interweb research, the right tools and a list of the necessary steps, the job is straight forward and reasonably easy.
If you've come here just looking for the tools and steps - perhaps to print out for doing the job yourself - follow this link to everything you'll need...
Step-by-Step: Replacing Rear Axle Seal & Bearing on a 1st gen Tacoma w/ABS (or 3rd gen 4Runner)
OK, so having written up all the steps, it was - as usual - time to gather the parts and tools. This is a double-edged sword for me - I love new tools, but don't love paying for them. But hey, I'm saving money by doing this myself, right?

buy to save™
The parts for this project are reasonably few, and I went OEM on everything since I generally figure that a few extra bucks for parts that are perfect is worth it. Even then, nothing here is that expensive.
- (2) Dust Seals (90313-48001) - one for each side of the axle
- '96-'00 4Runner or Tacoma - P/N: (90313-48001)
- '01-'02 4Runners or '01-'04 Tacoma use P/N: (90313-54001)
- (2) Axle Bearings - one for each side of the axle; oil washes out grease.
- '96-'00 4Runner or Tacoma - P/N: 90363-40020-77
- '01-'02 4Runners or '01-'04 Tacoma use P/N: 90363-40068
- (2) Inner seals for axle housing (90310-50006) - these are the actual axle seals
- (2) Axle Housing Tube O-rings (90301-88077) - one for each side of the axle
- (2) Snap rings for retainers (90520-36045) - Optional. Toyota says to replace these when doing the job.
- DOT3 or DOT4 brake fluid
- 3qt 80W-90 Gear oil for rear diff
- Crush washers for rear diff
Note that I decided to save about $150 and re-use the ABS tone rings and inner- and outer-retainers. The steps I've linked to above can help you save that same $150.

Next, I needed to pick up a few special tools.
- 20 ton press (sometimes Harbor Freight is cheaper)
- Rear Wheel Axle Bearing Puller & Tone Ring Tool/Installer (ebay) - used with the shop press to both remove and install various components on the rear axle. Amazing tool, worth twice it's price, and you're supporting a fellow gear head in the process. Plus, this tool works across much of Toyota's truck lineup - 1st, 2nd, and 3rd gen 4Runners ('84-02), 1st gen Tacomas ('96-04), older Hilux, T100 ('92-97), and 1st gen Tundras ('00-06). It's also available with a late model adapter (ebay), adding 2nd & 3rd gen Tacomas ('05-present), 4th & 5th gen 4Runners ('03-present), 2nd gen Tundras ('07-present), all FJ Cruisers, and all Sequoia's. And there's an eBay Store with more variants, sweet.
- 3” ABS cleanout, with cap - to seat the new rear axle bearing.
- OTC 4507 Seal Driver Kit - to seat the new rear axle seal.

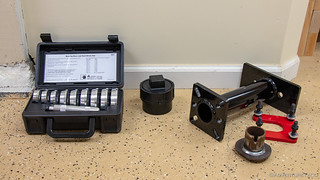
And of course, I used the "normal" tools that we all have around the shop for the various jobs we do on our trucks.
- Floor jack and (2) 6 ton jack stands.
- Misc sockets (I recommend this set from Williams, a Snap-On brand)
- 10mm socket - to remove the ABS sensor from the axle housing.
- 14mm deep socket - to remove nuts holding brake drum to axle housing.
- 24mm socket - to remove diff fill/drain plugs.
- 5/8" deep socket - to use in the press when pressing on various components.
- Ratchet, Extensions, and breaker bar as necessary.
- 14mm box end wrench (set) - to remove nuts holding brake drum to axle housing.
- 10mm flare nut wrench (set) - to remove brake line fittings from rear drum.
- Snap ring pliers - to remove/install the snap-ring for the outer retainer.
- 3mm, 4mm, 5mm Allen wrench (set) - to measure placement of the inner retainer on re-installation.
- Assortment of vacuum caps - to prevent brake fluid from leaking out of rear lines once disconnected.
- Brake cleaner - to clean the brake components, as well as axle, throughout the process.
- Grease - for installing new parts.
Logistics out of the way, I printed out the steps and after a leisurely breakfast of something that I'm sure was tasty, I got to work. My first order of business was getting the rear axle of the 4Runner up on jack stands so that I could remove the rear wheels, a step which quickly highlighted the problem for me - the stain of diff oil right there on the outside of the brake drum.
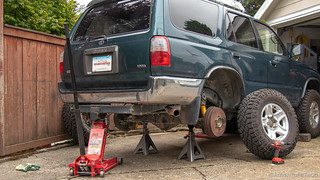

Next, it was time to remove various bits so that when I went to pull the axles out of the housing, it wouldn't be held up by anything. First up were the brake drums. Perhaps naively, I'd expected these to come off relatively easily. Ha, couldn't be further from the truth. Even after disconnecting the e-brake lines from them, they didn't budge one iota as I pulled on them and tried to pursuade them with my dead-blow mallet. Ultimately - after loosening the tensioners also failed - I resorted to using two, M8-1.25x50 bolts to coax them off, each one making a small popping noise as the rust that secured them to the axle released - now 45 minutes into the project.


Confidence waning already, I decided that my next move would be to drain the rear diff while I removed the other bits off the brakes - so it could drain out fully before I pulled the axles. Plus, it's easy - so no worries about further eroding my ego.  You'll see here that I'm actually draining the diff oil into a milk jug rather than my normal oil drain pan. That's because I'm going to reuse this oil, despite the fact that it might break the Internet. But seriously, it'll be OK - it's got less than 1500 miles on it.

As the oil drained out - mostly into my jug - I took a few minutes to remove the rear brake lines using a 10mm flare nut wrench and some silicone caps that kept brake fluid from getting all over everything, and the ABS sensors - which were covered in diff oil, another indicator of axle seal failure.


Now flush with confidence, and having learned when I changed the timing belt that a job like this benefits from a little organization - I was ready to remove the 4, 14mm nuts that secure the back plate to the axle housing... which I did.


Found my missing rear diff oil!
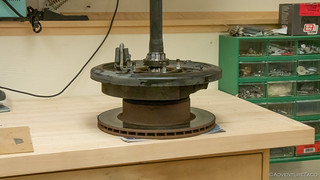
Axle now in hand, I cleaned it up a bit and set it on the workbench - or rather, on an old rotor I'd set on the workbench - so I could start the work of pressing various components off... and then new versions of those same parts - back on.
Now - this is probably a good place to mention that if you're replacing your axle seals as a preventative maintenance - and they weren't leaking - you may not need to do any of this. But, if your axle seals were leaking, and allowed diff oil into the axle bearing (and brake drums) - then you need to replace your bearing and drums as well. Diff oil in the bearing will "wash out" the bearing grease that keeps things moving smoothly, and will keep your brakes from working well - so it's a good idea to replace everything at the same time.
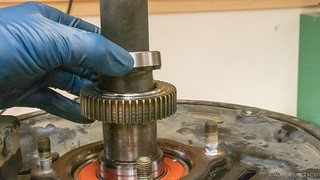
The first step is to use the 20-ton shop press and Rear Wheel Axle Bearing Puller & Tone Ring Tool/Installer SST to remove the ABS tone ring and inner retainer from the axle. And to use the SST, I had to pound out one of the studs that holds the backing plate to the axle housing. Using a nut to protect the threads and my trusty hammer, I was soon ready to go.

With the stud removed (from the assembly, not from me), I slid the red plate of the SST under the ABS tone ring and secured the puller over the axle with supplied washers and nuts and then put the entire assembly into the press. So far, so good.


As I started to press, I thought two things to myself. First - the design and build quality of the shop press is pretty "meh." I mean, it's Harbor Freight, and it seemed to work - if clumsily - for the entire project, but it is not a finely tuned machine. If I had more uses for it, I'd strongly consider a more expensive machine with a little better fit-and-finish. Second - I marvelled at the design and build quality of the Rear Wheel Axle Bearing Puller & Tone Ring Tool. This thing is awesome. Through the entire project, it couldn't have been more perfect - making all of the pulling and pressing operations simple - and safe. If you're doing this job and are considering making do with your own fixtures, my recommendation would be to do yourself a favor and pick one of these up. The time and frustration saved are worth it alone, even if you don't care about safety.
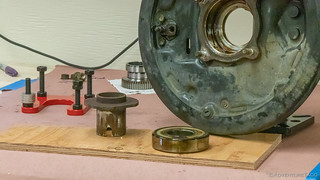
Pretty soon, I had the axle pressed out of the ABS tone ring and inner retainer. And, it's easy to see here where the axle seal rides on the inner retainer.


The next press operation was to remove the axle from the bearing and outer retainer, and to do that I had to draw the stud I'd removed from the backing plate back into place - an easy process with the washers supplied in the puller SST and a 14mm nut.

Oh, and I had to remove the snap ring that holds the bearing and retainer in place. I was prepared for this to take a bit of doing given how long other snap rings have taken to remove, but this time I guess I got lucky - it came right off, easy peasy.


With the snap ring removed, I could secure the Rear Wheel Axle Bearing Puller to the backing plate with its heavy duty washers and nuts, and move back over to the press. This time, as I pressed the axle down through the SST, the bearing and outer retainer would be captured, leaving the axle bare at the end of the operation.


Boy! The bang when the axle bearing released was - how should I say this - a "pants changer." It was loud, the entire press shaking as the energy was released. But, everything worked as it should, and as I removed the SST from the backing plate, there was the outer retainer - clean as a whistle, and with no "wear line" like the inner retainer - since no seal rides on it.


The fact that there is no wear line on the outer retainer is what allows us to save that $150 that I mentioned at the beginning of the post - we can simply swap the positions of the retainers on installation, and have a nice clean surface for our new axle seal to ride on. But more on that later...
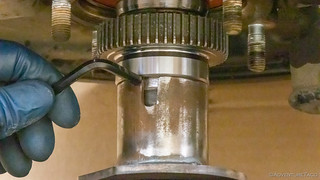
I had to more bits to remove at this point before I was ready to start re-installation. First up was the outer dust shield, which just pulled right off with a pair of pliers. With the dust shield out of the way, I could use the Bearing Driver that came with the same Rear Wheel Axle Bearing Puller & Tone Ring Tool SST (how awesome is that?) to knock the wheel bearing out of the brake backing plate and onto the workbench.

At this point, I think it was mid-afternoon. It'd taken me a good 4 hours or so to get this far. I'd blame it on photos, but the reality is that I was just being really careful to double check myself at every step, since this was the first time I'd done this. As Eric at @Relentless Fab said to one of his guys when I was there - "Slower is faster." Truer words were never spoken .
After lunch and some parts clean-up, I was ready to start pressing components back together. This is essentially a reverse of removal, so the axle bearing was up first. A bit of grease on it's outer race and the matching bore so things would slip past each other easily, I used the bearing driver SST to support the brake backing plate, and a 3" ABS cleanout to carefully press in the bearing. It's not a tight fit, so the ABS works well - both as a match for the outer diameter of the bearing, and also because if you're deforming the ABS, you know you're doing something wrong.


After the bearing is in the brake housing, it was time to press that - and the outer retainer (which used to be the inner and has a wear mark on it) onto the axle. With the bevel on the retainer facing away from the bearing, I got everything set up using the Bearing Driver (and the Rear Wheel Axle Bearing Puller) and into the press before easily pressing everything together.


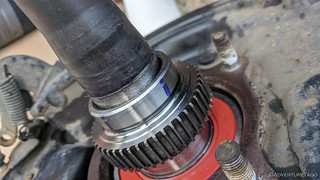
Then, continuing our reversal of the removal, a new snap ring before greasing and putting the ABS tone ring and inner (was outer) retainer in place to be pressed. Note: the tone ring is installed with the solid side toward the diff, and the retainer has the bevel away from the diff, to better mate with the axle seal that was redesigned by Toyota a few years ago.

And then, it was back to the press, where I once again used the Bearing Driver and the Rear Wheel Axle Bearing Puller to drive the two rings onto the axle. The key at this point is to ensure that the inner retainer ends up in the perfect position - so that the axle seal rides right in the middle of the flat surface. To achieve this, press the two rings on and utilize the fabulous access hole in the Bearing Driver SST to monitor the progress.
When you start to see polished axle showing below the inner retainer, slow down. You will ultimately want 3- to 5mm of polished axle showing in order for everything to line up. So when you get to 3mm - which you can measure with a 3mm Allen wrench - stop. I went to 5mm initially, and it was too far! (an easy fix with the Bearing Puller and Tone Ring tool, but something I could have avoided).
To see if the inner retainer was in the right place, it was finally time for me to replace the axle seal. And it was nearly 4:00pm! I headed out to the truck and attempted to pull out the old seal using some pliers. No success - the seal was in there good, and despite mangling the seal (while being very careful to not mangle the race), it wasn't budging.
Dang! I'd heard that using the slide hammer in the OTC 4579 Seal Puller Kit made this super-easy, but I'd decided I could probably get it out another way and save the hundred bucks. Dummy. I quickly realized my folly, but it was too late - getting the kit was going to take four days - time I didn't have - and so I did the only thing I could do - panic.
No, I'm kidding. I actually futzed around for a bit after looking at the design of the OTC kit and came up with what I can only call a contraption that I hoped would solve my problem - fashioned to hook the seal in a couple of places, then allowing me to hit the maple block with a hammer to pull it out.

It worked, terribly. So if you're reading this - just buy the OTC 4579 kit and don't lose a few years of life due to stress.

The seal might have been mangled, but it was out and I was relieved. I immediately set about installing the new seal - first heating the axle housing with a heat gun and freezing the new seal - just to give myself as much chance as possible to get it in easily.
It worked great, and seated just fine using the OTC 4507 Seal Driver Kit.

Having that done meant that I could test the position of my inner retainer on the axle, so I drew some lines with a marker and inserted the axle into the housing. A few turns to get the seal to rub off some of the marker, and I knew I had a problem.
I'd pushed the retainer on 5mm, but it was too far. It was back into the shop where I used the Rear Wheel Axle Tone Ring Puller (have I mentioned that this thing is awesome?) to quickly pull the retainer and tone ring 2mm up the axle. And the next test fit was perfect!

Now, it was just a matter of replacing the largest o-ring I've ever seen on the end of the axle housing, and then buttoning everything back up - torquing the nuts that hold the backing plate to the axle housing to 48 ft-lbs, and making sure the ABS sensor and brake line connections were "tight enough."


It was 5:30pm, and I'd finished the first side.
As one does, I figured it was the perfect time to start on the second side. 
It turns out of course, that I now had a better idea of what I was doing, and I didn't have to take any photos - so I was able to go a bit faster. And by a bit, I mean that I completed the entire process in about a quarter of the time - just under two hours - and with fewer mistakes.
By 7:45pm or so, I was buttoning everything up - the day a long one, but a successful one. I left refilling the rear diff with gear oil and bleeding the brakes for the following morning, but those things are easy enough to do that I wasn't at all worried.
It was dinner time, and I was famished. 
- - - - -
Of course, now that I've addressed the axle seals, my next project is replacing the rear brake shoes. You know, because the current ones are saturated with diff oil from the previously leaky seals. 
Good God!! You're crazy, but then I guess that's not news. Is that "buy to save" your trademark on that? I've been using that for years. If it is yours, you could perhaps also add "I can't afford not to buy it". UJ
Hahahahaha, I wish it were my trademark. I'm sure you were using it before me. I do enjoy the addition, will have to start using that as well!
Now that you have those dandy tools, you have to figure out a way to make them pay! I'll ship you my axles next time around and pay you to do the installation on my truck!! That
or a lease program for the right tools to be shipped to the lucky installer....:-)
Nice write up!!
Thanks! Happy to do your axles next time, just let me know.
Nice work i can defenitly use these tools to do mine were you get the tools I dont know if I missed it
Hi Antonio, All of the tools listed have links to where they can be purchased near the top of the article. Let me know if there's a tool that I don't have a link for, and I can let you know where to get it.
I noticed a bunch of the links to Amazon are no longer available and Amazon is telling me most of the parts won't fit my 2000 4runner its weird and thank you so much for the reply you did an amazing right up
I do see that a couple parts aren't on amazon anymore - looks like they just don't have those anymore. Part numbers are listed though, so you could get them any number of places, and I'll work on getting the links updated as best I can.
As for whether amazon says they fit your 4Runner, I don't really have a ton I can say for that. Fitment on amazon seems to be a bit hit-and-miss to me. One of the great things about amazon though is that if things don't work, you can generally return them.
Thats very true on the if it dont fit you can return to amazon I do appreciate the help ordered a few tools the specialty press tool been wanting to grab the axle tool for awhile just could never find the link again i had lost it
I do appreciate all the help and responces brother you rock I defenitly need to make an account on this site I'm a member of 4runner.org also
Hi! I’m about to embark on this mission—but I’m still unsure about pressing the bearings myself (buying all the SSTs) vs paying a shop to do it (which I still haven’t gotten a quote yet. From what I can see from the links above, the total cost of those tools is about $450 (hydraulic press, bearing puller/tone ring, ABS cap, seal driver kit, not including the seal puller kit) . Is that about what you spent on the tools required for pressing the bearings yourself?
Hey Kyle,
As far as SSTs go, I spent $160 on the press (use a HF 20% off coupon), and $180 on the awesome bearing puller tool. The seal driver kit was $50 when I bought it, though I see it's a bit more now. The ABS cap was like $7 at Home Depot, so you can likely save a bit if you don't have it shipped from Amazon. The seal puller tool (which was very beneficial - reduced the stress level *a lot* for me - was $90). So, the total there is $487 (or $397 without the seal puller).
There were of course other tools required (that I didn't consider SSTs - like sockets and snap ring pliers) so you'll want to make sure you work those into your costs as well...but they will all likely be beneficial on other projects, so your cost will be spread over time.
I will say - I'm glad I did this myself. I like knowing the press is around for future projects, and while I was hesitant to tackle this initially, it turned out to be "not bad at all" as long as I didn't rush and was careful at each step.
Anyway, good luck either way you go!
Holy hell, what a project! I finished this over the weekend and just had to come and say THANK YOU! Really, you made a difficult but fun DIY project into one that was more fun than difficult by creating this guide.
Both this guide and the step-by-step guide were invaluable. I printed out the step-by-step guide to keep with me in the garage, and then referred to this page when I wanted a visual. If anyone mechanically inclined is reading this and wondering whether they can do it, you definitely can by following this.
I bought all of the tools (with one exception) that you suggested, and there was a few times that I stopped and thought about how annoyingly difficult some of the steps would be without the right tools. Especially the axle bearing puller and tone ring installer tool! The only tool that I didn't buy was the seal puller kit, because my local auto shop had one for rent.
I also did a complete brake job and the breather mod all at the same time. Highly recommended just to cover all bases.
Again, thank you so much for the guide!
Hey hey, so glad to hear this was helpful for you Wyatt! That's exactly why I put it together, and it's always great to hear of other peoples successes! Keep on wrenching, and I hope you're able to get out and enjoy the truck as well! ?
Hey turbodb, I'm doing a suspension refresh pretty soon, and since I'll have everything apart and already bought the press I figure I'll do the front seals and wheel bearings. Any idea if there's a removal/installation kit for the front like the one we used here for the rears?
Hey Wyatt, sorry for the slow reply - I've been out enjoying the woods! Front wheel bearings - as I understand it - need a heavier duty press and most guys take them to a shop to do them...but I've never done it myself, so more research would be necessary.
So yeah, that's my short way of saying I don't know of a removal/installation kit like there is for the rear... Good luck, and report back if you find one (or don't)!
Hey turbodb, I finally got around to doing the front wheel bearings (and a slew of other things; just how I roll) and learned that there isn't a kit because there isn't really any need for one. Everything can be pressed out and back in just using press sleeves. I bought a press sleeve kit online before doing the job and while expensive (around $130), it was well worth it.
Also, I used the same 20 ton press for the job and it was plenty. Hopefully this will help someone in the future!
Awesome, thanks for the update and info - could be handy even for me some day! ?
Well I’ve had this page open for 3 weeks now, I replaced the carrier bearing while waiting on parts. Thanks to your step by step I was able to get both sides done relatively quickly. 3.5hrs on the first axle with an hour long VA phone call from my nurse, fixed the neighbor kids bike tire and finally 1hr for the second axle. All in all 6 hours of work and I was done and ready for dinner ?
Tomorrow comes the front bearings that started it all, the driver side grinds a tad but that passenger side screams like a banshee on turns.
Awesome, glad the post could be of help Tom!
Another great write up. Small question, is there any need to remove the abs sensor? Iirc it is part of the axle housing tube and didn’t need to be removed when I pulled the axles to replace my rear diff, but this was on a 98 4Runner not a Taco. I ask this because those plastic sensors are always tough to remove and seem to break if I whistle too loud. Thanks.
Thanks Ben! I think you're right that you technically don't need to remove the ABS sensors. I like to remove them to get them out of the way, and just in case they are sticking down into the housing - I'd hate to bump/break one as the axle was going in/out, etc. But if you find that removing them is more prone to breaking them, then I think you could totally give it a shot with leaving them installed. ?
I cant say Thank You enough for this posting and the suggestions of the puller/press adapter kit from ebay, It made this project for me as easy as it could possibly go. Your step-by-step procedure along with your pictures made this a simple process to follow. Took me about 5-Hours to complete but that was with a trip to the store for a few extra parts. But all and all a great write-up, Thanks again and I look forward to following a few of your other procedures for some more projects I want to do to my Gen-3 4Runner. Thanks again!!
Awesome, glad it worked out for you Josh! If you have a chance, I'd love a positive review on Google, it turns out they help with search results lot more than I originally realized they do!
Good job. Your spacer that goes on the axle shaft last, and sits next to the tone ring was backwards.
Hey Darrel, as I noted in the write-up, "Note: this is the opposite orientation compared to OEM/removal. However, it is better given a redesign that has taken place to the axle seal since 2003." So, you can do it either way and there are likely pros/cons to each one. Installing it the "FSM way" means that you have the beveled surface being pushed into the axle seal, which could be "easier on the seal." However, by installing it the way I've done it here, you have a wider flat surface in the area that the seal rides on the retainer, giving you a better chance for a good seal. Hope that explains the situation for ya! ?
Great write up on on a challenging job. A good guide for many Toyota models as they have similar rear axle designs. I highly recommend the E-Bay vendor mentioned here for the Rear Wheel Axle Bearing Puller & Tone Ring Tool/Installers. I have his tool for 100 Series Land Cruisers it is very well made and gets the job done.
Got a new 3rd member (regeared from ECGS) and axle shafts fully rebuilt with seals/bearings/clips/etc...Also did new drum brakes and hardware. Put it all back together really easily! But the wheels don't spin other than with a LOT of force. Took Drum brakes off (and ensured e brake off) and still too hard to turn. Took out each axle shaft, 1 at a time, not as challenging, but a good bit of force. Took both shafts out and 3rd member pinion flange was quite a bit easier to turn, but not like freely like spinning. What could be wrong? I had ECGS do 3rd member and a Toyota specialist to axles and both swear they did it correct.
The pinion won't "freely spin" in my experience, even with both axle shafts out. If it moves easily though, that sounds correct.
Does each wheel bearing spin easily? That is, when the axle shaft is out of the housing, can you spin the shaft in the brake backing plate easily? That should sping very easily; if not, the bearings aren't installed correctly.
Brakes - as you suspected - are the most common thing, but it sounds like you've looked at that already. Re-verify that, and the two items above, and then it could just be tightness of the new gears. I'd drive it around the block - or some short distance - and then check again. Of course, as you start driving, be on the lookout for any strange sounds and stop if anything at all seems amiss.