")
In general, the rear brakes on a Tacoma or 4Runner wear much more slowly than the front - after all, they are only providing a small fraction of overall braking, and as drum brakes wear more slowly anyway. However, eventually they need to be changed - whether due to wearing out or - perhaps more commonly - due to a rear axle seal leak.
A rear axle seal leak was what caused me to do the job on both my 3rd gen 4Runner (full story) as well as 1st gen Tacoma (full story to be written), which you can read about if you're interested.
Whatever the reason for replacement, it's not a hard job, requires no special tools, and is one you can save a lot of money by doing yourself. So let's get started.
Parts
There's not much you need from a parts perspective, in most cases. I prefer to always use OEM parts for brake work, since that's an important function of any vehicle, and one I want to work properly.
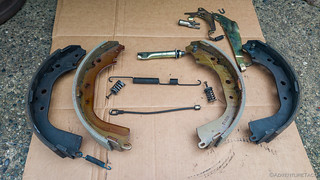
- Toyota Rear Brake Shoe Kit (04495-35230) - this kit includes new shoes and new retaining clips for both sides of the vehicle.
You may optionally also decide to replace any of these other parts, but generally it's not necessary to do so:
- Toyota Rear Brake Drum (42431-35210) - this is the same part for each side of the vehicle, so order two if you are replacing them.
- Drum Brake Hardware Kit ('95-97 Tacoma) ('98-04 Tacoma) ('96-02 4Runner) - various springs that attach to the brake shoes. This is one place where I think an aftermarket kit is a better option, since you get all the parts in one go. Generally unnecessary unless you live in a rust-prone area.

Tools
From a tool perspective, you'll hear people talk about various special tools to remove some of the springs, or turn the adjusters. You don't need those. The following tools are all you need for this job:
- Two slot/flat screwdrivers
- A pair of needle nose pliers
- One medium-size (approx. 10-inch) vise grip pliers
- A floor jack
- Jack stands (one is fine)
- Necessary sockets (good set) and a torque wrench to remove/reinstall your lug nuts
- Brake cleaner
- A small amount of high quality grease
Possibly (to remove the brake drums if they are stuck)
- A rubber mallet
- Two M8-1.25x50mm bolts and the necessary socket to fit
Doing the Job
With all the parts and tools gathered, it's time to get to work. Perhaps obviously, the job is mostly a bunch of removal of parts, and then a bunch of installation of those same parts - or rather, installation of replacement parts. This list of steps is just that - a list of steps (which makes it a great resource to print off and reference when you're doing the job).
Note: As always, when you are removing parts, it is useful to arrange them in the orientation they were installed, so that you keep them organized and make it reassembly easier.
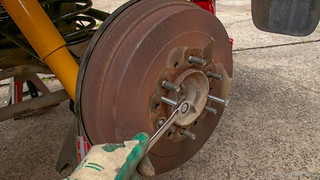
Removing the wheel and brake drum
- Jack up the rear axle under the rear differential using a floor jack, and place a jack stand under each side of the rear axle with the rear tires off the ground.
- Remove the lug nuts securing the rear wheel
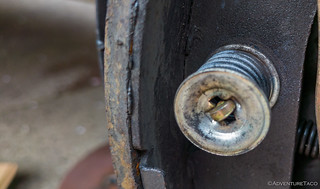
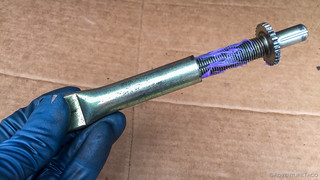
- Remove the brake drum. Note: this may require some tapping with a mallet, or loosening the automatic adjuster if the drum is too tight / rusted to the axle housing. If neither of those methods work, use two, M8-1.25x50mm bolts threaded through the drum to press it off.
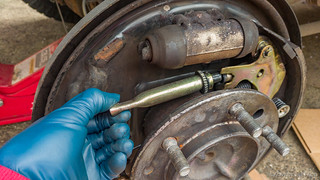
- Use brake cleaner and catch container to clean off the rear brake drums.

Removing the rear brake shoe
- Loosen the adjuster by pulling the catch away from the adjustment gear, and turning the gear so that rear brake shoe can move forward as much as possible.

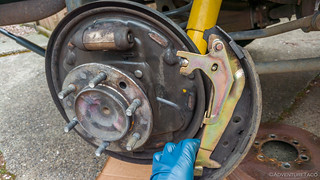
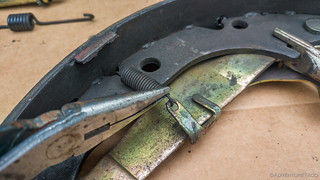
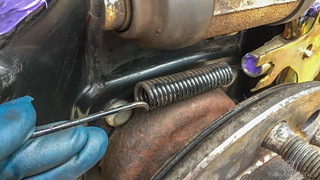
- Using a pair of vise grip pliers, remove the upper spring from the rear brake shoe.

- While pressing in on the post from the rear of the housing, remove the retaining clip and spring that press the rear brake shoe towards the housing by turning it until the head of the post can slip through the slot in the retainer and the retainers (2), spring, and post can be removed and set aside.
- Remove the rear brake shoe by rotating it down and disconnecting the lower spring from the front brake shoe.

Removing the front brake shoe
- Remove the brake shoe adjuster by sliding it towards the rear, out of the front shoe assembly.
- While pressing in on the post from the rear of the housing, remove the retaining clip and spring that press the front brake shoe towards the housing by turning it until the head of the post can slip through the slot in the retainer and the retainers (2), spring, and post can be removed and set aside.
- Remove the front brake shoe by rotating it down and disconnecting the emergency brake cable from catch that protrudes through the backing plate.
Disassembling the front brake shoe
- Using needle nose pliers, remove the small rear spring that secures the adjusting lever to the front shoe.
- Using a flat screwdriver, pry off the C-clip that secures the adjusting lever to the front brake shoe. Set aside the adjusting lever and cam that is secured between it and the emergency brake lever. Note: The C-clip can be tossed as a new one is included with the Toyota Rear Brake Shoe Kit (04495-35230).

- Using two flat screwdrivers and/or needle nose pliers, pry apart and remove the horseshoe shaped retainer for the emergency brake lever attached to the front brake shoe. Note: The horseshoe clip can be tossed as a new one is included with the Toyota Rear Brake Shoe Kit (04495-35230).

At this point, everything has been removed and disassembled. You can place the new brake shoes in their respective locations by matching them up with the originals, and everything can be laid out in the orientation it was originally installed.
Assembling the new front brake shoe
- Apply some grease to the post on the front brake shoe.

- Place the emergency brake lever over the post and secure it with one of the replacement horseshoe retainer by placing the retainer around the post and using needle nose pliers to deform it into shape.

- Put a small amount of grease in the adjuster cam, then place it between the emergency brake lever and adjusting lever as you place the adjusting lever on the post of the front brake drum. Secure the adjusting lever with the new C-clip.

- Install the small spring on the rear of the adjusting lever, securing it to the hole along the edge of the front brake shoe as shown.

- Install the emergency brake cable into the emergency brake lever.

Installing the front brake shoe
- Place some grease in five (5) locations: on each of the three (3) pads on the backing plate where the front brake shoe will contact the backing plate, where the top of the brake shoe fits into the cylinder at the top of the backing plate (1), and where bottom of the brake shoe contacts the stop at the bottom of the backing plate (1).

- Hold the front brake shoe in place and insert the post, retaining clips (2), and spring that hold the front shoe in place. Note: a second set of hands, or a clamp to hold the brake shoe in place for this step, can be useful.
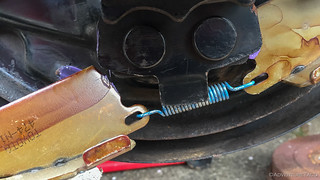
- Secure the emergency brake cable to the hook protruding from the backing plate. Note: the cable runs under a curved piece of metal attached to the housing.

- Install the upper spring by looping it behind the front brake shoe and through the triangular opening along the edge of the shoe.

- Unscrew, clean, and re-grease the adjuster mechanism; insert the adjuster mechanism into the adjuster cam on the front brake shoe.

Installing the rear brake shoe
- Place some grease in five (5) locations: on each of the three (3) pads on the backing plate where the rear brake shoe will contact the backing plate, where the top of the brake shoe fits into the cylinder at the top of the backing plate (1), and where bottom of the brake shoe contacts the stop at the bottom of the backing plate (1).
- Install the lower spring between the bottom holes on the front and rear brake shoes. Note: The spring sits behind the metal shield on the bottom of the housing.
- Making sure to align the adjuster with the slot in the rear brake shoe, hold the rear brake shoe in place and insert the post, retaining clips (2), and spring that hold the rear shoe in place. Note: a second set of hands, or a clamp to hold the brake shoe in place for this step, can be useful.

- Using a pair of vise grip pliers, install the upper spring into the triangular hole on the outer edge of the rear brake shoe.

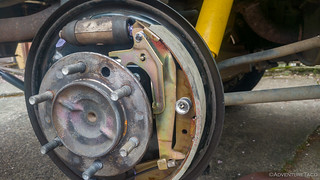
Installing the brake drum and wheel
With the brake shoes installed, it's important to have them correctly adjusted as the brake drum is re-installed. Correct adjustment is achieved when the brake drum can slide on over the shoes, but with some effort/rubbing. This is achieved by pre-adjusting the adjuster over the course of several test-fits.
- At the same time, push both the front and rear brake shoes toward the center of the hub, compressing the cylinder at the top of the backing plate.
- Fit the brake drum over the shoes and wheel studs. At this point, it should fit without issue or interference from the brake shoes, as the adjuster is fully compressed as is the top cylinder.
- Remove the brake drum and turn the adjuster to push the brake shoes slightly further apart, then re-fit the brake drum over the shoes and wheel studs.
- Repeat step 3 until the brake drum slides over the shoes as it is pushed into place - i.e. it will be tight, but movable - you should not feel that you are forcing it into place.
- Install the wheel and torque lug nuts appropriately once the vehicle is back on the ground under its own weight (factory lug nuts are torqued to 89 ft-lbs).
Once you have completed both sides, final adjustment of the rear brakes can be performed by pulling the emergency brake handle in the cab. As the handle is pulled - assuming your emergency brake is working - it will pull the emergency brake lever attached to the front brake shoe and will rotate the adjustment gear, tightening the brake brake shoes against the drum. Pull the handle several times until you are no longer "maxing out" its travel.
Done!

I just wanted to say thank you. These are some of the best instructions with clarity in the write-ups. I don't enjoy watching a 50-minute video while wrenching. Keep it up.
Absoutely M - glad you you found them useful, and there are lots of other step-by-step guides as well if you're interested...Cheers!
Pictures are worth a thousand words they say, and I agree with that 100% here.
Thanks for the instructions. Just hope my next vehicle has rear disc brakes. The Tacoma has the easiest front disc pad change out I've ever done.
Sure thing Thomas! The discs sure are easier (and brake better), but I do like the longevity of the drums, hahaha!
Thank you so much for these clear step by step instructions!
I watched a few YouTube videos prior to coming to your site,
and they only helped to a degree.
Awesome, glad that the instructions were clear and useful for you Todd! I've come to realize that it's really nice to have everything written out (and printed sometimes) because it ensures that all the steps are there (nothing's been edited out accidentally), and it allows me to go at my own pace. 👍
Will be doing this soon as well as the tundra disc brake upgrade.
Have you had to address anything with the load sensing proportioning valve? I plan on replacing w/ a new aftermarket. The one that is currently on the truck is very rusted on the outside and crunchy in the lever/arm boot that attaches at the bottom. Have no clue if it is bad or not, but the aftermarket PV was not expensive. I do think the rears lock up with hard stopping which seems like could be a sign PV is bad.
Rear locked up even before suspension upgrade where we added 1" block under leafs. None of the write ups on suspension work discussed needing to also consider the PV. Did you delete the LSPV for a manual or did you adjust the mounting of the arm hinge/mount on rear dif?
Hey Brandon,
You probably already know this, but for anyone who comes along to read it - the way the LSBPV (load sensing brake proportioning valve) works is as follows:
After you install a lift, if you don't compensate for the distance that you've pushed the frame away from the rear axle housing, the lift ends up (essentially) pulling the lever down, relative to its factory position, reducing rear braking. It sounds like that's the opposite of what you're seeing, so there's a good chance that the LSBPV isn't working correctly.
Once you get one that does work, you'll definitely want to install a riser on the rear axle housing so you keep the arm in the correct position relative to the frame. A lot of folks use this riser from BAMF (see image below), but you can also fab something up from a piece of 1/4" steel bar with four (or more) holes in it, mounting the bracket to the axle housing with the bottom two, and the LSBPV arm higher up.
Hope that helps!
Thanks DB...this is definitely helpful. Yeah I feel pretty confident my back end is locking up (pre & post 2" leveling lift). I haven't done a controlled test or anything, just judging by the feel of things when I've had to slam brakes a couple of times. Particularly the fish tailing.
Thanks for the link to BAMF brackets. How do I know which bolt setting to use? It looks like it not only adjusts vertically but horizontally? What would be the correct mounting bolts (to dif) and lever to account for my addition of 1" block? Not anything about this on BAMF website, but I can give them a call if you don't feel comfortable weighing in.
Happy to weigh in on the BAMF bracket, which I’ve used for years. Essentially, you want to mimic the original vertical positioning of the lever.
First, you’ll notice that there is a post that secures the BPV lever to the rear diff, using two bolts. Remove them and the post.
Use the lowermost two holes on the bottom left of the BAMF riser to attach it to the same two holes in the diff that you just removed the post from.
Lastly, to mount the post to the riser, you want to use two holes in the riser that correspond (approximately) to the amount of lift you have. With a 2 inch lift, look for two holes that will put the arm approximately 2” higher than the original mounting position on the rear diff, that the riser is now bolted to. For a 3 inch lift, 3” higher than those same two holes.
Good job with the procedure you wrote.
Unfortunately I could not get the return spring anywhere near the hole it goes in. I had to use a spring tool. And not the kind you can buy nowadays because they are made in China, the handles are not as long as they are on my tool (which I bought 50 years ago), and the hook at the tip (that catches the loop in the spring) opens up and you have to beat it back. And then it opens up again before the spring reaches the hole.
Hopefully I'll never have to do that job again but if I do, at least I have the right spring installation tool!
Just curious if you bled the brakes after replacing the shoes?
You only need to bleed the brakes if you allow air into the system, so as long as the brake lines remain connected, and you don’t replace the cylinder in the brake drum, you don’t need to bleed after replacing the shoes.
Think of it like replacing the brake pads on the front of the truck, which don’t require bleeding because you have not disconnected any of the brake lines.
Hope that helps!
This is great information. Thank you for taking the time to post this. Seriously, your work makes this world a better place. -Ilya
You're welcome, glad you found it useful! I've gotten a ton of help over the years, so it's nice to give back a bit. 👍