
With the interior removed for my sound deadening project, it was the perfect time to install a dashcam that I've had sitting around for - I don't know - call it four months or so.
I've wanted a dashcam for quite some time - not so much for the safety aspects that some feel it provides - but to capture video, and possibly even stills - of various things we see out the windshield but are unable to grab the DSLR to photograph.
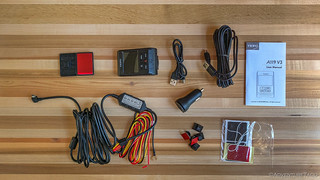
So, when I saw a good deal and great reviews for the Viofo A119 v3, I picked one up along with a free-due-to-promotion hard wire kit that would allow me to run it without having a USB cable dangling down to the cigarette lighter. Plus, hard wiring it would allow me - if I so desired - to have the camera on when the Tacoma was off and no power was available at the 12v accessory receptacles.
The key - of course - for the entire installation - was having the headliner removed so that I could run the wiring across the roof, down the B-pillar, and to the secondary battery that I have installed in the cab.
Removing the Headliner to Run the Wires
I got started by getting the headliner out of the way. This is something I've done before, so I approached it with more confidence than I had in the past.
Since this time, removal was part of the sound deadening project, take a quick read of that post or my original Removing the Headliner post for most of the details.
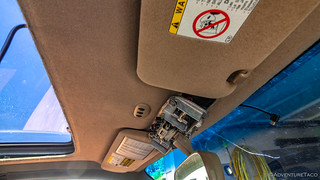
With most of the space above the headliner accessible, the only extra bit I needed to do this time was to remove the map lights so that I could run the dashcam wiring out the headliner at that location.
Map light removal is straight forward and starts with hinging the cover down from the front edge, towards the rear of the cab. This was scary for me the first time I did it, but now that I know it won't break, it's a simple operation.

Next, remove the four Philips screws that secure the map lights to the roof and allow the entire unit to hang down.

At this point, the headliner can be pushed down slightly to allow enough access to push the dashcam wires through - and then routed above the headliner to the rear of the cab.
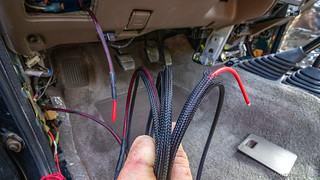
Once routed down the B-pillar, I was essentially done with the dashcam supplied wiring, since my house battery and power center sit in a cabinet behind the passenger seat. However, if you're planning to get power from somewhere else, now is a good time to run the wires up to the front of the cab - since you have the door threshold out, and that allows you to easily run wires up to the dashboard.
And then of course, I got to re-install everything I'd removed to pull the headliner. Oh, the joy. 
Adding an Accessory Power Wire
The wiring kit with the Viofo A119 v3 dashcam comes supplied with three wires: +12v battery power, ground, and a +12v accessory line. This last line is used by the dashcam to sense when the vehicle is ON, thus enabling continuous recording on the dashcam. Likewise, the same line allows the dashcam to enter parking mode the vehicle is off.

To connect this last wire, I needed to run an additional +12v ignition line from the dash to my power center. This was easy enough - I inserted an add-a-fuse into an ignition only circuit in the fuse box and ran a 12 gauge wire to the power center - under the door threshold and through the rear cubbies.
There, I installed a Blue Sea 5-stud Bus Bar, that I can use to attach any accessories I install that require ignition-only awareness.
Now it was a simple process of connecting the three wires from the harness - the positive and ground to the Blue Sea fuse box, and the ignition power to the new bus bar I'd installed. Note: the wiring harness doesn't come - as far as I can tell - with any fusing, so I installed a 5A fuse for this circuit; more than enough given that the cam can run off of USB power.

Plugging in the Dashcam
With that, all that was left to do was install the dashcam itself. Rather than try to place the sticky pad on the windshield and hope it was positioned correctly, I attached one of the pads to the dashcam and then held the entire unit in place as I pushed the sticky pad onto the windshield. Makes for a perfect placement, every time!

With an SanDisk Extreme Pro SDXC 128GB SD card inserted, the Viofo A119 v3 was ready to go. I have to say - video quality and stills both seem good and I'm quite happy that I can barely see the dashcam behind the rear view mirror when it's in operation.
So, while a super-clean installation isn't the easiest thing in the world, I recommend it, especially if you're already doing work on your interior. Because it's always better to do quality work.
Samples from the Viofo A119 v3
So far, I'm reasonably happy. Picture quality - as seen below - is good, though I clearly have some work to do on the reflections front. This likely has to do with the angle of my windshield and may not be an issue for others; in my case, the tablet I've mounted on the dash and use for navigation is what's reflecting in the video. A simple shield under the camera lens should be all I need to take care of the issue.
Sample 1440p video, obviously downsampled by YouTube.
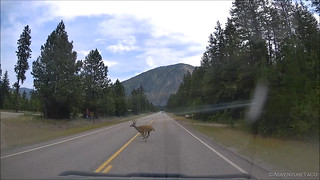
Sample still taken from 1440p video.
The clarity of the still image is remarkable in my mind. The truck was moving at about 55mph in this case, and the deer was probably moving at somewhere around 35mph as it galloped across the road. Even with no editing, it is a great photo once the glare issue is addressed.
I have dash cams installed on my vehicles and they are your independent witness in traffic accidents for your self and others too. During my peace officer career, one of my assignments was traffic enforcement and investigation and dash cam videos helped a lot in my investigations.