")
Any time any component of your A/C system is replaced, it's a necessary to recharge the system with refrigerant. This generally costs in the $150 range at the shop, but you can do it yourself for under $100 the first time, and have the necessary tools to do it for $20 any time after that!
And, if you're doing it as part of replacing other parts of your A/C system, here's how you do it all:
Trouble with Your Air Conditioning?

")

Tools and Supplies
To recharge your A/C, you'll need the following tools:
- A/C Diagnostic Manifold Gauge Set - this gauge set would allow me to test the system and to charge the system with 134a refrigerant once I knew it would hold pressure.
- A/C Vacuum Pump - working in tandem with the manifold, the vacuum pump removes all air (and more importantly moisture) from the A/C system prior to charging.
- Pneumatic A/C Vacuum Pump - you can use this pump and save a few bucks if you have a big compressor around that can generate 4.2 CFM @ 90 PSI
- Standalone A/C Vacuum Pump - if you don't have a large compressor, this pump will work great by itself.
- 2, 12oz cans of 134a A/C refrigerant - this is the stuff that makes it chilly.
- A/C Can Tap for R134A Refrigerant - connects the cans of refrigerant to the manifold gauge.

Recharging the A/C System
Note: The FSM states that the A/C system on a 1st gen Tacoma holds 21.16oz +/- 1.76oz of R134a refrigerant. As such, the process below outlines using two (2), 12oz cans of refrigerant (24oz total) since that can size is a common size. Given that the process of transferring the material is likely to lose a bit in the process - inside the manifold set if no other place - this places essentially the correct amount of refrigerant into the system.
For a visual of the recharging process, this video does a good job of walking through most of the steps. I found it useful to watch the video, and then follow these steps below.
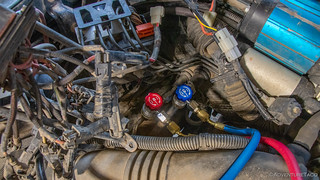
- Start by hanging the A/C Manifold Gauge Set on the hood latch and ensure that all valves on both ends of the red and blue lines are in the closed position.
- Secure both the high (red) and low (blue) pressure lines to the valves on the lines that pass through the firewall. Note: the fittings are quick connect style, and are different sizes, so they'll only fit on the appropriate respective line.
- Attach the vacuum pump to the yellow line and begin pulling a vacuum.
- Open the high and low pressure valves on the manifold, and also open the high and low pressure valves on the quick connect fittings. Note that the quick connect fittings "open" a Schrader valve in the A/C lines by depressing it; so turn the valves to open but don't over depress the Schrader valve.
- Run the vacuum pump for at least 30 minutes to evacuate all air and moisture from the system. During this time, the vacuum should be pulling between -25inHg to -30inHg depending on your altitude.

- After 30 minutes, turn off the vacuum pump and let the system sit for at least another 30 minutes to make sure that the vacuum holds at whatever vacuum is indicated on the manifold. Any decrease in vacuum at this point means that there is a leak in the system that must be addressed prior to charging the system.

- After 30 minutes of maintaining a constant vacuum, close both the high and low pressure valves on the manifold and remove the yellow line from the vacuum pump. Attach that yellow line to a the can tap (sometimes included with the manifold gauge set) after connecting the can tap to the first can of R134a.
- Start the truck and turn the A/C all the way to cold, with the fan speed on high, and the windows open. Have a helper keep the engine at 1500 RPM.
- On the manifold, open the valve for the low side (generally blue and on the left), making sure the high side (red) valve is closed.
- Screw in the top of the can tap so that it pierces the seal on the 134a refrigerant can, then back off the can tap so that refrigerant can begin flowing into the system. As the refrigerant is flowing, repeatedly rotate the can from 12-o'clock to 6-o'clock to assist in the transfer of gas and liquid. Note: the can will get very cold as this procedure takes place.
- Once the can is completely empty, close the low side (blue) valve and make sure the can tap is completely backed out of the R134a can. Remove the empty can from the tap, and screw on the second 12oz can of refrigerant. Repeat the process of transferring refrigerant from the second can into the system. (steps 9 and 10)
- When all the refrigerant has been transferred out of the second can, close off both the low side (blue) and high side (red) valves on the manifold. Completely insert the can tap into the now empty can of R134a to seal it and isolate it from the system.
- Turn off the engine.
- Equalize pressure on the high and low sides of the system by slowing opening the high side (red) valve on the manifold gauge. This will recover a small amount of refrigerant that's currently in the manifold lines and push it into the system.
- Once the system is equalized, close the high side (red) valve on the manifold gauge and also close the two quick connect valves before removing them from the lines passing through the firewall. Note that upon removal, a tiny bit of refrigerant may escape - be ready for it by wearing gloves and safety glasses.
- Lastly, open all of the valves slowly to release pressure in the manifold gauge. Again, some refrigerant will escape - be ready for it by wearing gloves and safety glasses.
And with that, you're done! Button up anything that's still not put together on the truck pat yourself on the back for a job well done. It wasn't that hard, with the right tools now, was it? 
Excellent write up! However, I don’t understand step 14 - why do you open the high side at the end? Wouldn’t this push more/higher pressure refrigerant into the manifold?
Thanks Mike, glad you found the write-up useful. With regards to step 14... Once the engine is off - and the A/C compressor isn't running anymore - the pressure in the high side actually goes down. Essentially the system equalizes to a pressure that is between the high- and low-side pressures. Since the manifold was last open when the high-side was pressurized by the A/C compressor, it still has the higher pressure. By opening it, that pressure is also equalized - pushing a bit of coolant into the A/C system in the process - and reducing the refrigerant in the manifold. That reduction of refrigerant in the manifold is actually the benefit of doing this - it means you release less of it into the atmosphere when you disconnect the manifold.
Thank you for all...When,...and what amount of oil goes in when as this my 1st time A/C replacement of a/c parts on my 2003 4whdr., std.,3.4 tacoma...with extended cab.
I followed your entire guide to a tee. I replaced the compressor, condenser, dryer, evaporator, and then followed your recharge guide. my air is only blowing 60 degrees out of the vent on a 83 degree day. I'm at a loss. I don't know what could be wrong.
Bummer!
It’s holding vacuum for 24hours, I assume?
Not blowing cold could mean a couple things:
If you’ve replaced everything and the receiver/drier looks correct under load, and your pressures are right, it might be time to take it to a shop. Probably not cheap, but if the parts are all new/good already, it may not be too expensive.
Good luck!
after further testing something must be out of wack. I used regular 134a without any additives. what was interesting was when I was filling it up with the 2 cans it was taking forever to suck it all in. the compressor was running and my helper was revving the engine to 1500 rpm, but it was seeming to suck very much. also here is what the gauges are reading while idling and compressor running, 52 low pressure, 125 high. just hooking up the gauges and having the car off shows 120 low pressure and 40 high... something is out of wack.
Having the vehicle off will show different high/low pressures due to how the system "cools down," so don't read too much into those numbers. What happens when you run the engine and have the A/C operational?
However, your observation that it wasn't pulling in the 134a could be an indicator of something going on. Did you weigh the two cans to be sure they were consumed?
ya I weighed the cans before and after charging. they were 15.5 oz before and 3.64 oz after. so about 24oz of coolant went into the system.
when running the system with the vehicle on, the low side pressure is about 50 and the high side is about 125. the A/C works, but the temp coming out of the vent is only 60 degrees. It used to be like 37 degrees. when I recharged my other Tacoma, it was about 37 degrees after charging the system.
ok so I did some further testing. The high side gauge was broken. with working gauges, pressure while the system is running is 35 low, and 225 high on a 80 degree day. That seems pretty normal to me, I wonder why it's not getting very cold.
Have you gone through the troubleshooting / on vehicle inspection from the FSM? I've uploaded it here in case you've not seen it.
From there, if everything checks out, my next step would be heading to an A/C shop.