June 15, 2018.
For part 1, see How-to: Planning a Trip/Route (with Google Earth, GPX, KML, and more)
So, you've done your research and created a route that you're super-jazzed about. If you're anything like me, it's taken you days. Or weeks. Months of work (on-and-off), even. That's awesome - you're in a small class of folks who do detailed route planning. Now it's time to get out there! You know, like this...

Seriously though - the hard part is done, now comes the fun part - seeing the beauty that nature has to offer. Here I'll cover how I take a route and use it to guide the adventure. As always, there are many ways to do this using all different sorts of technology. But this is what I do. We'll look at:
- Setting up a tablet for navigation
- Exporting a route to the tablet for in-vehicle use
- Prepping the tablet for offline use when you're on the trail
Equipment selection
Before we get into setting up the tablet, let's talk about the hardware itself for a moment. I use an Android tablet - specifically a Samsung Galaxy Tab A 8.0, with 16GB of RAM and a 64GB or larger SD card.
. Here's why:
- As long as you get one with GPS capabilities, a tablet is much more functional than a standalone GPS unit, if you're willing to create your own maps (which is exactly what we're doing here).
- I choose Android over iOS because of cost - Android devices are a fraction of the cost.
- I choose an 8-inch screen because I like to keep the tablet mounted high on the dash. A larger screen would block either my AC vents or the windshield.
- I choose a tablet with 16GB of RAM (vs. 32GB or more) because I don't care how much storage is on the actual device - that's what the SD card is for. And again, that keeps cost down. A good SD Card is cheap (I recommend this 64GB, or this 128GB card).
And, I should note - the Tab A 8.0 is a cheap tablet - if you spend more you can get a faster processor or better screen, but I don't feel like I've really needed those. The Samsung Galaxy Tab S2, and the 8" Lenovo Tab 4 are two other tablets that I'd consider.
Update 2020: I now use a 8" Lenovo Tab 4 as the Samsung Galaxy Tab A 8.0 screen separated from the back of the tablet when it got hot (it was mounted on the dash in the sun). The Lenovo has a bit faster processor as well, which makes it more responsive.
Update 2022: I'm still using the 8" Lenovo Tab 4 and like it, but the processor is getting a bit long in the tooth as apps continue to be developed and so require more and more processing power. Not sure what I'll move to next, it seems there aren't a lot of good 8" Android Tablets being created these days.
Update 2023: I recently cracked the screen on my 8" Lenovo Tab 4 and I've upgraded to the 8" Lenovo Tab M8 FHD. It's a great device - faster processor, better screen, same great GPS features.
Setting up the tablet for navigation
Getting the tablet setup is relatively easy - there are really only a few steps.
- Make sure you have WiFi on and that you are connected to a network.
- Make sure you have location services turned on in your tablet Settings. Obviously, to use the GPS, any navigation app will need access to accurate location information.
- Download a navigation application. I'm a fan of Backcountry Navigator TOPO GPS (the paid version - $12 at the time of writing) onto your tablet because it's got a ton of features and is relatively straightforward to use (as straightforward as any of these type of apps).
- Insert your SD card if it isn't already.
- Configure Backcountry Navigator to save data to the SD card rather than built-in memory by:
- Tap on Menu > Settings > Storage Options > Storage Root(Advanced).
- Select the External Storage Card that is presented (if it is not already in the Current section).
- Click SAVE.
Exporting a route to the tablet for in-vehicle use
With the tablet setup, it's time to get the route we created exported so we can see it on the tablet as an overlay on a map. As you can imagine, this too is relatively easy to do.
- Connect the tablet to your computer using the USB cable and make sure you've enabled file transfers (vs. just charging). This is generally done by pulling down the notification menu and tapping USB connection > For file transfer.
- On your computer, find the KMZ or KML route file you created with Google Earth and copy it to the Download folder on your tablet (generally This PC > Galaxy Tab A > Tablet > Download).
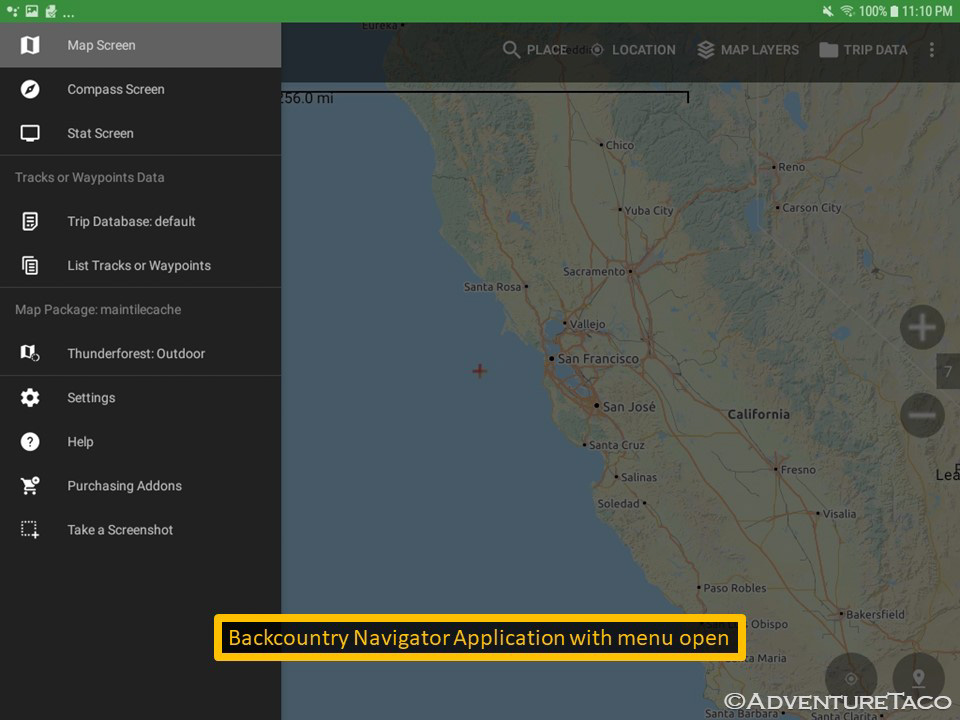
- On the tablet, open Backcountry Navigator.
- Import the route file by tapping Trip Data > Import Tracks or Waypoints.
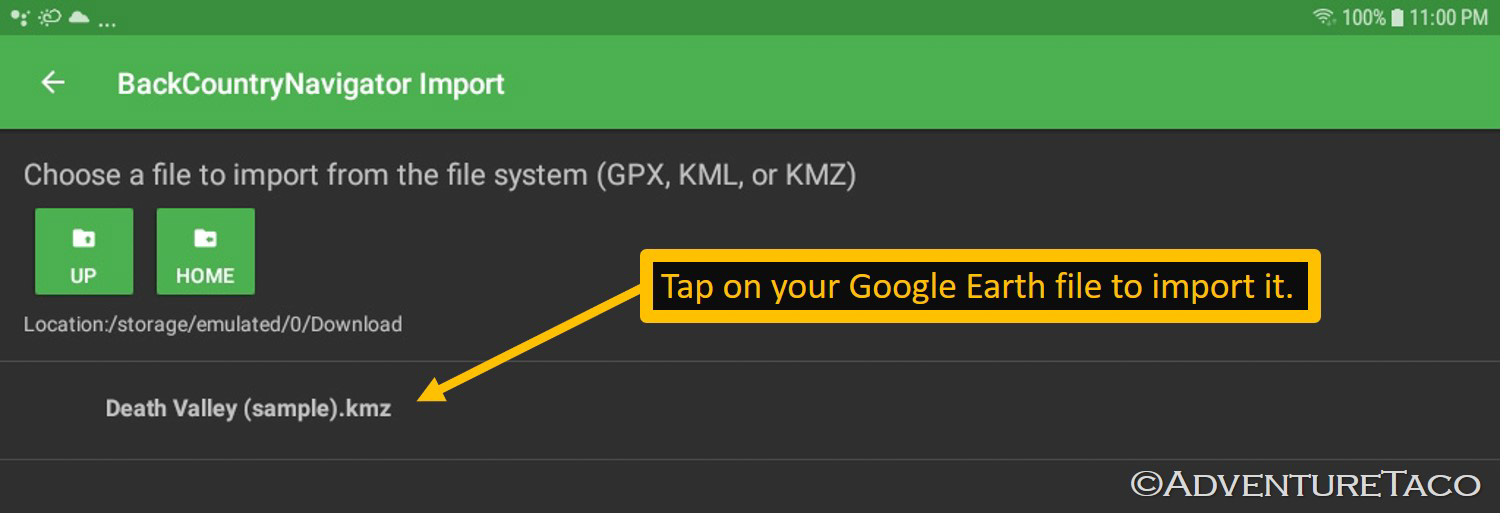
- The next screen should already show the Download folder, and you should see your route file listed. If it doesn't, navigate to your route file (likely KMZ or KML) and tap it to bring up the Import GPS Data screen.
- Generally on the Import GPS Data screen, you can simply tap Start Import (to the Existing Trip Database named default). However, take a quick look at the settings and make sure they are what you want before tapping Start Import.
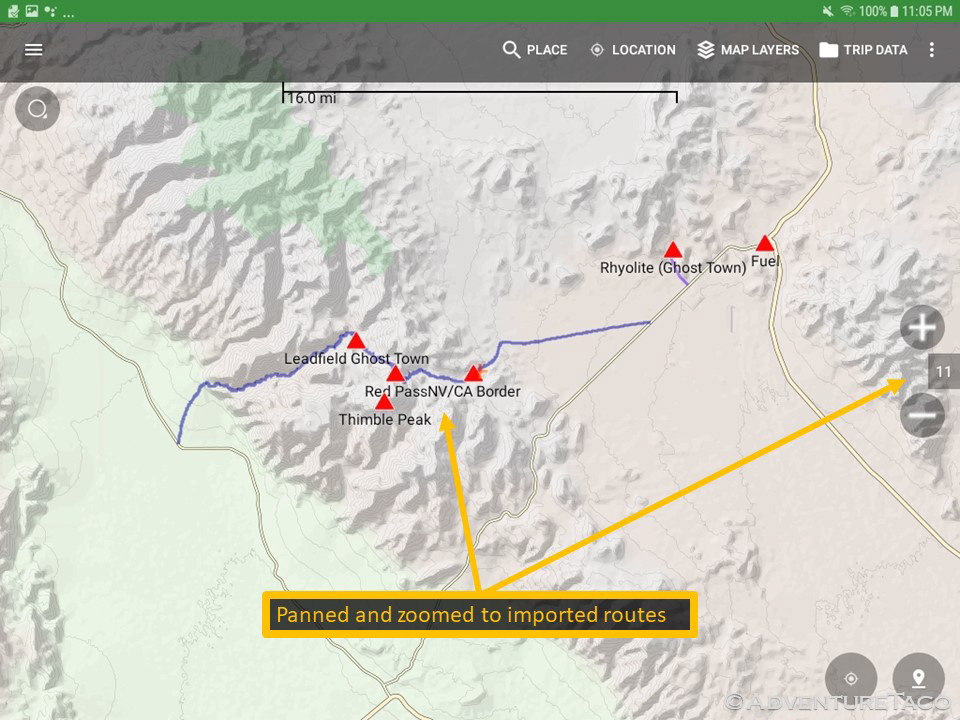
- Backcountry Navigator will then import all of the tracks (routes) and waypoints (placemarks) from your file and display them on the map. If they aren't in view, pan and zoom the map to bring them into view.
Nice. You now have maps on your tablet, and if you have internet connectivity (via WiFi or cellular), you can navigate a trip. Of course, on a great trip you won't have either, so let's deal with that situation...
Prepping the tablet for offline use when you're on the trail
When you go offline, the tablet will continue to show your tracks and waypoints - those are stored on the SD card if you followed the instructions above. However, unlike when you're sitting at home connected to WiFi, Backcountry Navigator won't be able to download maps, unless you've stored those on the SD card as well. Follow these steps to download the relevant maps for offline use.
- Open the Backcountry Navigator app while you are connected to your home WiFi. (Because you're about to download lots of data.)
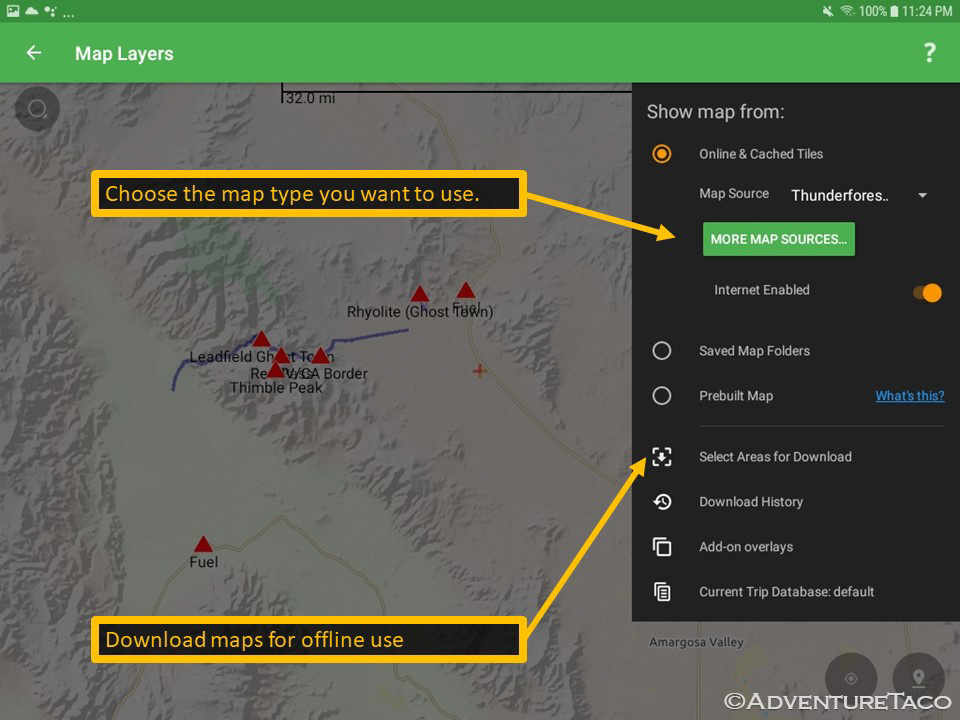
- Tap on Map Layers at the top of the app, then More Map Sources and then select the map "type" you want to download. I find the following two maps to be the most useful
- Worldwide > Thunderforest: Outdoor (I primarily use this map)
- Worldwide > Virtual Earth Hybrid Satellite Imagery Maps (this is nice to see terrain/roads that may not be "official" roads).
- Tap Map Layers at the top of the app (again), then Select Areas For Download.
- The top toolbar will change to show SELECT | SCROLL | DOWNLOAD | DELETE; along the right side of the app, you'll see the zoom controls (+ | -) and the zoom level: 1-16+
- Make sure you are at zoom level 10, and then tap on SCROLL and use your finger to navigate to the area of the map you want to download.
- Tap on the SELECT button and use your finger to mark the area you want to download.
Note: you probably won't be able to fit the entire area you want to download on the screen at one time. Alternate between the SCROLL and SELECT buttons to create rectangles that encompass the area you want to download. The edges will be "choppy" and that's OK. It's also OK for the rectangles to overlap; those areas will only be downloaded once.

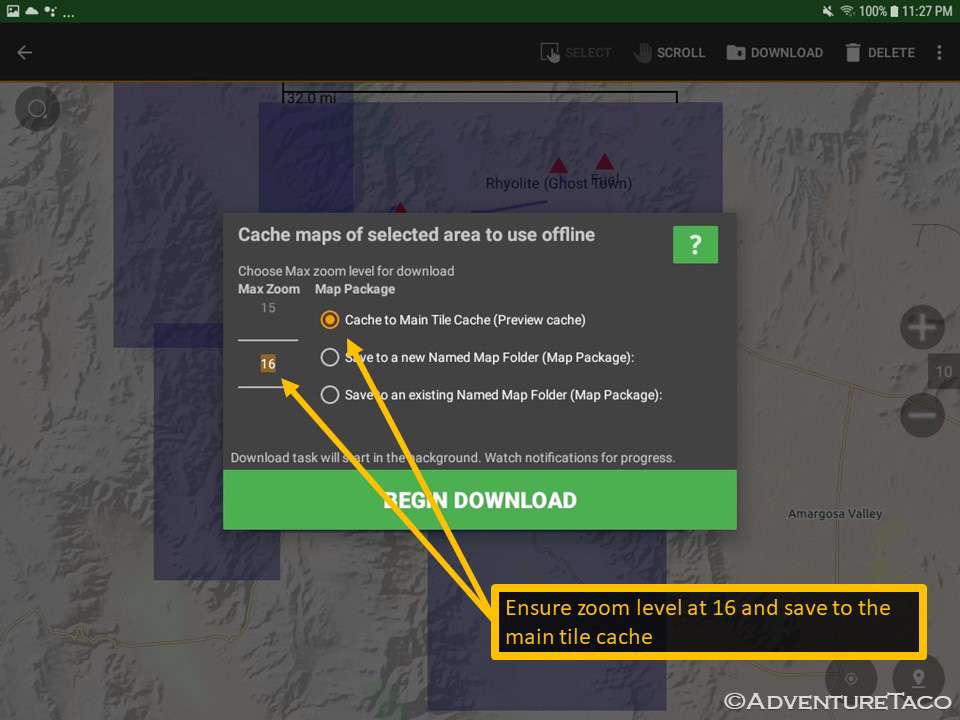
- Once you have everything selected, tap the DOWNLOAD
- Set the Max Zoom to 16
- Set the Map Package to Cache to Main Tile Cache (Preview Cache)
- Tap Begin Download and follow the prompts as appropriate to download the maps.
Note: You can repeat steps 3-6 to download different geographies for offline use; they will all just live in your map cache for offline use.
Once the download of any/all the geographies you want offline complete, you can verify that they will work when you are offline by disabling WiFi and using the tablet to navigate the area you downloaded. Make sure to zoom in and out (between zoom level 8 and 16) to ensure you have all the map tiles.
And that's it! You are now ready to head out on an adventure, with offline maps. #gooutside #beadventure 
Bonus: Recording tracks and recording points of interest
Besides just navigating with your offline maps, it's often useful to record where you actually go, and things you see along the way - since you often end up off-route, and you discover things along the way that you never found on the internet or didn't mark because they didn't seem interesting at the time. Camp sites are a great example of this.
Recording tracks
While you are adventuring, you can record a GPS route of where you've been. You do NOT have to have offline maps of the area to record the track - that is, even if Backcountry Navigator shows empty map tiles, it will still record a track correctly, and you can see it on the map later, when you have connectivity again.
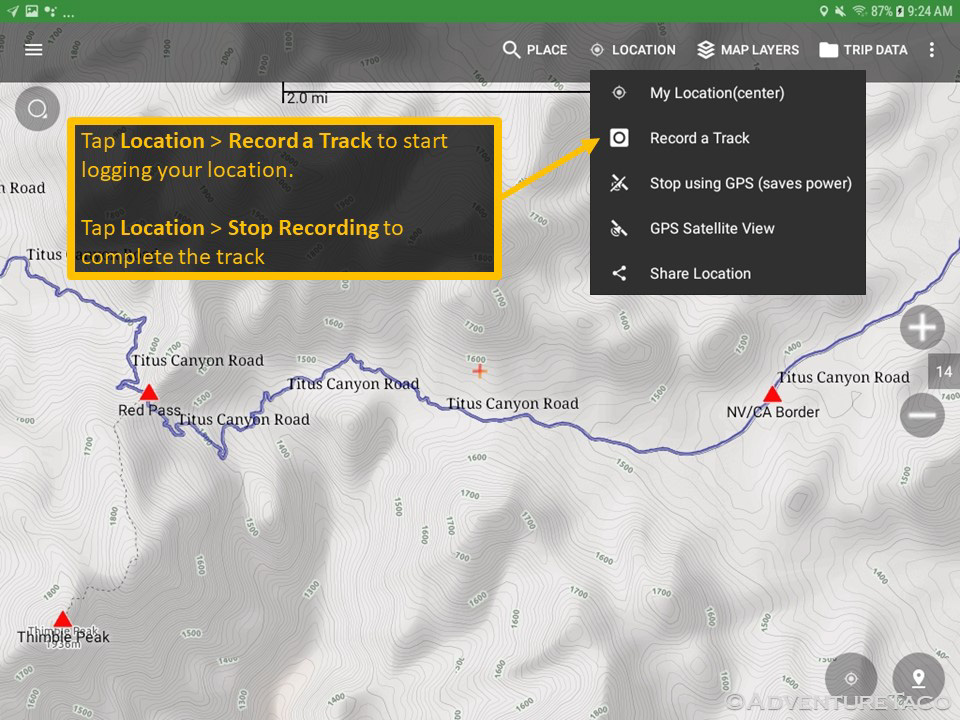
- Open the Backcountry Navigator app
- Tap on Location, then on Record a Track
- Give the track a name and press Start Recording
- When you're done with the track (end of the day or end of the track), tap on Location, then on Stop Track Recording.
Repeat steps 2-4 as appropriate to record as many tracks as you'd like.
Noting Points of Interest
In addition to recording tracks, you can also create waypoints at interesting places (this works whether you are recording a track or not, and like tracks, you do NOT need to have offline maps of the area to record a waypoint).
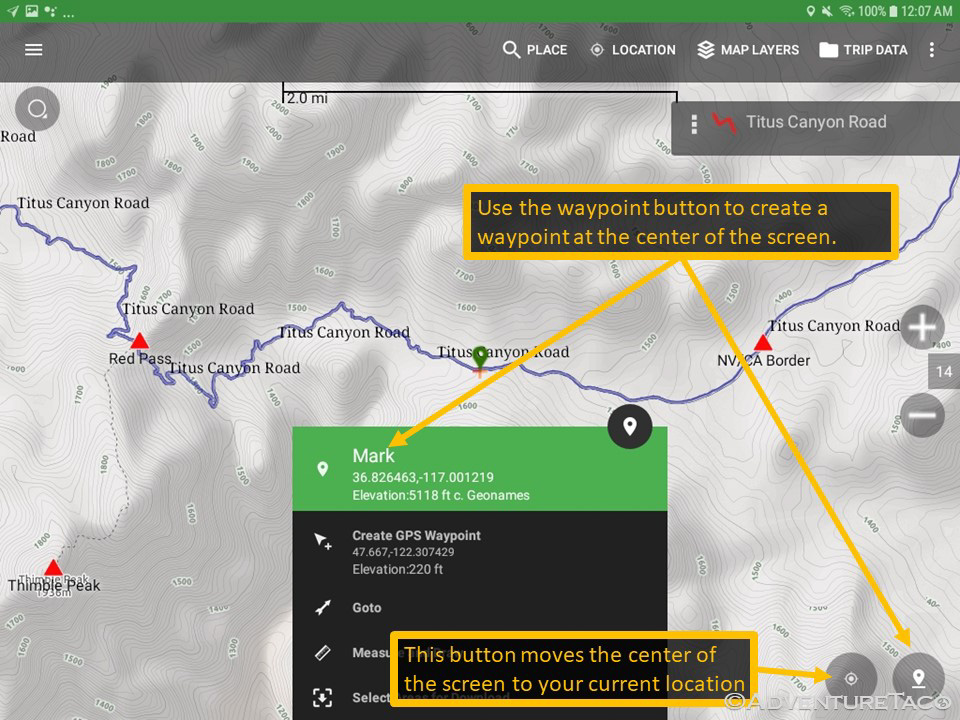
- While the Backcountry Navigator app is running, place the red + in the middle of the screen on the location you want to create a waypoint.
Note: If the map is not centered on your current location, tap the center on current location icon ( ) to move your current location to the red + in the middle of the screen.
 - Tap on the waypoint icon (
 ) in the bottom right corner, then tap on the green text that pops up. This will either be Mark (if the map is not centered on your location) or Create GPS Waypoint if the map is centered on your location. They both bring up the same Waypoint dialog, and both create a waypoint where ever the + is currently shown on the map.
 - Select the Waypoint name and enter the name of the waypoint you are creating.
- Tap Save in the top right of the application.
So - with that you're ready to research and create your own routes, transfer those routes to an Android tablet running Backcountry Navigator, and use those routes offline while you adventure along them (noting anything interesting you come across). Hopefully this has been helpful, and as always feel free to ask questions!
Thanks for these instructions! I'm just getting stated with this and will follow your instructions. Just had some questions though.
1: Use backcountry Navigator Topo gps pro, or the free one?
2: If I use Google My Maps and create an off road route, why can't I just transfer that as an offline map to my android tablet for use when there's no wifi/cellular?
3: I'm just wondering how the Backcountry Navigator app is needed to follow a route if can I just transfer a Google My Map route directly to my tablet?
Thanks for any info. I'm just trying to understand how it all ties in and together etc.
Hey Matt, glad to help!
1. If you're happy with the default BCN (free) maps, then by all means, use that one. If you find that you want other maps (like the Accutera Geotreks Land Use map that shows public/private land), then go for the BCN Pro.
2. You can use Google My Maps and transfer that to your tablet (using Google for your mapping) but a lot of times the roads you might want to explore are not "known" roads to Google. In that case, you have to draw them yourself in Google Earth (or some other tool) so you can export them as GPX/KML and import them into a more generic mapping application, like BCN.
3. I think this is the same question as #2, but let me know if there's a nuance that I'm missing.
Have fun out there - like anything, the first few times you create routes/plans, they won't be perfect and it'll take longer than you'd like. Over time you'll get better and better at it! Cheers!
Thanks!
I'll download the BCN Pro for sure and start learning how to use it.
A couple more questions I have though.
1) Does BNC Pro show a lot of Topo24k details like old mines and such?
2) Can satellite imagery be downloaded to BNC Pro as well and with the ability
to toggle between satellite imagery and topo24k as I'm navigating backcountry?
Thanks again, appreciate it. I plan on using it for planning routes/navigating back desert roads/trails and such.
For both of your questions - there are *many* different maps you can download for BCN Pro (and BCN XE, then next version of the app). They do include older Topo Maps and satelite imagery. Just remember, downloading those for offline use will require quite a lot of storage (and time to download) so make sure you plan ahead and have plenty of space on your device.
Okay and thanks again!
So far working out pretty good! I just have to practice with it to become proficient at it. I was wondering if there's a way to get Backcountry Navigator to be able to give directions/Navigate to the starting point of a route? Or at least Navigate you to a point that either Google Earth or Backcountry Navigator recognizes that's closet to the starting point of a off road route?
Thanks
Glad to hear it's working out Matt!
I'm not sure about having BCN navigate/generate directions for you. Certainly you'd need to be online (so it wouldn't work if you didn't have connectivity), but I personally haven't used that functionality.
Do let me know if you figure it out though!