June 12, 2018.
Route planning for an offroad adventure can be daunting to say the least. Just finding a geographical area to explore is often time consuming, and that doesn't even take into account the time spent figuring out the cool things to visit in that area and how exactly to get to those things (i.e. the actual route). Oh, and then there's navigating that route when you're out in the wild - often without any type of internet connectivity.
Because of this, two of the most common questions I see on the interwebs are:
How do you plan your routes? Where to go and how far you'll make it each day. Where you'll camp, etc.
I'm headed to {some place}. Anyone have any suggestions of trails I should run, or totally awesome camp sites in the area?
Usually when these questions are asked, there are no meaningful answers in the rest of the thread - for good reasons:
- Most have no idea how to answer, because they are in the same boat.
- People who do know how to route plan, and who have discovered amazing routes don't necessarily want to share those routes with others. Well, not "others" so much as "everyone," which is what answering a question like that on the internet would be. If the route were shared with the internet, it would quickly get overrun, and no longer be the majestically beautiful place previously was.
- Route planning is complicated and time consuming. Explaining it is also complicated and time consuming. And frankly, it would just be too much work to constantly write up every time the question was asked.
So then, here's what I'm going to try to do: I'm going to try to give a sense of my personal route planning process. This isn't the only process (or set of tools) out there - everyone who has figured out route planning has their own process - but it's one that mostly works for me (so far). I'm going to do this by walking through planning part of an actual route that I've run. It's not going to be a complicated route, or a remote route (because I don't want to give those away to the internet), but it will have all the elements of any route one would create.
Hopefully it's helpful. If it's not, well - I definitely encourage you to figure out a route planning process that works for you!
What are we going to cover?
There's a ton to cover in route planning, so I'm going to break the topic into two posts (each of which will be too long themselves)! In them, I'll cover:
- Planning and building a route
- Where to go and an initial list of what to see (points of interest)
- Building a route using Google Earth to create tracks
- Adding route detail, iterating on the route and points of interest
- Planning distances and camp sites
- Using the route on your adventure
- Setting up a tablet for navigation
- Exporting a route to the tablet for in-vehicle use
- Prepping the tablet for offline use when you're on the trail
So let's get started.
Planning and building a route
Before we get started actually planning and building a route, let me state right up front that planning is tedious and time consuming. If you've ever painted a house, then you know that prepping for paint takes 75% of the time. That's the same with an adventure - the route planning can take longer than the trip itself (at least for me). The nice thing is that it happens in the comfort of your own home, allowing you to take breaks, get distracted, etc.!
Where to go and an initial list of what to see (points of interest)
The first step in planning a route is deciding on the general area you want to visit, and the type of trip you want to have - i.e. are you looking for something that's on mostly paved roads, gravel, or unmaintained dirt? Do you want to camp in campgrounds with bathrooms, or are you looking for a secluded spot with a private view? These things are often but not always intertwined - if you're looking for something "more civilized" then you want to look at state or national parks, and you're generally looking at "more mainstream attractions" in those types of places. On the other hand, if you want dirt roads and solitude, that can inform the fact that you should be looking away from national parks, or at least away from their main attractions.
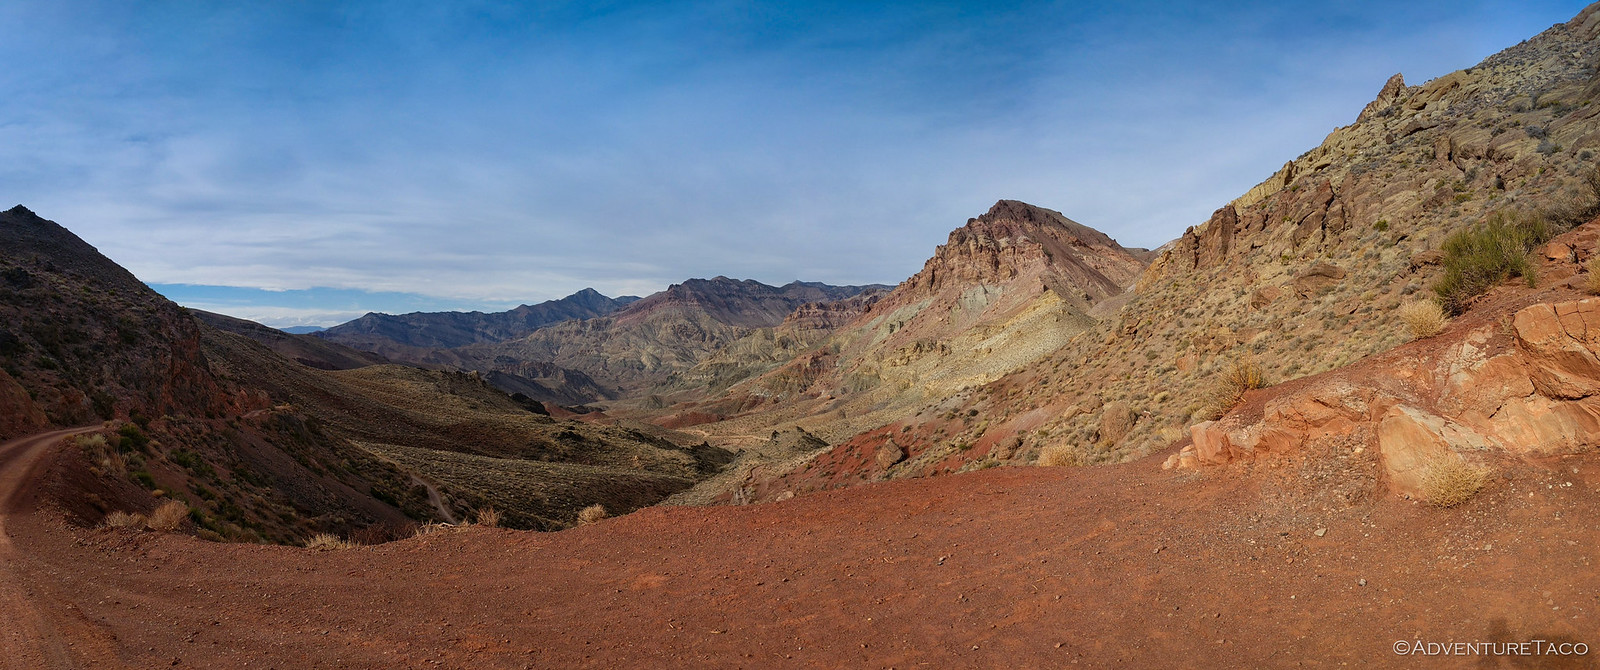
As I mentioned previously, to make this more real I'm going to plan part of an actual route throughout this post. I think a great general area to plan that route would be Death Valley National Park. It's a great option because it's a relatively well known place (so I'm not giving away any secrets) while still having many points of interest (with varying remoteness) to explore.
So now we have our general area: Death Valley.
The next step in route planning is to find some points of interest for your trip (places to go, things to see). There are two main resources that I take advantage of at this point:
- The internet via search engines
- People I know who have gone to the general area
#2 should be pretty obvious, so I'll touch on it only briefly. If you have friends who have been to - people you physically talk to or correspond with 1:1 (i.e. not "friends on the internet in some forum or on facebook") - then ask them what they recommend seeing. Just get a list of points of interest from them. You can then search for those things online to get more details.
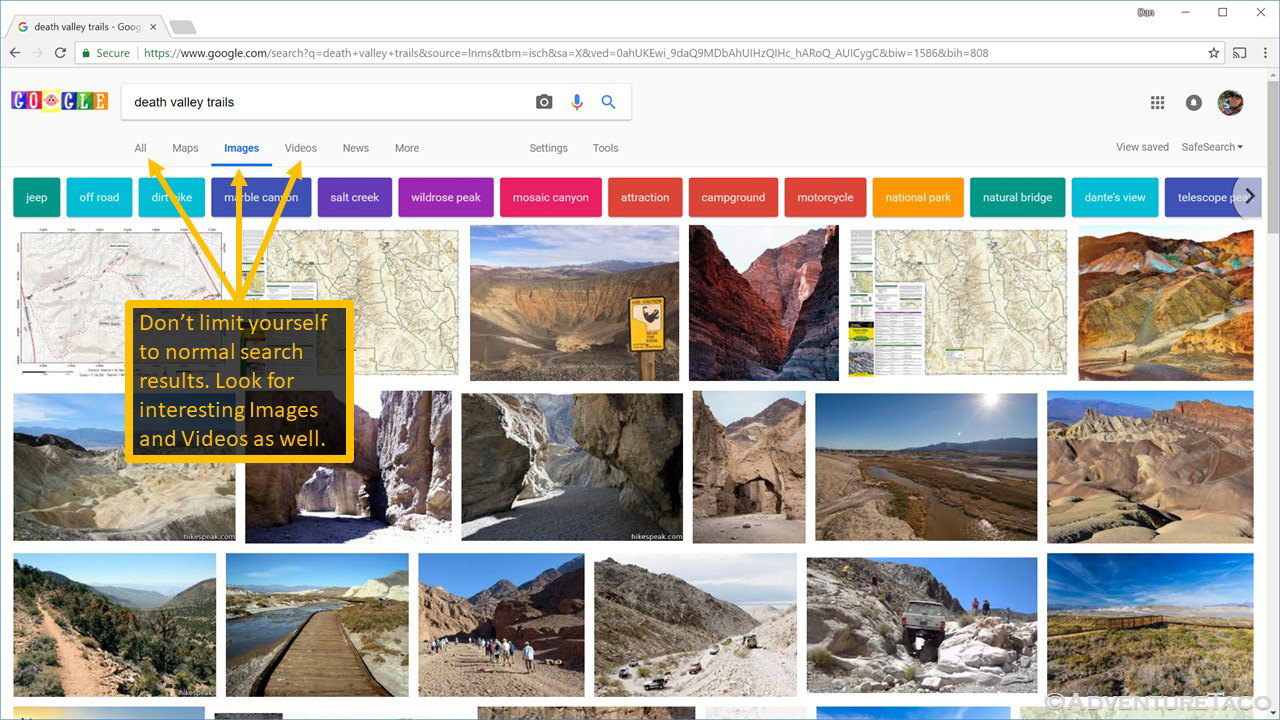
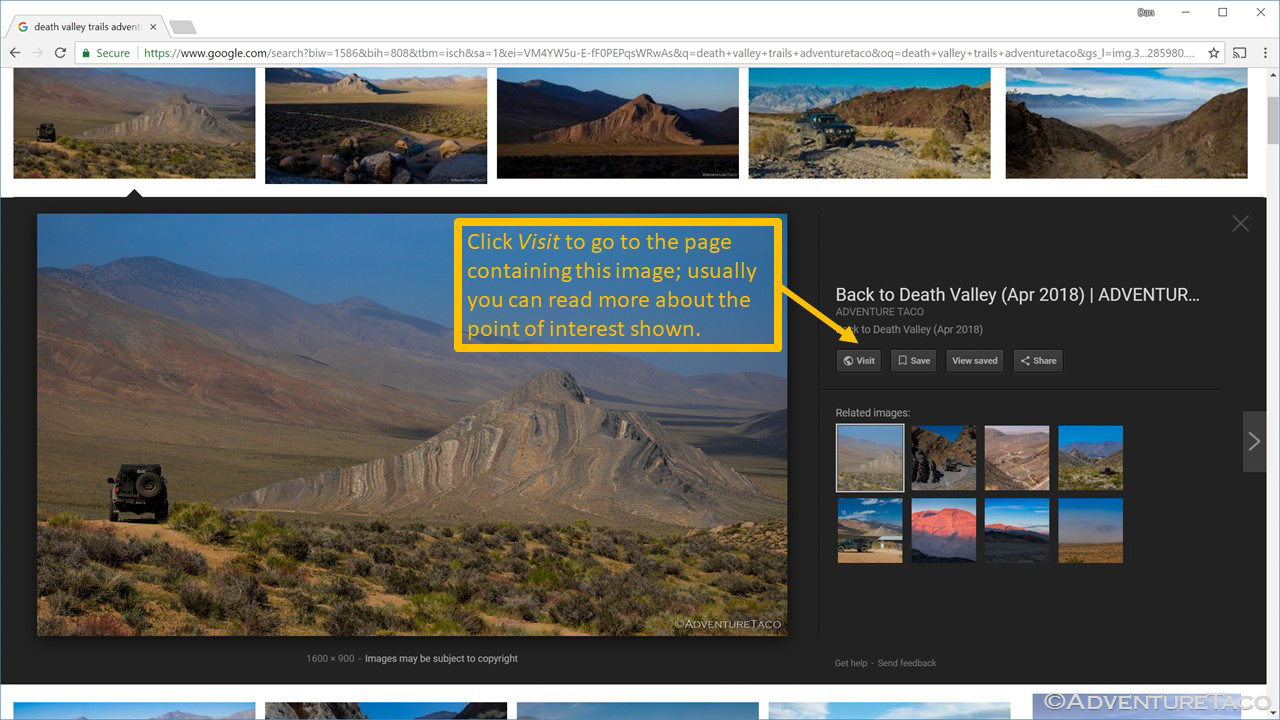
For #1, start by searching for generic terms about the place you want to visit - "Death Valley" and maybe "Death Valley trails" in this case. From there, click on links that peak your interest. Perform additional searches for those interesting items, and don't just limit yourself to "normal" search results. Look at "image" and "video" search results as well - if you click on an image, Google will show you more info about the image, including the page that contains that image. Clicking through to that page can get you more information about a place you may want to go.
There are several types of results you are looking for when you're searching. In the order of most-to-least valuable (usually):
- GPS tracks for a route you're interested in - sometimes you'll "get lucky" and find an actual track, or a web site with a bunch/set of tracks.
- A trip report - a blog, photo journal, etc. from someone who's to the same place before, and written about it, ideally with landmarks you can follow on a map.
- Names of places - just a name or photo that you can us to search for more information, or look for on a map.
As you find interesting places, catalog and bookmark them; you'll come back to those bookmarks when you're done - and if they are well categorized, you may come back to them for years to come. Spend as much time as you need, over several days until you've built up a bunch of bookmarks.
For Death Valley, with a bit of searching, let's say that we came up with the following list of bookmarks for places we wanted to see:
- Teakettle Junction
- Ubehebe Crater
- The Racetrack
- Titus Canyon
- Goler Wash
- Eureka Dunes
- Saline Valley
- Badwater Basin
but, as anyone who has visited Death Valley will know, while the places above are all technically in Death Valley, they are quite a long distance apart - you'd likely need more than a week to visit them comfortably.
Building a route using Google Earth to create tracks
So, the next step is to create a set of routes that will get us to the places we've gathered, so we can see how they relate to each other spatially (on a map), and which ones we can visit over the course of a trip. There are many ways to do this, but the tool I use is Google Earth - mostly because it's got a good set of maps (being Google), and because I figure it will be around for a while (again, Google).
I should note that Google Earth can be a bit daunting the first several times you use it, but if you master a few of the basics, it's not that bad (and you can learn more over time). For the purpose of this post, I'll walk through creation of just one route; obviously you could create the others in exactly the same way.
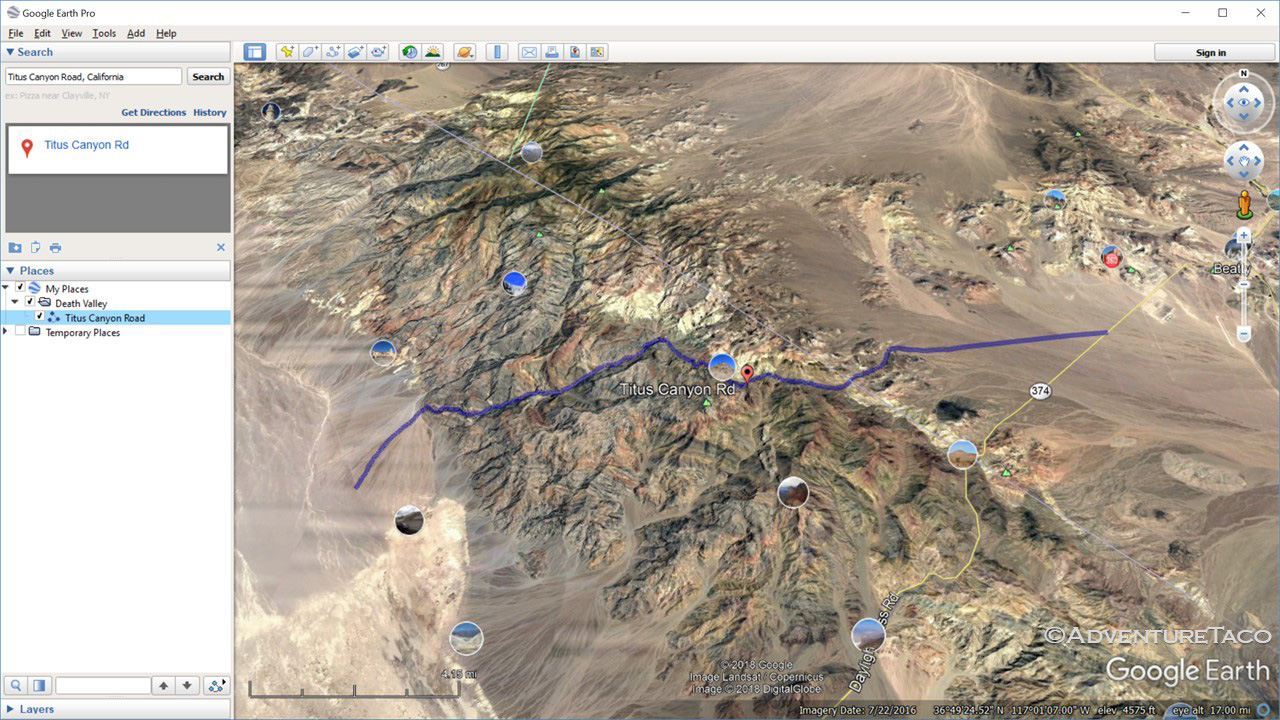
Since it's so beautiful and since it's "on the way into Death Valley," the route I'll cover here is Titus Canyon.
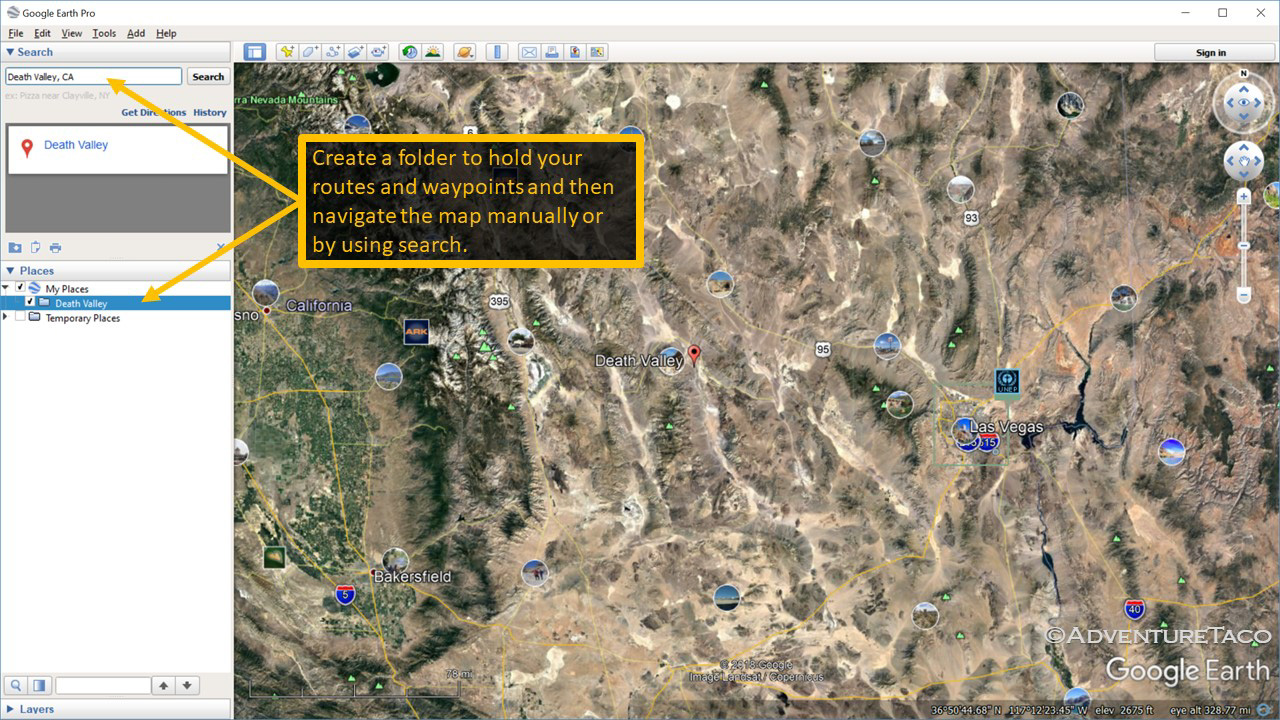
- Start by opening Google Earth; then right-click on My Places and choose Add > Folder. Name the folder Death Valley.
- Next, navigate the map to Death Valley by typing Death Valley, CA into the Search box.
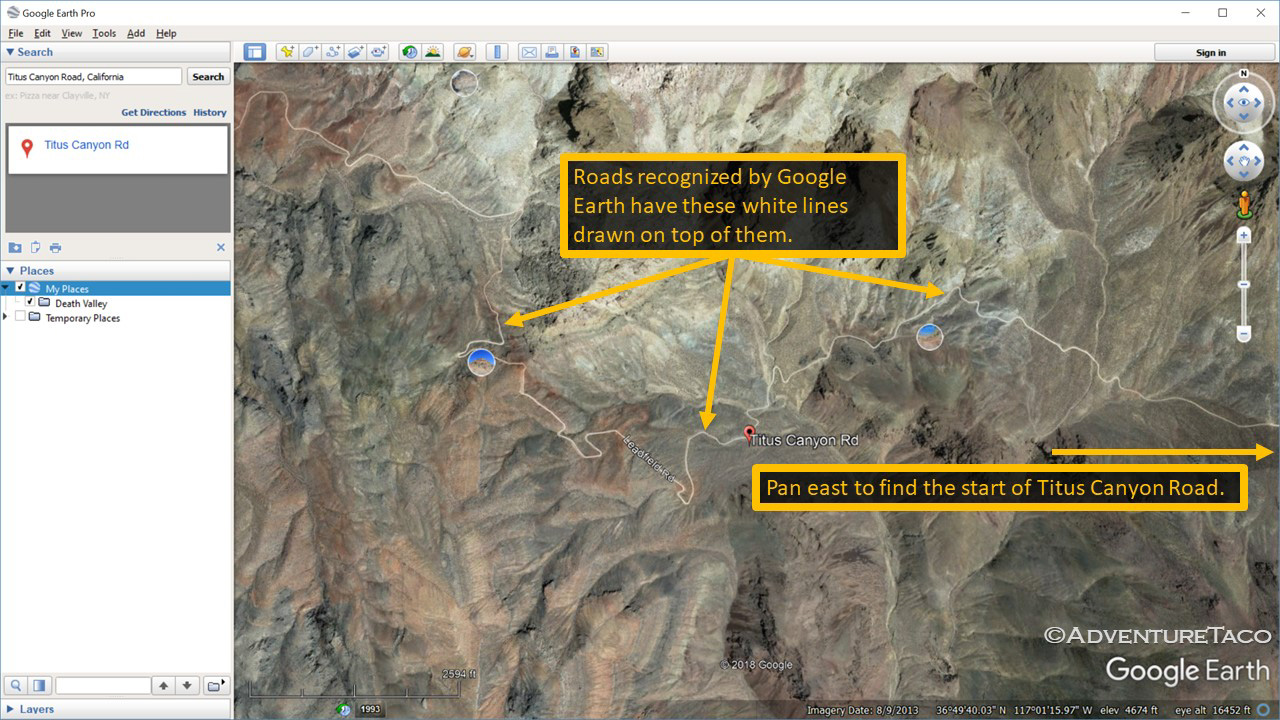
- Next, in the Search box, enter Titus Canyon Road, and let Google Earth zoom in on the road for you. You can see that Google Earth recognizes the road because a white line is shown "over" the road.
- Using your mouse, pan the map view to the beginning of Titus Canyon Road (to the east) until you hit the first major road it crosses (Hwy 374).
At this point, it's time to start creating a track. First I'm going to walk through manual track creation using the Path tool, since it will "always" work regardless of Google's knowledge of the road; then I'll show you a shortcut that will work when Google Earth knows about a road (i.e. a white line is shown "over" the road).
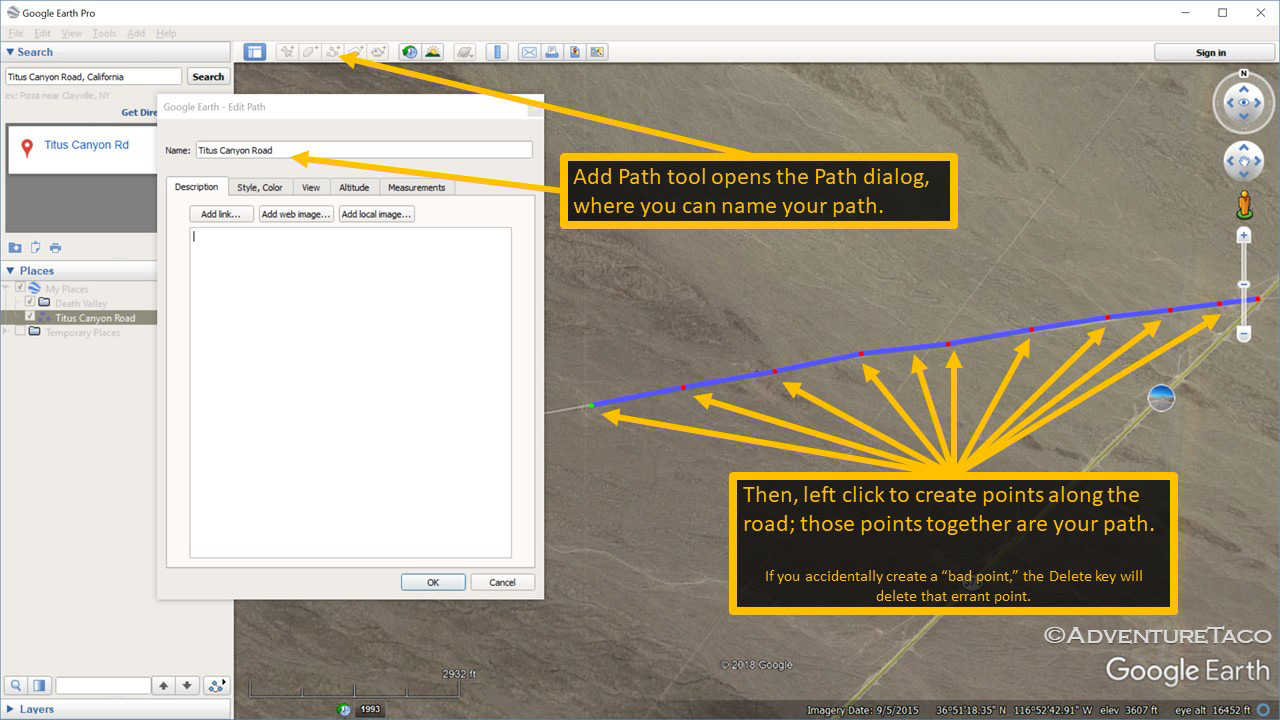
- With the starting point of your track in view, click on the Add Path tool in the toolbar.
- In the New Path dialog that opens, name your path Titus Canyon Road, but don't close the dialog.
Note: Whenever the Path dialog is open, any clicks on the map will add to the path, so be careful! At this point, use the keyboard arrow keys to pan the map (vs. using the mouse). - Left click the mouse at the intersection of Titus Canyon Road and Hwy 374, to create a point. Then, left click again (and again) to the west along Titus Canyon road, creating a path. When you run out of room in the view, using the arrow keys on the keyboard to pan west. Continue this process until you reach the end of Titus Canyon Road, in Death Valley.
Note: This will take a while, and takes patience. That's part of why it's hard to find good tracks, and why people don't often share tracks with others.
When you're done, you can zoom out a bit, and your track will look similar to this:
As I mentioned above, there is a quicker way to do this for roads that Google Earth "knows" about. Instead of manually creating a path, Google Earth will do it for you, if you give it a start point and end point. Let's give it a try.
- Uncheck the Titus Canyon Road track you already created to hide it from view.
- Find the beginning of Titus Canyon road (intersection with Hwy 374) and click on the Add Placemark button on the toolbar.
- A placemark dialog will be shown, and a placemark icon will be added to the center of the view. In the dialog, name the placemark Start and then leave the dialog open; drag the placemark icon to the beginning of Titus Canyon Road; then close the dialog.
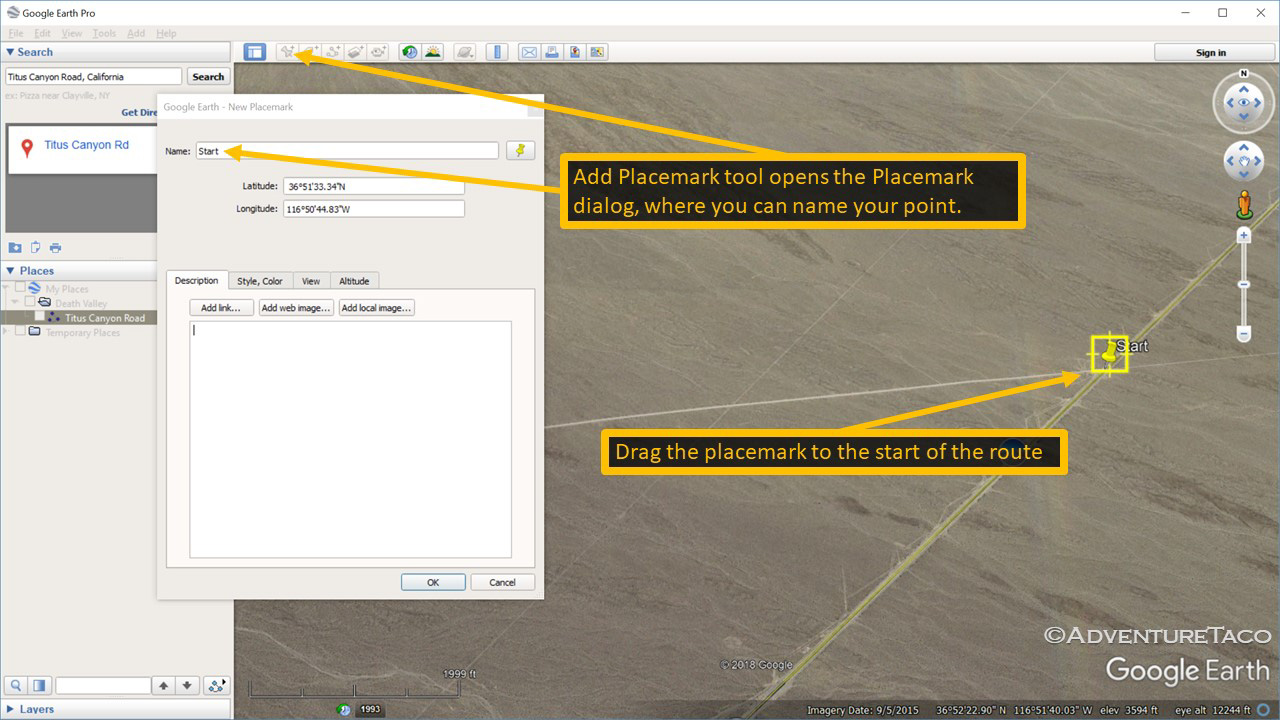
- Create another placemark named End, at the very end of Titus Canyon Road, in Death Valley, so you have two placemarks.
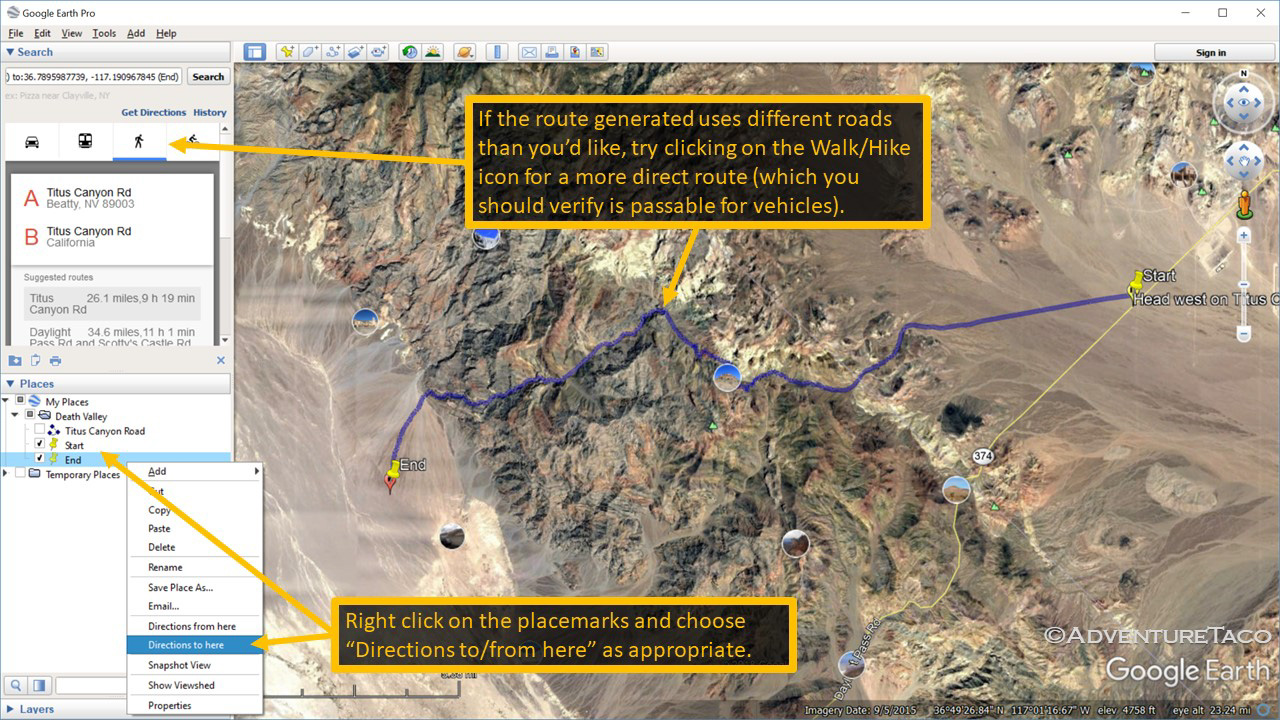
- Right click on the Start placemark in the Places pane, and choose Directions from here in the context menu.
- Immediately right click on the End placemark in the Places pane, and choose Directions to here in the context menu.
- Google Earth will determine a route from one placemark to the other, and draw it on the map.
Note 1: In some cases (like this one), Google Earth will draw a path that uses "main roads" rather than the dirt path you're likely after. In this case, click on the Walk/Hike icon in the Search pane, to see if there are alternate paths.
Note 2: In some cases, you may never get the route you want. In those cases, create placemarks along the route, and get directions from/to those intermediate placemarks. You'll end up with several paths, but that's fine - it'll look like one track on your GPS.
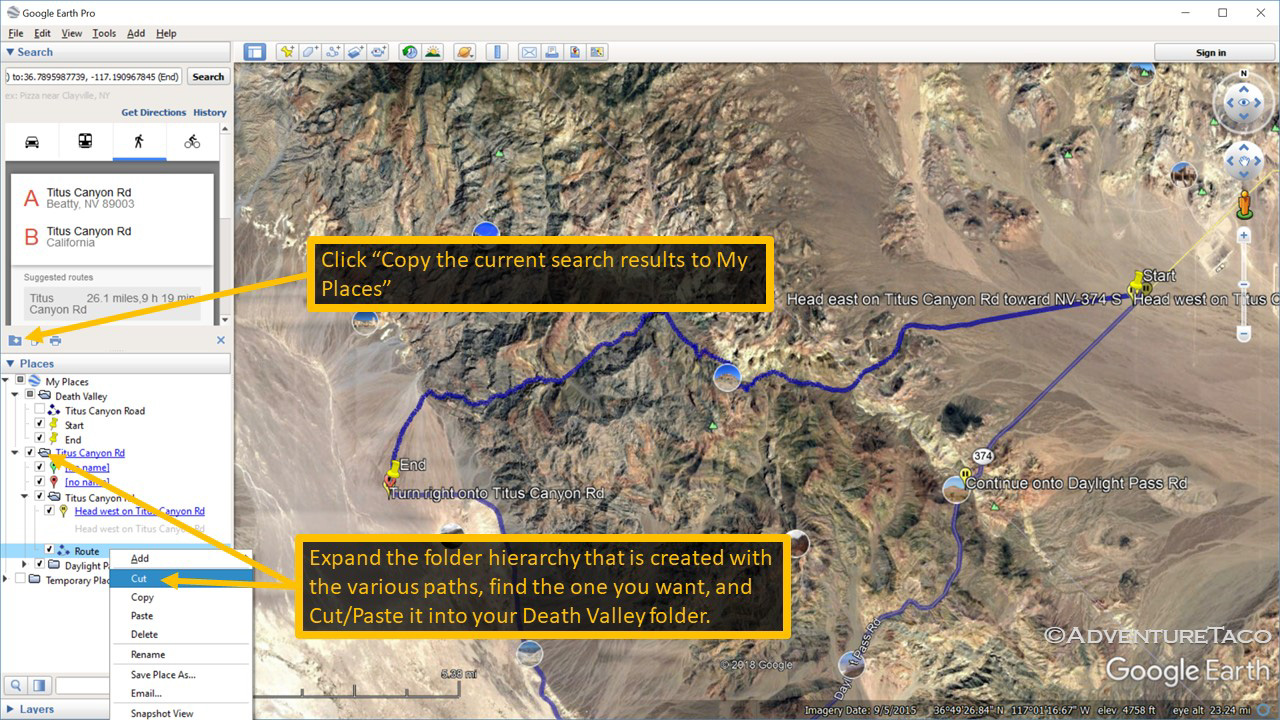
- To save the generated path, click the Copy the current search results to My Places button at the bottom of the Search pane.
- Scroll to the bottom of the Places pane and find the folder that contains the route that was created.
- Expand the folder until you find the path named Route.
- Right click on Route and choose Cut
- Right click on the My Places > Death Valley folder, and choose Paste.
- At the bottom of the Places pane, delete the folder that was created for the route (to delete extraneous waypoints and other routes).
- Delete the Start and End placemarks you created earlier to generate the route.
You've now successfully created a path much more quickly than manually clicking each point along the path. Not that it was easy, but it was easier.
With the path created, it may seem like we're done - but we're far from it. It's now time to iterate on the path and add route detail.
Adding route detail, iterating on the route and points of interest
What does it mean to add detail and points of interest? For me it means:
- Finding any interesting points of interest along the route and marking them, so I don't miss them when driving the route.
- Doing more research about the route (online and in books from the library) to add interesting points.
- Marking any fuel locations along the route, so I know where I can fill up.
Let's tackle these one at a time. First, finding interesting points along the route.
- In Google Earth, zoom in along the route looking for points of interest. You can find these by looking at the terrain for lakes, mountain peaks, etc., as well as looking for photos left by previous visitors. Also, look for places that look like they would be good to camp (dead end roads with a clearing, etc.)!
- For any of these that you think are worth noting, create a placemark along the route at that location, using the Add Placemark button. Make sure to give it a good name (and description).
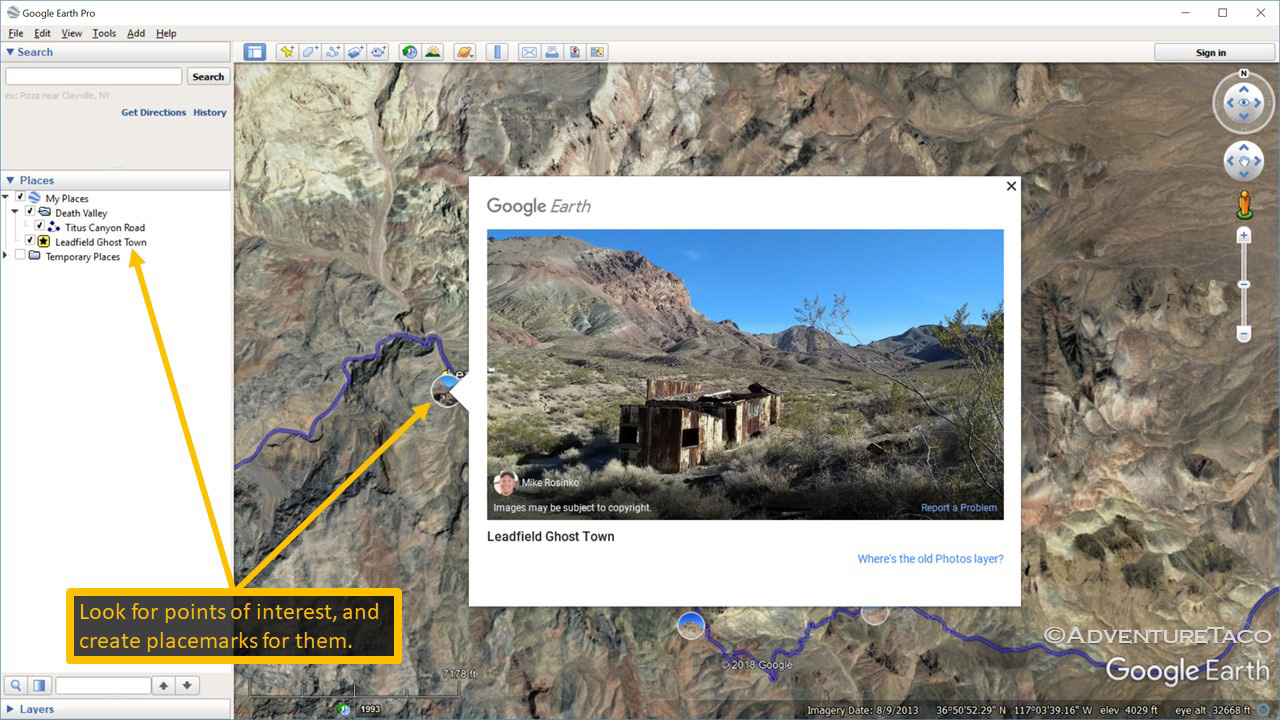
- For Titus Canyon Road, using only Google Earth, I'd likely create placemarks for:
- Leadfield Ghost Town
- Red Pass
- Thimble Peak
- Nevada/California border
- No Camping (this just isn't the right place to camp)
Next, it's time to do more research (using the internet and old books at the library). It's amazing what you can find in books about a location - ghost towns, amazing vistas, and mines just to name a few. These are all things that are often hard to spot on satellite imagery (at least, in a way that you know what they are), but that when called out in a book are cool to visit.
In the case of Titus Canyon Road, there is a ghost town worth adding that I found in a library book: Ryolite.
- Add a placemark for Rhyolite to the map, and also add a path to get there (likely before you get to Titus Canyon Road, on your way from Beatty).
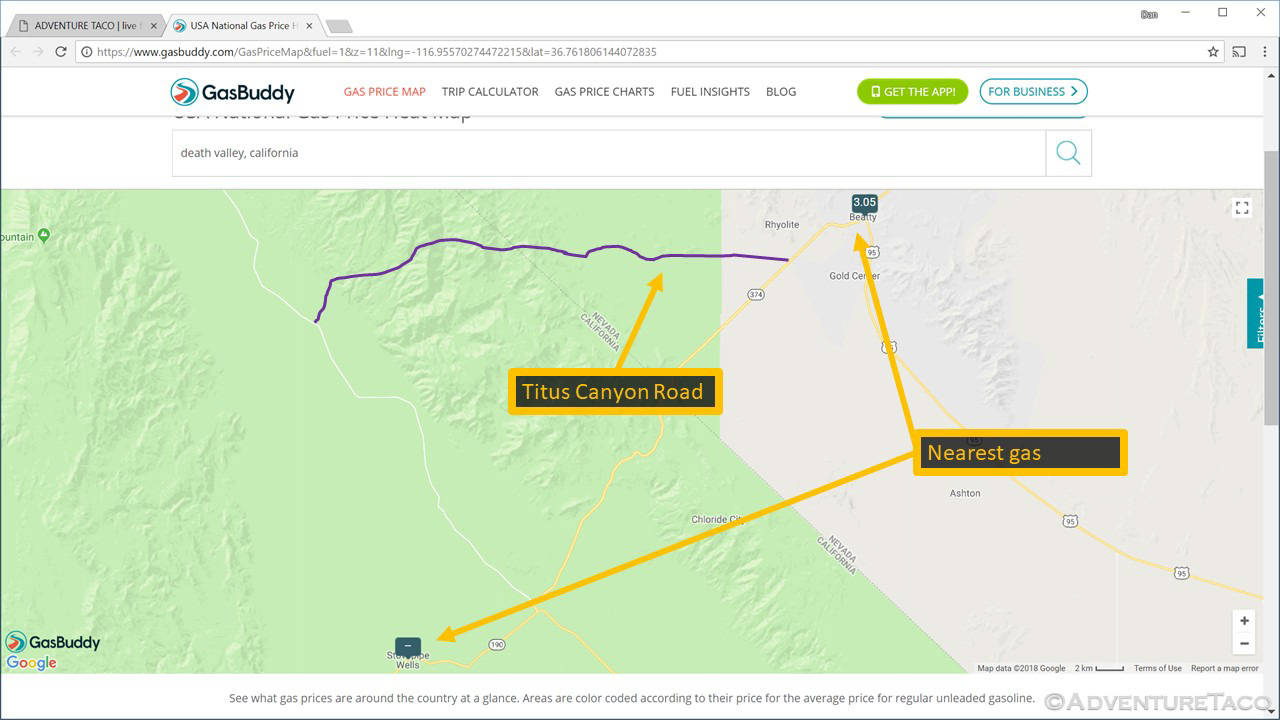
Lastly, it's time to add fuel placemarks. Generally I like to fill up with fuel whenever I pass a station and I've got 3/4 or less of a tank. That said, it's always nice to know where fuel is, so if you do start running low, you can make a run for the station.
- Using your favorite web browser, go to gasbuddy.com
- Search for Death Valley, California, and then when the results are shown, click on the Map button.
- Scroll around until you find Titus Canyon Road, and you'll notice that towns with gas are called out on the map. In this case, the closest gas is available in:
- Beatty, NV
- Stovepipe Wells, CA
- Furnace Creek, CA
- Create placemarks in Google Earth named Fuel for each of these locations.

We're getting close. Once you've created all of your routes, and iterated on those routes to add points of interest, one of the last things you'll want to do is to add possible camp sites along the route - or at least get a sense of where you will want to start looking for camp sites as you drive the route.
Planning distances and camp sites
There are a few strategies I'd recommend when it comes to planning possible camp sites and distances for a trip.
First - I highly recommend planning camp sites when planning routes - that is, many routes have one or more amazing views/points of interest along their length. If you can camp at or near that location, it will make camp much more enjoyable, since you'll have something awesome to look at in the evening and morning. Of course, sometimes this means you'll stop "early" in the day (or at least earlier than you might need to stop). That's OK. The point of one of these adventures is to enjoy the adventure - so don't turn it into a race to finish.
Second - I highly recommend being flexible when you are looking for a camp site - if you've planned a specific spot, but it's clear that you aren't going to make it to that spot before dark, or if someone else is already in the spot when you get there, just keep driving your route and look for spurs off of the route that could work for camp. Investigate some. You'll almost always find something within just a few tries. It might not have the view you were expecting, but it'll be great. And maybe it will have an epic view you never expected.
Third - when it comes to planning distances, there's no clear-cut, always-applies rule for how far you'll make it each day. But here's a rule of thumb that sort of seems to work, and can help you look along your route to see if possible camp sites you've marked are approximately the right distance apart (i.e. will you be able to make it to the next site each day).
- Mostly paved roads, and some graded gravel - if you're travelling on the equivalent of mostly paved roads, plan on travelling up to 300 miles per day.
- Mostly dirt roads, with varying level of maintenance - if you're travelling on dirt roads that are require mostly 2WD but where you may have to engage 4WD every now and then (but very rarely 4Lo), where some of the roads aren't well maintained, and/or where there are gates you need to pass through, plan on travelling around 100 miles per day, or maybe 150 miles at the extreme.
- All dirt, with little to no maintenance - if you're really in the wild, on roads that are unmaintained and require 4WD at most times and 4Lo on a regular basis, congrats - you've found a special spot. Plan on travelling between 20-50 miles a day.
Of course time of year, weather conditions, road conditions, stopping to enjoy the views, and many other factors can affect these estimates. No matter what, remember strategy #2 - be flexible. As evening is nearing, look for a spot wherever you currently are - it's much nicer to find, set up camp, and make dinner in daylight than drive into the night and miss the sights along the way.
Saving your work
Once you've added your routes, iterated on them and various points of interest, and thought about where you might camp... it's finally time to save your work. Actually, you should be saving as you go, since Google Earth has a tendency to crash (at least on my computer), but if you haven't saved to this point, make sure to do it now!
- Right click on the Death Valley folder you created, and choose Save Place As...
- Save the file as Death Valley.kmz to the location of your choosing.
- - - - -
Whew, that was a lot to cover. Next time, we'll pick up with part 2 - how to move the route to a tablet and actually using it on your adventure! If you've got questions, feel free to add them below the post and I'll try to address them as quickly as possible.
I just re-discovered the viewshed feature on Google Earth. Planning on exploring this further to see if it aligns with line of sight propagation for VHF / UHF -- just wanted to put that out there for all the other overlanding hams out there. Recently had some issues hitting repeaters in parts of Death Valley that I was trying to understand better after the fact.
-N
I've never known about that feature, that's pretty cool! Thanks for sharing!