
September 26, 2021.
For the last few months, my steering rack has had a slow leak. I first noticed it when we were exploring New Mexico on the New Mexico Backcountry Discovery Route (NMBDR), but it hasn't taken much to keep it topped off so I mostly ignored it, except for buying a new steering rack and letting it sit in the box.
This is the story of my replacement. I'll gloss over a lot of details, and share the nuances of my install. Think of it as entertainment, really. If you're looking for how to do it, I've written a guide for that. It's got all the little details for you to do the job yourself:
Step-by-Step:
Replacing the Steering Rack on a 1st Gen Tacoma
(or 3rd Gen 4Runner)
As I mentioned, my first order of business - several months before I tackled the project - was to pick up a new Genuine OEM Power Steering Rack (44250-35042). I could have gone with an aftermarket rack and saved quite a bit of money but I've heard tons of horror stories about that - how quickly the aftermarket racks fail - so decided against it. Plus, the original lasted 22 years and nearly 200K miles.

After a quick little trip with my Dad to explore the areas affected by the 2020 Creek, and 2021 Dixie Fires in California, I'd discovered that my rear axle housing had split, and that just added to the list of maintenance items I had in the backlog for the Tacoma:
- replace the steering rack
- rebuild the shocks (all four)
- replace the timing belt and water pump
- replace all the diff/transfer case/transmission fluids
- replace or repair the rear axle housing
Whew.
Starting to feel a bit overwhelmed, I figured I had better get on it, so on a Sunday that looked like it was about to rain outside, I made one of my not-so-better choices and decided this was the day for the rack. Actually, first I looked at the weather report - it was noon, and the rain was supposed to start at 4:00pm, so I figured I had plenty of time to loosen a few bolts and tighten them again.
I got started - as usual - by jacking up the truck after removing the wheels and skid plate. Fifteen minutes in, things were going swimmingly.

The next order of business was to remove the rack, and the first step in that was disconnecting the OTREs. This is where I came up with a fabulous idea to make reinstallation of the OTREs easier - I could hit them with a quick spray of paint and have a perfect mark that would indicate positioning when I threaded them into the new rack.

Progress continued steadily, and it was something like 1:00pm - only an hour into my 4-hour window - when I was ready to disconnect the rag joint. That's the joint that connect the steering rack to the steering wheel, and everything I'd heard suggested that this was a very important step. It was important because once the two are disconnected, they can quickly get "out of sync," such that when you install the new rack, the steering wheel might be all wonky (turned 90 degrees or something).

In the end, I think that everything I'd heard was actually not quite right, and the "right" way to replace the rack makes the removal - and alignment - of the rag joint immaterial at this point. That is, as long as you don't go spinning the steering wheel once you've removed the rack.
Anyway, I got the rag joint disconnected, and then it was time to disconnect the power steering lines. These didn't make me nervous, but I knew they were going to be messy. In fact, I'd prepped a couple of rubber plugs to shove into the lines once I disconnected them, to try to keep as much of the fluid in the lines as possible.


Having done the project, I can say with full authority that plugging the lines is not only a waste of time, it actually makes the job harder. This became obvious to me during installation of the new rack, when it is much easier to work with lines that are fluid-free. As such, rather than plugging the lines, I'd recommend letting them drain completely while you eat a tasty snack. You'll thank yourself when you aren't getting power steering fluid all over your new rack - and yourself - a second time!
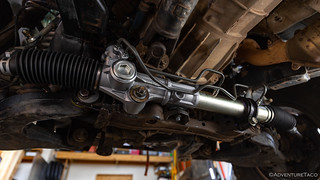
With the lines disconnected, the rack was ready to come out, and I proudly beamed at the old and new racks sitting on the workbench. It was 1:45pm.

The problem, however, was that as I was basking in my glow of success, I heard the first raindrops hit the ground outside. I figured they'd stop in a moment or two - after all, it was more than two hours before the rain was supposed to start - but no, they actually got larger and more frequent. Soon, it was a downpour.
And of course, with now steering rack, the Tacoma wasn't getting pushed into the garage for a drier day. 
So, I did what anyone would do - I solicited the help of @mrs.turbodb and we setup the beach awning that she'd gotten for a trip with her Dad earlier in the year. It seemed pretty great - and plenty large - as we deployed it, but as soon as we maneuvered it over the Tacoma, I knew I was still totally screwed.

You see, the awning wasn't quite big enough to push the water that cascaded off of the sides to a place where it would drain away. In fact, our driveway is slightly lower in the center, so the water would hit the ground and simply pool under the truck. You know, right where I was working to replace the rack. Fun times.
Still, I soldiered on. Stupid soldiered is perhaps a better term, all of my clothes soaking wet by the time I was done, just before 4:00pm. That's right, just before the rain was supposed to start.
Of course, it turned out that I wasn't really done. I'd gone to a lot of work to keep the steering wheel from moving when I was replacing the rack, and had similarly been quite careful to keep the rack from moving at all with respect to how it came from Toyota. Naturally, this resulted in a steering wheel that was turned 90 degrees to the right when the Tacoma was driving straight ahead.*
* I should note that the actual alignment of the wheels was quite good when the steering wheel was turned 90 degrees, which meant that my OTRE spray paint trick had worked fabulously in keeping the rest of the system adjusted.
I didn't realize it was a problem at the time, so took the truck in for an alignment. It was only after the alignment shop spent nearly three hours getting my truck onto the lift - while I patiently waited outside - that they notified me that there was no way they were going to be able to align it with the rack so out of whack.
So, back home I went, thinking the entire time - how am I going to get this aligned correctly? I realized the correct method about 5 minutes from home, and withing half an hour, I had everything apart, and was correctly aligning the rag joint on the steering rack. It was simple really - rather than try to align the two halves of the rag joint, the key was to assemble them first, and then slip the entire joint onto the (centered) rack when the steering wheel was also centered.
I did, and everything was perfect. Finally. Which I was due for, really, having done the job twice, and once in the rain!

For more pics of the process, now that you know the story, feel free to check out the guide!


I attempted this job over the weekend and royally screwed myself. I cross threaded the larger nut of the two power steering lines and now I cant find it anywhere online. Do you happen to know the part number for it?
Dang man, that sucks, sorry to hear it!
Some not great news on that front if the larger nut is the one you cross-threaded. The PS lines run directly from the PS pump to the rack, and are sold as a single unit Toyota OEM Power Steering Pressure Feed Tube Assembly Line Kit (44410-04030), for $700. Luckily, you can get an aftermarket line kit for a still-omg-but-much-less-expensive price of $175.
Depending on the situation with the other smaller nut - which is not included in the line kit for some reason - you can pick up as Toyota OEM Power Steering Return Tube (44416-04020).
Those parts should work for both 1st gen Tacomas (96-04) and 3rd gen 4Runners (96-02) with the v6 5VZFE engine.
Hope that helps!
I found this on eBay. It appears to be just the section that I need. Thoughts?
https://www.ebay.com/itm/125893694904?mkevt=1&mkpid=0&emsid=e11401.m144671.l197928&mkcid=7&ch=osgood&euid=8a05873d342a4d00890a05e25d56785d&bu=45433393331&osub=-1%7E1&crd=20251027204109&segname=11401
I saw that as well, and several other options that came up when I searched for the OEM part number.
The reason I didn't include that was because it was
For me, that would probably be enough to go with amazon, just to make sure I got something that worked the first time, rather than wondering/hasseling on eBay.