While I believe the saying, "They don't make them like they used to," generally does apply to a 1st gen Tacoma, it most definitely does not apply to the sound deadening of these old trucks. Nearly any vehicle you get today will have better sound deadening than a 20-year old truck and after thousands of freeway miles, I decided it was finally time for some peace and quiet in the cab.
Or at least, that was the plan. Oh, and while I'm definitely no audiophile, I figured I might as well put in some new speakers while I was at it.
Before we get started... this turned out to be quite long - so I've broken it into two parts. Read it all, or only the part you're interested in, and enjoy!
Options
It turns out that there are lots of different opinions out there on sound deadening. I did a medium amount of research before deciding on an option, ultimately basing my decision on a few factors: recommendations from friends, cost, and online reviews/research. I won't list all the pros and cons of each option I looked at here, but I think there are really three leading contenders when it comes down to it. If you're going to sound deaden, you'll probably be happy with any of these three:
- Dynamat Xtreme and Dyaliner
- SecondSkin Damplifier Pro and OverKill Closed Cell Foam
- RAAMmat BXT II and Ensolite IUO Closed Cell Foam
Update (Jan 2021) - unfortunately, the good folks at RAAMmat have gone out of business. Just too much work, and the complications of a global pandemic.
The other two options are now your best bet as far as materials go. They both work well, but are just more expensive.
Update (Sep 2021) I've heard from multiple folks that KILMAT does a reasonable job at sound deadening. Seems that it's likely not as good as Dynamat or Second Skin, but costs significantly less, and so is a reasonable compromise if you're looking for a cheaper solution.
And, for a budget solution, with less performance, Noico seems like an "acceptable" alternative.
Oh, and of course, you need to know how much to get. That will vary a little bit on whether you have a standard, xtra, or double cab, and of course on which parts of the cab you're planning to cover - doors, rear quarter panel, rear wall, roof, and floor. I've put together this handy little table that should give you a sense of what you need for each of the options, and the approximate price as of June 2020.
| Sound deadening product line | "great" job on single cab or "pretty good" job on an xtracab |
"great" job on xtracab or double cab |
|---|---|---|
| Dynamat | Dynamat Xtreme - 1 kit @ 36sqft Dyaliner - 4 kits @ 12sqft ea ($350) |
Dynamat Xtreme - 2 kits @ 36sqft ea Dyaliner - 6 kits @ 12sqft ea ($602) |
| Second Skin | 2 door kit - 1 kit Damplifier Pro - 1 kit @ 20 sqft OverKill - 2 kits @ 9 sqft ea 3M Adhesive - 1 can ($451) |
Damplifier Pro - 2 kits @ 30 sqft ea OverKill - 7 kits @ 9 sqft ea 3M Adhesive - 3 cans ($765) |
| RAAMmat | RAAMmat BXT II - 37.5 sqft Ensolite Foam - 41.625 sqft sold as Package 1 ($179) |
RAAMmat BXT II - 56.25 sqft Ensolite Foam - 62.43 sqft sold as Package 2 ($279) |
| KILMAT | KILMAT 80 mil - 36 sqft Dyaliner - 4 kits @ 12sqft ea ($245) |
KILMAT 80 mil - 2 kits @ 36 sqft Dyaliner - 6 kits @ 12sqft ea ($396) |
| Budget | Siless Max 120 mil - 30 sqft 150 mil Foam - 1 kit @ 36 sqft and1 kit @18 sqft ($150) |
Siless Max 120 mil - 2 kits @ 30 sqft ea 150 mil Foam - 2 kits @ 36 sqft ea ($244) |
Pulling Together the Parts
Ultimately, I decided to go with RAAMAudio for my project. I'd probably made this decision even before I did all my research, based on the recommendation I'd gotten from friends about how well Package 1 worked for their 1st gen Tacoma. Ultimately, I wish I'd gotten Package 2, as I wanted to fully cover the roof and floor, as well as double up the RAAMmat BXT II in a few places, and there's not enough in Package 1 to do all of that.

I also purchased some speakers for my front doors, and rear quarter panels. I've listed these here for completeness, but I recommend you buy what suits your taste from Crutchfield, since they will come with any necessary adapters, etc.
- Front doors - JBL Concert Series 521 5-1/4" Speakers with Metra 82-8140 Speaker Adapter (for 96-00 Toyota Tacoma)
- Rear quarter panels - Kicker CSC65 6-1/2"Speakers w/Woofers with Scosche SAC656 6.5-6.75” Speaker Adapters


Lastly, I ended up using a little bit of 3/8" split loom to house the interior door handle rods once the sound deadening material was installed, since without the loom, the rods would get stuck in the butyl rubber and cease to function. 
Tools
I didn't need much from a tools perspective. No special tools or anything for this job - just an assortment of screwdrivers and sockets.
Doing the Job - Removing the Interior
With all the parts in hand, and only a few basic tools gathered up at this point, I dug right in. There's nothing glamorous about the first part of this job - removing nearly everything out of the cab! On the one hand I know that sounds exciting; on the other...terrifying.

Mostly I was terrified that I'd break some clip, but I shut that thought out of my head and only broke two the entire job.
Start by removing the seats. This is done by popping off the plastic covers that clip over the rear anchor points, and then removing the four (4) 14mm bolts that secure each seat. Note: Make sure to disconnect any wires running to the seats prior to pulling them from the truck - in my case, only the seat belt sensor on the driver side.

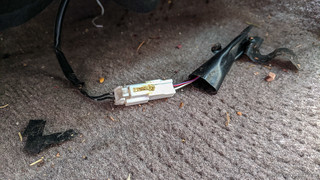
Disconnect the seat belt sensor on the driver side prior to seat removal.
Next, remove the center console. This is done by pushing in the center of the two small clips securing the front-most piece of console, at which point the clips should simply pull out. This piece can then be removed, unplugging the two 12v aux connectors as it is pulled away from the dash.

Six Philips screws and two 10mm bolts (inside the console compartment) secure the remaining pieces of the (MT) center console. Remove them all, as well as the knobs of the shift levers, and then remove all pieces of the center console.


With much more room to work, the next step is to remove the trim from the rear wall. Start at the top and pry off the plastic trim using a flat head screw driver with a bit of tape over the blade to protect the trim. Start prying at one end and work your way to the other; there are five metal and two plastic clips that secure this piece of trim. Note: I find that these often pop off of the plastic trim piece and remain in the slots that secure the trim to the cab. If they do, just use some pliers to retrieve them and re-attach them to the trim.
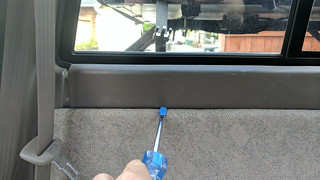
With the upper rear trim out out of the way, use a 12mm socket to remove the bolts securing the rear seat padding. Then, it'll lift right out.

Next, remove the rear seat belt clips that are secured to the lower rear plastic trim. Simply lift up the rubber covers to expose the 14mm bolts, and remove them.
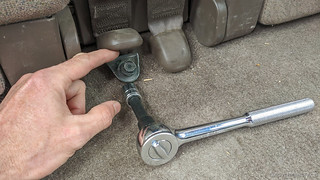
The lower rear plastic trim is held in place with a dozen or so plastic clips. I've always been successful in getting these out in one piece, but if you break any, the part number to replace them is 67771-04040.

Next, remove the quarter panel trim. To start that process, remove the clothes-hanger hook at the top of the quarter panel by removing the Philips screw that secures it. Then, pop off the cover for the Xtra cab window and remove the two Philips screws that secure it to the body.

Then, pop open the covers for the upper anchors of the seat belts and remove the 14mm bolts that secure each to their respective pillars and let them simply hang down - you will not remove them entirely at any point. Note that the cover for the front anchor pops off entirely, but the cover for the rear anchor simply hinges up.

Front seatbelt anchor with cover removed.
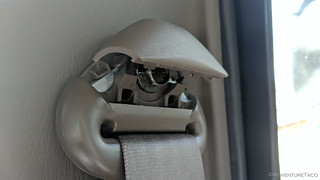
Rear seatbelt anchor with cover opened.
With all the bolts that secure the quarter panel now out of the way, remove the four Philips head screws in the door threshold and carefully pry it up. The rear-most bit of that threshold secure the bottom of the rear quarter panel, so once it is removed, you can carefully pry the quarter panel away from the body. Note that the quarter panel uses the same clips (67771-04040) as the rear trim and door trim, in case you happen to break one or want to have extras on hand.


Next we're going to work on loosening the headliner - because you don't want to go to all this trouble, only to leave the roof unattended. First, remove the two small clips at the back of the headliner - these simply pry out with judicious use of a slot screwdriver and your fingers.

Next, remove the dome light by popping off the clear cover to access the two Philips screws. Remove them, and unplug the connector that powers the dome light before setting it aside.
If you have a sunroof - as I do - now is also a good time to remove the two Philips screws that secure the plastic cover for the handle so that you can it off to expose two 12mm bolts that secure the handle to the roof. Remove the two bolts and let the handle hang down. Finally, pull off the edging that trims the opening.


Lastly, if you have "oh, shit" handles secured to the headliner, remove them by popping off the two plastic covers on either end with a small flat screwdriver, and then remove the two Philips (actually JIS, but Philips usually works) screws in order to remove the handle.
At this point the headliner won't come completely out of the truck, but you should be able to pull it down enough to gain access - from the sides - for the sound deadening work. Note: completely removing the headliner is a PITA because it entails removal of the A-pillar trim, which is quite fragile.
The final three elements to remove inside the cab are the front kick panel, storage compartment trim, and rug. The kick panel can be removed easily - simply pull it towards you and it will come out.

The storage compartment trim is removed by backing out what look like Philips screws, but are actually just plastic clips. The "screw" portion of these clips can be turned counter-clockwise while you push the pin from the bottom, and then remove the entire clip.

And then, starting from both the front and back of the cabin, carefully remove the carpet! Note: There are several clips along the door threshold that need to be removed in order to fully remove the carpet.
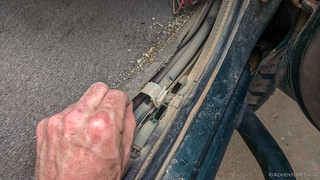
Remove these plastic clips prior to removing the carpet.
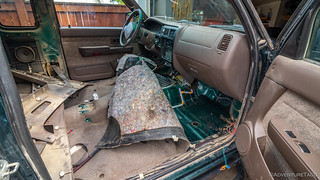

With the interior of the cabin removed, the final element to tackle in order to make access for sound deadening is the removal of the interior door panel. This is not difficult, but can be a bit finicky, so pay attention as you do this work. Note: there are many different door panels, so if you have a different panel than me, you'll need to research it's removal. It will be similar, but vary slightly from what I have here.
First, lower the window. This will be important later when removing the interior panel, at which point the ability to lower the window will be limited since the window lowering controls will be removed/unplugged.
Next, pop out the two plastic covers on the arm rest and remove the two Philips screws. Note that the arm rest will stay in place.

Remove the single Philips screw securing the interior door lever, then, carefully push the door lever forward to unclip it from the door.
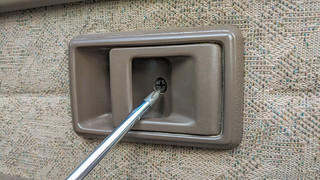

At this point, you can see that there is a small plastic clip that secures the door lever to the metal rod that connects it to the door latch. Carefully release the slip by prying it towards you, being careful to not break the clip. Once the metal rod is released, remove the interior door lever.


Remove the arm rest control panel by prying up from the front edge. Note that if you pry on the rear edge, you will break the rear clip. As you lift out the control panel, unplug any electronics that are connected to it - for power windows, door locks, and mirror adjustments.

Next, remove the small triangular trim piece near the side mirror by simply prying on it from the bottom to release the clips.
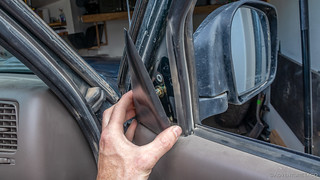
Depress the center of the clip at the upper-forward corner of the interior panel and remove the clip.

Finally, starting along the bottom edge, slowly pry the interior door panel away from the door. Once you find the location of a door clip, pry carefully on each side of the clip until it releases; then move on to the next clip. Eventually, all the clips will be released, and you can lift the panel up and over the door lock to remove it from the door.


"Never been off pavement." - Every Craigslist post, ever.
With the interior door panel removed, the final elements to remove are the speaker and plastic weather barrier. The speaker removes by disconnecting the plug and removing the five Philips screws. The weather barrier simply peels off.

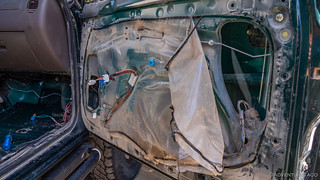
And that is the interior removed! It will be out for a while, so arrange it in an orderly fashion somewhere while you do the rest of the work. Good job me! (And you!)

All that's left now is a bit of cleanup and then actual application of the sound deadening material. Oh, and then putting everything back together again. And I'll address all of that in the next part of this story-turned-tutorial.


Wow this is awesome and very timely. Been seriously thinking about giving my 2000 4Runner the same treatment
Nice! Next post will detail the actual deadening 🙂 ?
I want to thank you for making this detailed write up! I've never stripped the interior trim & carpet from my 2003 Tacoma before, and after reading your tutorial it was almost like I knew what I was doing. Lots of little pcs and clips to keep track of - gotta to be patient!
FWIW, I ended up using the Amazon brand version of Dynamat. It was 80 mils thick and went on just fine with a heat gun. I ended up ditching the silly roller they tell you to buy and used the handle of a screwdriver like you did. It smushed it on much better! Now my truck rides more like a car - I'm not so irritated when I drive over bumps and I can hear the tunes better too. Thanks again!!
Awesome, glad the guide could be of assistance Monte! You don't have a link to the Amazon brand version of Dynamat that you used, do you? Now that RAAMmat is gone, I might add it to the list of options.
Here ya go - I guess it's not the Amazon 'brand' but their 'choice'
https://www.amazon.com/gp/product/B07ZKLKHN5/ref=ppx_yo_dt_b_asin_title_o09_s01?ie=UTF8&psc=1
You have a very cool site - neat mods and trips! Lots of good ideas - keep them coming!
Hey there - Hope you had a Merry Christmas, and Happy 2023 in advance! I was wondering if you had a source for the fasteners that are used to re-attach the rear side panels? I have an '03 Tacoma xtra cab, and I'm sure it probably uses the same as yours but after several searches I can't seen to find those same ones. It seems I always break one or two every time I remove those panels (yeah, I know - stop removing those panels) They are around 3/4" long and kinda phallic shaped (sorry, best way i can describe it without uploading a pic)
Hey Monte, Merry Christmas to you as well! Mine was spent trying to find a way to get home to the Seattle area from Hawaii (given all the crazy freezing weather), but I certainly can't complain about the warm weather for the week I was enjoying the islands! ?
I think the part number you're looking for is one of:
90468-05076 - these are little metal clips that latch on to the plastic tabs and then press into the sheet metal (probably not what you're looking for)
90467-10148 - there are nine of these clips (per side) I think, and these are likely what you're looking for
90467-10168 - I think this is another part number that is the same as 90467-10148, but I'm not sure. Some diagrams seem to use one number (*68), others use the other (*48)
Hope that helps!
Awesome post. I am thinking about doing the same thing to my 2004 Tacoma Xtracab. Quick question if I were to go with Dynaliner foam in addition to Dynamat Extreme what thickness would you go with (1/8”, 1/4” or 1/2”) and where would you layer it in interior if different thicknesses as I don’t want panels to not fit. Love your writeups!
Hey Robbie, I'd definitely go with the 1/8" Dynaliner foam. Any thicker than that and you'll have trouble getting some of the panels back in. Also, you can add "thicker" foam wherever you'd like by doubling up the 1/8" material. I only did this in a couple places (primarily behind speakers) as I outlined in the Sound Deadening a 1st Gen Tacoma - Mat & Foam Installation section of the guide.
For an 2004 Xtracab then, you'd want to pick up:
Hope that helps! Shout if you have more questions! 👍
Sir! I can't thank you enough for all the detailed descriptions of the work you've done on your truck. They have saved me so much time, frustration and $!!
Awesome, glad to hear they've been helpful for you Reed!
Hello, do you remember if the stock deadening material on the underside of the carpet was glued on very well? Id like to try to replace it with better deadening material and Im just trying to get a gauge on if you think it would be possible to peel that old stuff off before I go tearing out my interior. Any intel is much appreciated!
Also, in doing research on this project, this is definitely the best guide for Tacomas but I think it is lacking some info on the types of products to consider for a project like this. Feel free to fact check me on this or completely ignore, but this is a summation of what Ive learned on the different types of products available and what they are used for, and a popular guide like this might benefit from having some of this info.
CLD (constrained layer damper): This is the foil backed butyl rubber product you used and its primary purpose is to constrain surfaces from resonating, NOT ambient sound absorption or sound blocking. This type of product will reduce the overall noise floor of the vehicle by reducing resonance of panels from wind and engine vibrations and lower distortion in your sound system by reducing resonance from your speakers vibrating panels. CLD products are most effective in a single layer, on panels with large flat surfaces, and when applied in as large of pieces as possible in the middle of panels. In doors CLD is most effective on the outer door skin and the back of the interior door trim panel. It is also highly effective on shapes like the roof and back of the cab, and the floor (of body on frame vehicles). CLD obviously has some mass to it and will block/absorb some sound entering the vehicle, but its primary purpose is to constrain panels from acting like massive woofer cones. With these products the thickness of the foil layer and quality of the butyl rubber and its resistance to melting at high temperatures are the key factors to consider for good performance.
Decouplers: Thin closed cell foam like you used also does not block sound efficiently. It is most effectively used for reducing rattles and vibrations between panels. It is often recommended to be applied on the backside of trim panels as this will ease future maintenance and repairs. Applying it to the floor of the vehicle under carpet probably has an insignificant effect on reducing noise and is not an efficient use of material. If you are using high powered speakers, especially with a subwoofer, you will want to use a decoupler to prevent all the trim in your truck from rattling. I imagine a decoupler will also help reduce rattling when on rough roads.
Sound absorbing material: You didnt use any products specifically designed for absorbing or muffling ambient noise. Soft fiber mats and soft open cell foams are most effective at this. However, when using these products they must be specially made for automotive use and be moisture resistant because open cell foams and fiber mats can trap moisture and can grow mold and mildew. If you are trying to reduce ambient road and tire noise in the cabin, in combination with a CLD these are the products you want, especially in the floor of body on frame vehicles. They are also recommended to be used directly behind door mounted speakers to reduce the sound energy transferred to the outer door skin, reducing resonance.
Sound blocking material: This would encompass products that rely on mass to physically block sound waves. These are most commonly used to block the holes on an inside door skin. Lead sheets wrapped in closed cell foam to decouple it from the body panel makes for a good sound blocking material. Its weight usually necessitates a mounting solution that relies on fasteners instead of adhesives.
Sorry for the info dump, not trying to be a know it all but just spread information to those who might need it!
Hey Colman,
The stock deadening material on the floor was pretty well attached in my truck. I'm sure that partially has to do with the condition and geography of the truck (mine was in a cool underground garage for the first 18 years of its life). I will also say that it's probably not all that difficult to mostly scrape up if you take the rug out and then soak the material (it seemed to be some sort of impregnated paper product) with something that weakens the adhesive.
As for the various types of sound deadening material, you've nailed it with great descriptions. I didn't discuss the purpose of each type of material much since this guide is about educating folks how to do the project, assuming they've already decided to do it. I did very briefly cover a little bit of the whatM/em> each material does in the Mat and Foam Installation part of the guide, since it's good to know what the products you're sticking to the various bits of your vehicle are doing, at a very high level, as you do it.
Thanks for the great descriptions, they'll definitely help to bring folks up to speed without going to other resources. 👍