
I just got done camping in one spot for three days. Temps were in the high 80's, the ARB 50qt fridge was set to 35ºF, and the 175W inverter was running much of the time charging various electronic devices. The whole time, I didn't start the truck once.
A couple weeks ago, my dual battery system would have been hosed by the end of this trip - probably wouldn't have even lasted the entire time - but when we pulled out of camp this time, the batteries were topped off and had power to spare.
This my friends, is the amazingness of solar. For this style of stationary camping, it's a game changer! Let's back up for a moment to figure out how I got here, and then I'll lay out how I setup my system.
Background - Why Has It Taken Three Years?
There are really two types of vehicle adventuring in my book. One - where the vehicle is driven most of the day, only really stopping at night to camp - allows the alternator to keep the battery(s) charged. The other - where the vehicle is driven to a given location, and then not started for several days while that location is enjoyed - means that some other method must be used to keep batteries charged and electronics running.

Neither style of camping is "best," but each has their own set of considerations.
For the last several years - and even today - the first style of adventure is my primary mode of getting out there. I can count on my fingers the number of nights that I've stayed in the same spot more than once, so using the alternator to keep everything going has been great. Sure, at some point I wanted a bit of redundancy and added a secondary battery to my setup to give me peace of mind on hot summer nights - but mostly I did that so that I could be confident about starting the truck in some of the remote locations we visit.
But, for three years now I've been going on at least one or two trips each year where I stay in one spot for an extended time. Usually these are family trips - with @mini and @mrs.turbodb, or with my Dad - where the goal is enjoying each other's company more than it is seeing everything we can. And, as hiking becomes a bigger part of each adventure, even the see everything trips can often mean the Tacoma sits for a day while we explore on foot.
Before the fridge, this wouldn't have been much of an issue. I could still go back to a cooler with ice for these types of adventures. But the fridge is one of the top three game-changing mods from my perspective and makes life so much easier that it was time to find a solution that allowed it to keep doing its job.
Enter: solar.
What I Choose and Why
My requirements when I started were relatively simple, I thought:
- Have enough power to keep the fridge running at 37ºF during the a 90ºF day (and night).
- Be able to move the system between the Tacoma and 4Runner, since family-basecamp-style camping happens in both vehicles.
The Panel Itself
Initially, I thought I was going to get a rigid panel that I could mount to the roof of the Tacoma - over the sunroof, which I dislike because the sun shining through all day makes me hot - and solve two issues with one solution. Quick releases would mean that I could move the panel between vehicles, or not bring it at all on trips where I knew I'd be driving all the time.

Nice conceptually, but not ideal in practice. Form over function, really.
But, after a bit more research, there were a couple drawbacks that I just couldn't get over: first, rigid panels are relatively heavy at between 20-30lbs. Second, by mounting the panel flat on the roof, I'd be limiting my ability to orient it towards the sun, and I'd require myself to park in the sun rather than leaving the panel in the sun and parking the truck (and fridge) in the shade.
So, I started considering a rigid panel that folded. This wouldn't solve the weight issue, but would allow me to position the solar panels away from the vehicle and orient them toward the sun for maximum power generation. Still, these are big an bulky and I didn't like the idea of having to pack them in the cab.

Fully functional, but clumsy form in that the panels would be hard to pack around. And still heavy.
I kept looking, and eventually stumbled upon a few informative online articles and videos that talked about solar blankets. These are less "blankets" and more "small panels hooked together with flexible material." As such, some can fold up into reasonably small packages, and they weigh significantly less than rigid panels since there's no aluminum frame, glass on the panel, backing plate, mounting hardware, etc. The only problem - predictably - is that they can be costly. This Off-Grid-Trek was recently featured on Expedition Portal, but their cheapest 200W blankets cost nearly (cough) $1500; a 112W REDARC offering costs over $1700 at the time of writing and is not even sold in the USA. 
But then, with some more research, I stumbled upon a reasonably cheap foldable panel that seemed to tick all my boxes. The TP-solar 100W Foldable Solar Panel Charger Kit.

- Rated for 100W of power (though no panel ever reaches this rating - 60%-70% is the best you can hope for).
- Folded into 11"x8"x3" (basically the size of a ream of printer paper) for transport.
- Weighed only 5 lbs.
- Could easily be positioned away from the vehicle (with a custom cable).
- Was completely standalone and could move between vehicles.
- Was reasonably inexpensive.
And, it (initially) seemed to tick a few more as well:
- Came with a charge controller that would charge USB devices directly, and 12V car batteries with a supplied adapter.
- Came with a bunch of adapters for various 12-24V devices (laptops, etc.).
- Great reviews from folks who'd purchased it before me!
The Charge Controller
There was however, one drawback to the panel/charge controller kit that I'd found: the charge controller was meh at best, for two reasons:
- It was a PWM controller. More on this below.
- When charging the car battery, rather than use the 19V/5A plug on the charge controller, the instructions directed me to use an adapter that stepped up the USB voltage to 13.8V and a maximum of 2A - for a max charge of ~27W, less than 1/3 of what the panel could generate through the 19V/5A port.
The first issue I could live with - after all, what I really cared about was charging, not the technology used for that charge. The second issue though was a showstopper for me; with a 100W panel, I knew I needed to get as much power as I could out of the panel if I hoped to keep the batteries charged and the fridge running on hot days in camp. So I started looking at charge controllers.
Initially, I thought I'd get a REDARC BCDC1225D DC-DC Charger w/Solar. I've heard great things about Redarc, and knew it'd work just fine for my purposes. But, I also knew it was overkill - after all, a big part - the main part really - of the Redarc DC charger is to keep a second battery charged from the alternator, with solar being a secondary consideration. Plus, it cost nearly $400, bleh!
So I started doing more research. I quickly discovered that there are two types of solar controllers that exist today (2020):
- Pulse Width Modulation (PWM) - in essence a switch that connects a solar array to a battery. The controller sends out a series of short charging pulses to the battery - a very rapid “on-off” switch. Between pulses, the controller constantly checks the state of the battery to determine how fast, and how long the pulses will be. This is a proven technology, but one that requires the panel to be matched to the battery, and does not optimize the current/voltage for the most efficient charging.
- Maximum Power Point Tracking (MPPT) - more sophisticated than PWM, the controller will run the solar panel at a voltage/current combination that generates the optimal power, and then convert that to the optimal power/current combination to charge a battery. This optimization can result in 10-40% more efficient charging, and also allows the controller to change the power sent to the battery at different times - in essence, allowing for fast charging when necessary before switching to trickle charging once the batteries are near capacity.
Clearly, I wanted an MPPT controller. The Redarc fit that bill nicely, except for the price and so I set out to find other brands. There were of course specialty controllers for "bug out" and "preppers," but these cost even more than the Redarc and were much too large for my taste, so I passed them by. Ultimately, two brands kept popping up - Renogy and Victron. Both seemed to have their followers, but reading between the lines on reviews, it became clear that Renogy was a leader due to (low) cost, and Victron was a leader due to (high) quality. Not only that, but the Victron SmartSolar line allowed for configuration and monitoring of the controller via Bluetooth from a smartphone - a very nice touch. And, since the Victron focused on being a solar controller only, its price was significantly less than the Redarc BCDC1225D.
So, I picked up a Victron SmartSolar MPPT 100/20 Solar Charge Controller w/Bluetooth, which could handle panel configurations of up to 100V @ 20A - significantly more than I'll ever need.

Setting It All Up Was Easy
Most of my time on this project was spent in the research phase - so here's a quick review of the parts I ended up with. Total cost of these parts was under $400.
- Solar panel - TP-solar 100W Foldable Solar Panel Charger Kit.
- Charge controller - Victron SmartSolar MPPT 100/20 Solar Charge Controller w/Bluetooth
- Supplies to make extension cable to locate panel up to 30' away from vehicle:
- DC Connector Male 2.1mm 5.5mm - plugs into the 19V/5A plug on the solar panel, for the extension cable to the charge controller.
- 30A Anderson Powerpole connectors (10 pair) - used to connect the charge controller to the battery, as well as for the extension cable from the panel.
- 30 feet of 12ga red and black wire
- 30 feet of 1/2 inch braided wire sleeve
- some heat shrink tubing in various sizes
With everything in hand, I set about installing the components. This install will be specific to each vehicle, but entails essentially two parts: first, connecting the controller to the battery and second, connecting the solar panel to the controller. The only thing that's important in these connections is that the connection between the controller and battery is made prior to the connection between the controller and solar panel, and that when disconnecting, the opposite order is observed.
In the simplest system, the charge controller could be constantly connected to the battery. This would meet the connection order criteria, but has the drawback that the charge controller draws a bit of power from the battery at all times (to enable Bluetooth, and the internals of the controller). As such, a better solution is to place a quick connect between the controller and battery - either using something like an Anderson Powerpole connector or even a Bussmann 80A Circuit Breaker. The Anderson connectors are both simpler and cheaper, so I opted for this route, making two short lengths of 12ga red/black wire. One end of both these wire sets connected to the controller and battery respectively, and the other end terminated in an Anderson connector - allowing the two components to be quickly dis/connected.
I also mounted the charge controller vertically - as per the installation instructions - in the electronics drawer of my in-cab power distribution station.

The only other step was to create a 30' long, 12ga red/black cable that would connect the charge controller to the solar panel. I started by measuring out two lengths of red and black cable and fishing them through a similar length of wire loom in order to keep them tidy. A bit of shrink wrap on each end completed the bundle. Then, one end of the cable received a Male 2.1x5.5mm connector* that would plug into the solar panel, and the other end received a pair of powerpole connector that I could plug into a small 12ga pigtail running out of the controller.
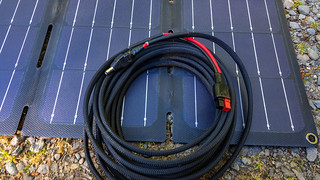
* Note: I was asked a good question about the connectors that I've linked, since they have a 16ga pigtail, and the rest of my extension cable is 12ga. Does that reduction in wire size cause any sort of problem? Check out my response in the comments below.
So, How's It Work?
The short answer is: better than I could have ever imagined. The first few days I used it, I kept mentioning to @mrs.turbodb how magical it all was!
The solar panel can be positioned in the most convenient location - on the roof, windshield, next to the vehicle - wherever the most power is generated.


And, both the panel and controller seem to work spectacularly. Peak power appears to be on the order of 70W out of the panel - right at the theoretical maximum I'd expect, and the controller does a splendid job of managing that power into the batteries over time.

A few very interesting things I've noticed over the first week or so of daily use:
- Using this system in conjunction with the Blue Sea ML-ACR works wonderfully. Leaving the ML-ACR in "auto" mode, if the batteries have disconnected for any reason, the solar system first begins charging the house battery - to which it is directly connected - and then after a period of time the ML-ACR links the batteries and the solar system charges both batteries as a bank.
- The Victron SmartSolar controller does a great job of charging AGM batteries. It varies the voltage into the battery based on the current battery voltage, meaning the battery is optimally charged to its full capacity.
- A 100W panel in full sun on a 90ºF day is more than enough to keep both batteries completely charged - even with the fridge running at 37ºF, a laptop charging, and other devices (camera batteries, phones) charging as well.
- The key to solar is that devices such as the fridge and laptop charge over a limited period of time. During this time, battery voltage may drop (a relatively small bit), but as soon as they are done drawing power, the battery is fully replenished (quickly) by the solar system.

As of now, I couldn't be happier. Adding solar has enabled me to camp-in-place much more confidently than I have in the past. Well, the recent past anyway, with food cooled in the fridge!
In this Series
 House Electrical - 3 month review")


Great & timely article as I have been planning to upgrade the solar charging system on my teardropsNW trailer. Thanks so much for doing my homework & research for me!
Nice! Glad if I can be a little help. I think the Victron SmartSolar MPPT 100/20 Solar Charge Controller w/Bluetooth (at least) would be a good choice. Panels seem a bit more use-case sensitive to me.
Thanks for the article! I’m starting from scratch on my electrical system. Do you think you would of went with the RedArc BCDC if you didn’t have your ML-ACR?
Glad you enjoyed it Tyler! As far as charging the secondary battery goes - I think the ML-ACR is the best solution for a 1st gen Tacoma, since the stock (and replacement) alternator puts out a high enough voltage (14.7V) to charge an AGM battery. For 2nd and 3rd gen Tacoma's, I think the right solution probably is something like a Redarc 1225D, since that will step up the alternator voltage to something that will actually charge the second battery. Then, the fact that it can also be used for solar is an added benefit. So I guess the answer is "yes, if I wasn't on a 1st gen" :). Hope that helps!
This is an awesome article and thank you for sharing your expertise. This will be a future project for me. Be prepared for me to pester you with questions?
Hi Dan, In your solar setup page “infinite free power,” you link to a 5.5x2.1 power pigtail on Amazon. That linked plug looks different from what you have in your pictures in the write up. The linked one has 16 gauge leads already attached. Do you have your 12 gauge extension wires choked down to 16 gage at the plug?
Thanks. Blevin
Hey Blevin,
So... the short answer is yes, I've got 12ga choked down to 16ga at the plug.
The longer answer is a bit more complicated ?. I started with some different plugs - in fact, in the photo here you can see that I clearly have a different 5.5x2.1 connector on the end of my extension. The problem with the connectors I used in initially was that I could never really get them secured to the wire. They worked, but not well, since as the wire moved (wrapping/unwrapping it, plugging/unplugging, etc.), it would work its way out of the connector - the screws just didn't provide enough gripping power.
The solution was to go to the pigtailed versions of the connectors that I now have linked in the write up. While this might initially seem to be a "poor decision" due to the constriction of wire gauge, the reality is that it really doesn't cause any problems, for two main reasons:
Anyway, hope that helps. Happy to answer any question about any of that.
Cheers, Dan
I just finished my install, the only question I have, did you use the pin jumper? I did not quite understand what it did, I tried reading the instruction booklet but never landed on anything concrete.
Thanks!
Hey Michael, I don't use the pin jumper (none of the pins are connected via the jumper). Here's the section of the manual that describes what the jumper does (LOAD output settings). You'll note that by leaving the jumper uninstalled, you can control the setting using the Victron app - which I think is a lot easier and more flexible, so that's what I do (and recommend doing).
When you installed the controller, you probably noticed that there are six (6) connections at the bottom - two for each BATT, PV, and LOAD. Obviously, the BATT output goes to the battery(s) that you want to charge via solar, the PV input brings power in from your array of solar panels, and the LOAD is an output that you can use to power devices directly from the controller, when it senses that the batteries are (mostly) fully charged. Personally, I prefer to leave those two connections "unconnected" and use only the BATT and PV connections. Then, any devices that I want to power are powered directly from my batteries, via a Blue Sea Fuse Block (6 circuit | 12 circuit).
Hope that helps! Shout if it doesn't.