
It's been a minute since I happened to glance under my truck on the way home from a trip and noticed that the rear axle housing was cracked and leaking at the passenger side leaf perch. Luckily though, the sinking feeling I had at the time has faded, no doubt due to the smashing success of the patch I installed - following Ryan's @Reh5108 lead - which has been trouble-free ever since.
Of course, the only reason I installed the patch was because it was going to take a long time - six weeks was the estimate - to get a extra-beefy axle housing from Diamond Axle and Front Range Off-Road. Turns out, six weeks turned into twelve, so I'm now even happier that I jumped on that patch.


Interestingly, a few days after receiving the new housing, I got a call from Front Range Off-Road asking me to cut off and send back my OEM ABS housing ends as cores within 30 days, or - if I preferred - to pay an additional $300 to keep my old housing as a "spare." Having already paid-in-full 12 weeks prior - and with no mention of this "core" charge at the time - I was dumbfounded. Plus, by this time I'd been driving on my patched housing for nearly 90 days - long enough to know that it was fully functional - and I was in no rush to replace it with the slow-to-arrive Diamond housing.

Thankfully, after a bit of back-and-forth, I was able to convince the good folks at Diamond that it was not in their best interest to ask for more money after the fact, especially when it wasn't mentioned in the original invoice, and it'd taken them twice as long to deliver as they'd initially promised.
Now, nearly three years later, it's finally time to install the new axle housing. Not because the patch has failed or because of some fear-of-failing that I have, but because I'm replacing my stock-length Alcan leaf springs with some Chevy 63s. As part of that work, I'll be unbolting the OEM housing anyway, so I might as well bolt the new Diamond housing back in.
So yeah, it's feature creep.
Also, when I say "I," I am - as always - extra grateful to Zane @Speedytech7 for his help with the whole process. I'm sure I could do it myself, but it's nice to have someone around who knows what they are doing.
OK, so this post won't go through all the steps or show all the photos, but it is what happened when Zane and I tackled this work while in the process of replacing my leaf Alcan springs with Chevy 63s - a project that already had the rear of the Tacoma looking "naked," the perfect time to throw in a new axle housing.
Day 1 to Day 3: A Quick Recap
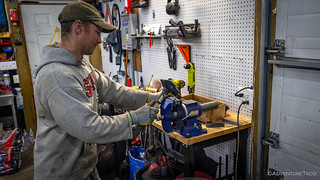
I'd shown up at Zane's on a Thursday afternoon, and we'd quickly gotten to work stripping down the rear end of the Tacoma to cut up the frame and install some new, longer - and most importantly, more comfy - Chevy 63 leaf springs. Despite taking a good half-day longer than we'd expected, the project had gone very well, and now that we were ready to reassemble everything, it was the perfect opportunity to bolt in the new axle housing rather than reinstalling the one we'd pulled to do the leaf spring work.


Afternoon of Day 3

As we'd worked our way through Day 2 of the leaf spring job, I realized that it'd be better to have the axle housing painted prior to installation, so while Zane continued with the real work, I'd put on my artistic hat to work on the masterpiece I call "basic black."


After a few coats of primer and several more of attention-grabbing-black, we moved the housing into Zane's basement in the hopes that it'd dry better in 60+ °F indoors, than it would in the high-30°F temperatures of eastern Washinton winter. That move lasted about an hour, at which point, the off-gassing was giving Zane a nice buzz, and we moved it back outside!
Even in the shop, the housing was just fine by the time we wrestled it into position under the rusty new (to me) leaf springs, ready to figure out the positioning of not only the axle housing, but all the bits we'd need to attach to it - you know, for things like leaf spring perches, shock mounts, and other obviously optional accessories, such as brake lines and emergency brake cables.


Besides the obvious importance of getting the perches installed in a location that would center the axle under the Tacoma, we also needed to get them installed such that the angle between the top of the perch and the front flange for the rear diff housing were the same as they'd been on the original housing. This required both math and reading, so we were careful to take it slow and check each other's work several times.


I have no idea if we got everything "perfect," but at least the opening on the axle housing pointed forward rather than back, so it probably wasn't all wrong.


It was during the welding of the leaf perches - the first pieces we were welding to the 3/8" thick axle housing - that I realized it would have been a good idea to bring along my Miller 211. Zane is - without a doubt - a better welder than I am, but we could have used a little extra juice to get the thicker material heated up. "A quick second-pass once you get home wouldn't be a bad idea," Zane suggested.
It was nearly 10:00pm when we locked in the positioning of the rear axle housing and while we were both getting hungry and tired, we knew we needed to push on just a little longer in order to set ourselves up for success on the final day of our project.
The next order of business - seating the rear axle seals - was one that was notorious for being tricky. These seals are what keep all that disgusting gear oil contained in the housing, and they have a very narrow retaining ring on the rear axle where they can be positioned. That, and the fact that they are finicky when being pressed into the housing meant that we'd need to be extra careful as we installed them, since I hadn't brought any extras!


With the seals driven in, we removed the brake drums from the OEM housing and crossed our fingers that the retainers - on which the seals would run - were in the right spot for the new housing. Zane was convinced they would be, and while I couldn't argue his logic, I remembered how entailed the process - of getting them pressed into the correct location - was when I'd replaced them a few years earlier, so I wasn't quite so sure.

Still, we wouldn't know immediately if we were in for a world of hurt, since before we could test the axles in the new housing, we had to get the rear diff - which would support the ends of the axles - installed first. It was midnight when we separated it from the OEM housing, Zane working to clean the rubber gasket material off of the mating face, while I installed new threaded studs onto the Diamond housing to secure the rear diff.


It was 12:39am when we stood back to admire our handiwork. We'd wanted to get this step taken care of before calling it a night, just so the FIPG would have a few hours to set up, reducing the likelihood that we'd screw something up as we continued the assembly process.
It'd been a long day, and we were spent. It was time for dinner, and then sleep.

Day 4
Exhausted, we'd had no trouble falling asleep immediately after a pizza dinner. Still, we were both surprised the next morning when it was much later than either of us expected when we each woke up. For me - usually up around 7:00am with no alarm - the fact that my phone was reporting 8:43am was crazy. It wasn't until an hour later - just before Zane showed up a bit after 10:00am - that I realized what was going on: we'd lost an hour to daylight savings time!
Though later than we'd preferred, the moment of truth had arrived - it was time to check the fit of the axle seals on the rear axles. If they weren't correct, we'd have only one option: put the OEM housing back under the truck.

As Zane headed out for a quick cup of coffee - at "2nd Base Espresso," an establishment that wasn't really his speed  - I got started fabricating some of the little brackets we'd need over the course of the day to secure the brake lines, emergency brake cables, and ABS wires to the housing. I'd actually purchased a few of these from Toyota in the hopes that we could just "stick them on," but it turned out that making our own was just as easy.
Positioning all the brake lines, wires, and cables in their approximate locations, and confirming a few measurements from the OEM housing, I'd hold a bracket in place while Zane tacked - and then welded - each one in place.

We hadn't been working long but having lost an hour into thin air as we slept, it was already after noon, and time for lunch. Still, the end was in sight. All that remained was reinstalling the pieces we'd removed the first afternoon, a quick check of the ride height in order to determine the correct location to install the lower shock mounts to the rear axle housing, and then the 350-mile drive home.

With all the weight back on the frame, it was clear that we hadn't gotten it quite right. I'd wanted to take a few inches out of the back, getting it closer to level, but we'd done a bit more than that, the front now ever-so-slightly-higher than the rear.
This was totally understandable - Zane had guessed at which leafs to leave in the Chevy 63 leaf packs when he'd prepped them - and also completely unacceptable. And, while the fix wasn't hard - I'd just need to reinstall one of the leafs that he'd removed, raising the rear an inch or two in the process - it was something I'd have to do at home.
And that meant heading home shockless. For Zane and me, it was a fitting end. It was Deja Vu all over again.
Day 4+1: Really Finishing Up
By some stroke of luck, I had a few rainless hours over the course of the first few days that I was home. In them, I removed the leaf springs, added another leaf to each side, and got the lower rear shock mounts positioned, melted into place, and painted.


It'd been a long five days but dang, the ride of these Chevy 63s is amazing and it sure is nice to finally use this axle housing!
Related Posts


")
Filed Under
Excellent job Dan, soon you will have an armored vehicle for the off-roads you travel. All these modifications give you added confidence of no breakdowns. Thanks again for sharing your adventures and modifications.
The grasmere area is looking more like May now, the weather and trails are still too iffy. Hopefully we can meet up then.
Happy Trails!
Thanks Kenny, and sorry for the delayed response; been out exploring the Arizona Backcountry Discovery Route for the last eight days and just returning home this evening.
Happy trails to you as well!
Nice upgrade!
I've got a Currie housing with a Ford 9" third in my Tacoma and it is bulletproof.
Awesome (and thanks)! It's always nice to get beefy equipment under there, as long as it works as expected (and so far, the Diamond seems to be working well).
It’s nice to have a built truck that you know will get you anywhere you want to go…and more importantly, get you home.
I’ve got a Long Range America tank arriving in a week or so which should complete my truck. I’m still eyeing a rear disk brake conversion but other than that, I think I’m done.
How was your experience dealing with them I tried emailing them to get quote on a axle and I get no response.
Hi Alvin,
I'd say my experience was mixed, but mostly good. I didn't have any trouble hearing back or getting a quote from them. It looks like they replied same-day to my emails, we had a thread of half-a-dozen back-and-forths, including a few phone calls, as I got my questions answered, and I paid an invoice 3 days after initially contacting them (Brian).
Turnaround on fabrication was about 4 months. While their initial estimate had been 3 weeks, the longer timeframe was fine with me because after I realized it was going to be more than a week, I decided to patch my existing housing, so I wasn't in any rush at all. In fact, I held onto the housing for a good year (as I recall) before I installed it (patching my original housing worked really well).
The housing itself is great. Super beefy, everything worked/installed perfectly when I did finally install it.
The only negative in my interactions with FROR, really, was after I received the new housing. A week or two later, they sent me an email out of the blue stating that I had to send them the ABS housing ends back as cores; if I didn't, they'd charge me an extra $300. This was something they'd never mentioned in any or my emails or phone conversations with them, and was something I couldn't do since I wasn't planning on immediately installing the new housing anyway. I sent them email to this tune, and eventually I never ended up having to pay the core fee or return the OEM ABS housing ends.
Hope that helps, let me know if you have any questions,