
I've very much enjoyed my Alcan leaf springs. The first set I had was near as perfect as I could ask, and working with Lew - the new owner in 2020 - on the second set was a pleasure, even if the end result wasn't as perfect as I could have hoped.
Rather than go for a third set of Alcan's - which I am 100% sure would solve my problems - I'm going to try something a little different in the hopes of finding a solution that gives me a ride that is a little softer - but that can still carry the weight of the Tacoma; in the hopes of finding something with a little more travel - but that costs a little less.
Anyway, one winter day, I headed to Zane's @Speedytech7 to do the work. He'd already done a bang-up job of installing Chevy 63s on his Tacoma, and I knew the whole process would go a hundred times faster if I had his help.
That is, unless things ended up like when we relocated my rear shocks. Surely though, we've become smarter over the years.
The rest of this story is about the great time we had doing this work. If you've come here for a tutorial, I've created a step-by-step guide with photos that covers the following aspects of the job:
- Why you might want to convert your Tacoma to Chevy 63 leaf springs.
- All the parts necessary to do the conversion.
- All the tools necessary to do the work (the way we did it).
- A walk through of the entire process.

Day 1
I pulled in about 2:30pm on a random Thursday afternoon. After being thoroughly impressed by Zane's new remote-controlled hydraulic gate, I unloaded the bed of the Tacoma so we could start the disassembly process once he got home from work.


Zane's job is a thankless one, but does have one benefit - he works 4 days a week and gets home somewhere around 4:00pm in the afternoon. Our plan then, after quick hellos - and several thank-yous from yours truly - was to try and do most of the disassembly before calling it a night. That would allow us to destroy - and then rebuild - the Tacoma the following day.
With Zane diving right in, things began to move at lightning speed. This guy knows his Tacomas and it was hard enough to keep up, much less take photos.


Removing the bed gave us easy access to all the other bits that we'd be stripping off the truck, but before diving in, I thought it'd be a good idea to pressure wash a bit of the EMHT debris off the now-exposed frame, top of the gas tank, and all the other nooks and crannies that had previously been tough to get to. It was a job that would make our lives just a little cleaner, though we'd still encounter plenty of dirt - piles of it in fact - as we pushed deeper into the project.

And then, the race was on. Plugs I'd never seen before were quickly disconnected. Fuel lines were separated so the gas tank could be removed. Brake lines, ABS sensors, and the e-locker on the rear axle were disconnected. It felt like Zane simply waved a magic wand and completed task after task, as I opened and closed drawers on his tool chest looking for the socket I needed to disconnect some reasonably unimportant part.


With the gas tank removed, and every line-or-wiring harness between the frame and rear axle out of the way, it was time for a bit of measuring. Our goal - to know the exact location of the rear axle in relation to the frame - was something we wanted to make sure that we got right. Getting it wrong could hamper our ability to complete the project at all, even to the extent of making the Tacoma completely undrivable.
The problem - as we already suspected and would later confirm - was that the good folks at Toyota weren't as precise as they perhaps could have been when assembling the frames of these early-2000s trucks. Cross-members are mostly perpendicular to the frame rails. Holes cut into the frame are sort of in similar locations from side-to-side. And, naturally, no two trucks are exactly the same.

Thanks Toyota!


After getting what we thought we needed at the time - but which would later turn out to be barely enough for us to eek out success - it was finally time to disconnect the still-reasonably-new Alcan leaf springs. We had two choices at this point - we could remove the rear axle from the leaf springs by disconnecting the u-bolts, or we could remove the rear axle and leaf springs as a single assembly by pulling the bolts from the front spring hanger and the rear spring shackle.


We only had one more thing to do before taking a few measurements, and that was to cut out the muffler. This wasn't technically necessary, but it when Zane suggested that it would be easier for us to weld the passenger side front hangers for the Chevy 63s - and assured me that he had a sleeve we could use to repair the exhaust when we were done - I was happy to get the monstrosity out of the way.

And with that, it was time for burritos and bed. Day 1 had been a huge success, and having gotten to the point where we could start installation of the new leaf spring hardware in the morning, I was sure that we were way ahead of schedule.

Day 2
We were up bright and early to start day 2, hoping that our measurements from Day 1 would be sufficient to accomplish our task. Conceptually, it was a simple 10-step plan:
- Do a bit more measuring to figure out where the new front leaf spring hangers would be installed, then weld them up and tack them in place.
- With the leaf springs temporarily installed in the front hangers, figure out the positioning of the rear hangers.
- Cut off the factory-installed front and rear hangers to make room for the
- Cut
 into the frame of the Tacoma - you know, "no big deal" - to french in the front hangers.
 - Tack the new front and rear hangers into place on the frame. [
- Install the Chevy 63 leaf springs and rear axle.
- Take a bunch of measurements and reinstall the bed to make sure the rear axle was in the same place as it had been originally with the Alcan leaf springs.
- Finish weld the new front and rear hangers.

- Cut and weld a couple frame-reinforcement plates around the front hangers.
- Reinstall everything we'd removed on Day 1.
Simple enough! ish?


(Except for that massive axle Zane had hanging around the shop.)
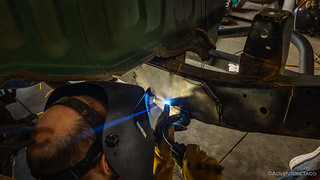
Things were going smoothly until approximately the second-half of step ...1. That's about when we realized that our yesterday-selves had measured a lot, but probably not quite enough as our today-selves would prefer. Still, we muddled through and completed one step after the other - Zane doing most of the welding and me doing a bunch of cutting and grinding.


Ever thankful for all the help Zane was contributing - not to mention the shop space - I'd made it clear that any food for the duration of my visit was on me, and that we should eat well. Or, if not well, then at least we should eat things that Zane liked. So, as 2:30pm rolled around and we'd not stopped for lunch, I gently reminded Zane that I needed him to keep eating so that he had enough energy to keep helping me with a project that would take me an order of magnitude* longer to do on my own.
* For all you math nerds out there, that means Zane was doing 90% of the work, for a few measly meals.


Turns out, the same thing would happen for every meal that had happened for our first - both of us easily consumed by the project at hand - each one seeming to shift later and later in the day. It was just after midnight when we wrapped up day 2 and ordered up a hot pizza that would be quickly consumed before we headed to bed.
Day 3
With only finish welding of the new hangers and reinforcement plates remaining, we thought - or at least I thought - we'd wrap up the job within an hour or two, leaving plenty of time get started on the next activity that we had planned for my visit...


Turns out that it took us until just after 2:00pm to wrap up that final bit of fitting, welding, and painting. By then, we were hungry and - once again - late for lunch. The truck wasn't completely back together - not by a long shot - but the remainder of the reassembly would require us to dig into our next project. Since we were still - literally - waiting for the paint to dry on this one, it was time for burgers and a short break.
After lunch, we'd have less than 30 hours to complete the second project - a tall order that would see us working late into the night - with no way of knowing whether we'd be successful until the very end. Still, it was a project I'd hoped to accomplish a couple years earlier when I'd visited Zane's shop to swap out my clutch - and we were both determined that we'd get it done before I had to blast off for home.
Keep reading the rest of the story - New Diamond Axle Housing from Front Range Off Road.
Epilogue: Are U-Bolts Really a Single-Use Part?
There's an ongoing "discussion" in the world of truck modifications:
I'm changing something about my leaf springs, can I reuse my U-bolts, or do I need to purchase new ones every time?
I'm not here to answer that question - I've been known to tell people that they should always use new u-bolts, while regularly reusing them myself - but I did want to share what happened to me on the way home from Zane's.
After working our way through most of the second project I alluded to above, it was time for me to blast off towards home. We'd accomplished almost everything we'd set out to complete, but there was a little bit of work that I'd have to do once I got home. And, doing that would require me to remove the Chevy 63 leaf springs we'd just installed (with some brand-spanking-new 5/16" u-bolts).

I didn't view this removal as any sort of problem; I figured that they would still be new enough and I'd reuse them. The problem was something else entirely: the top plate I'd purchased was designed for 5/8" u-bolts, not the 9/16" that I had on hand. Being smaller, mine would fit, but there was a bit more space around each bolt than we were comfortable with when we tried installing them using the supplied washers.
Luckily, Zane had some larger diameter fender washers, and we installed the u-bolts - torquing them to 110 ft-lbs - before I hit the road for a 300-mile journey.
It wasn't until I got home and started backing off the nuts that I realized how much force is really involved with u-bolts, and why there are those who suggest that the bolts deform under load may not be entirely wrong.


So maybe the moral of the story is this: reuse your u-bolts or don't, but for goodness sake, use the correct washers! 
Related Mods and Maintenance


Related Reviews


")
")
Truly Epic! Seeing the frame laid bare was my first clue that this was no mere tweak. Nicely done! Insane build. How common is this mod for Tacos, was Zane the first to do the Chevy 63s?
Hey Skidoo, I'd say that this is a well-known, but not-very-common mod for 1st gen Tacomas. There are other folks who have done it for sure (and well before Zane), but I really liked the methodology he used (frenching in the front hangers) and I knew that having someone around who'd done it before would be a huge reassurance as we cut into the frame. Plus, Zane's just a cool guy to hang around with, so I always enjoy working with him.
Pretty amazing work and shows how experience can make a huge task go easier. It does confirm a couple of things I've known/learned over the years. Crud will get into places where you didn't even know there were places and stress on some parts is a lot more than most people realize. A few months ago I did some front end work (after my mechanic who is a certified master) had done the work to raise the front end on my truck 3". I replaced some bolts with higher rated ones and with very heavy duty washers on the winch mount. Thanks for sharing that amazing project, always more fun to read about it and watch it than doing it, LOL!
Man, talk about crud getting places. We (my buddies and I) area always joking that after a trip to, you never get all the dirt out, even after several pressure washes of the entire truck. And of course, you always find those extra bits when they fall into your face when you're working on something.
But oh man, to find an inch of dirt/dust inside the frame. That was eye opening. And something I still need to take care of, because that can't be good from a rust perspective. A project for this summer, for sure.
Not just with vehicles. Here in the desert with the very fine sand and high winds, think everything is sealed up, double pane windows, tight weather stripping, yet the sand shows up around windows, inside the truck cab and trunk, just inside house doors, open the truck door and a shower of sand falls in my face! And inside the truck frame, sand blows through all the holes in the frame. I don't know how many buckets of sand I've cleaned up but it's a lot!
Don't even get me started on Owyhee "mud".
Sorry, typo there. I meant "glue." Concrete glue.😉
I pressure wash the undercarriage after every trip there and I still find chunks of it under my truck in the garage.
I need to get one of these: Underbody/Undercarriage Pressure Washer attachment
After finding the mud in the frame, I've picked up one of these kits. I'll probably end up writing a review on it in the future, but my hope is that I can get it inside the frame rails and run it long enough to stir up all the trapped dust/dirt and get it to flow out of the frame holes. Time will tell!
That looks promising. I try my best to pressure wash out the inside of the frame where I can but I'm sure that I am missing a lot.
I promise you you computer will let you know if all your sensors are as solid as before!! love those plastic clips arrgggh!
There used to be a place in Seattle that would make you custom spring packs however you wanted , preferably thinner multiple springs that are truly progressive for a softer ride.
Good luck !
Dave
A place in Seattle that made springs, huh? Never heard of it (though, I've only been in this "game" for the last 7 years or so). My go-to has always been Alcan Spring in Grand Junction, and I think they're great -- and still the right answer for 98% of people who need a high-end spring on a Tacoma. It's the ride that I'm hoping to get out of the much longer Chevy 63s, which they just can't hope to match with stock length springs.
Boise Springworks here in Boise will make whatever you want.
I have Alcan's on my truck now and am happy with them.
Interesting. I've got a buddy in Boise, but haven't ever heard of Springworks -- we always discuss/recommend Alcan when folks want a custom pack.
I know I said this in the story, but in general, I've loved Alcan and think they make fantastic springs. (the best I've found, I'd say).
My last order just didn't turn out well (due to what I think was bum info I got on my first order under the previous owner), so I was left looking for another option.
There are lots of options out there...here's the link for Springworks. They'll re-arch springs, add new leafs...pretty much whatever you need.
https://www.boisespringworks.com/
Nice work!! One Hella of a project!! Now, how is the ride? Better loaded with gear? With the extra left spring I added on mine, ride got stiff. Thinking your route might be the better. Jury is out on that one. So keep use posted!!
Thanks! The ride - on pavement - is fantastic. The forest-service style dirt roads are nice as well. Going to give an extended amount of dirt the first "try" in a few weeks here when we head down to run the Arizona Backcountry Discovery Route. I suspect that I'll think they are great there too!
The only drawback I've ever heard - and not frequently - is that the softer springs can result in a bit of axle wrap, so I'll be keeping an eye out for that, but in general I think this is going to be great!
Awesome job with the Chevy 63's! I'm considering the mod myself and have a few questions. What is your net ride height now compared to stock ride height? Considering your installation and Frenching the mounts, Do you think it possible to have a 63 setup where the ride height is +1" over stock?
I assume your rear suspension travel is now limited by your shock length. Do you think you could theoretically have 14" travel with the springs?
Hey Mark,
First - thanks!
Compared to stock ride height, I'm up about 2" on both the front and rear of my truck, perhaps slightly less. Keep in mind, that's 2" over the original stock height when the bed is loaded, which is usually about 1-2" above what most Tacomas are running at these days if they are still on the old/original equipment, since it sags over time (but slowly enough that we don't even really notice it). That 2" is a good spot for me, since I want a bit of extra ground clearance for some of the adventures I do, but still allows plenty of down travel on the front, which gets sacraficed if you go with a 3" lift up there.
As for 63's with a 1" lift over (original) stock height - I think that'd be tough to do while being able to get as much travel as possible, but might be doable if you don't generally carry a load and could go with only two leafs per side.
As far as travel goes - after installing the 63s, my 10" stroke shocks were limiting my travel (barely), and I've since upgraded to 12" stroke versions of the same shock from ADS. I could likely do 14" if I was willing to either (a) go through the bed with the top mounts or (b) have the bottom mounts hang down significantly lower, but I'm happy with the 12" for now, so I have no plans to change it. Also, remember that to use that full range of travel, a bit more lift (i.e. 2" vs 1") at ride/resting height is helpful, so you have more compression ability on that end of the travel.
Shout if you've got more quesions!
PS - I moved this comment over to the Chevy 63 install post (from the Diamond Rear Axle Housing installation) since it's really more about the leafs.