
May 3-5, 2019.
If you're going to turn a 4Runner into a family adventure vehicle to replace the Tacoma, one thing is for sure - it's going to need a way to carry the CVT @Cascadia Tents Mt. Shasta that we sleep in every night. With an Exped Megamat 10 Duo, it's some of the most comfortable sleep I've had, really.
So with most of the mechanical work done for now, I figured the next bit of work was to figure out the roof rack situation. I generally start with a mid-level design for these kinds of projects, but this time I just wasn't feeling it for some reason - ending up at essentially this.

I started by doing something that I maybe should have done before even buying the 4Runner - some research to see if the roof rails from 1997 were even rated to hold the weight of a modern day roof top tent (RTT). To my relief, the OEM crossbars are rated at 165 lbs of dynamic load, and all the aftermarket racks I could find out there had load ratings of 200-300 lbs, meaning that the rails attached to the roof using five of these riv-nut looking anchors were probably strong enough.

Whew. That was going to have been an expensive lesson if we'd been unable to use the tent!
At this point, I had two options - buy something or build something. I wanted a rack just large enough for the tent (not a full-length rack) and in the few-hundred dollar range. And, from a design perspective, I knew I wanted something reasonably sleek - I didn't want to see big bulky bars running around up on the roof.
A quick look around showed that I didn't really love the designs or prices of the few after-market options. Prinsu always seems to have nice designs, but I could nearly purchase another 4Runner for the price. The only possible option I really found was Rocky Mountain Racks (now Sherpa) - the design of their Antero half-rack along the lines of what I was thinking - alas, they no longer made it, opting to focus solely on the full-length model.
So that brought me to build. And really, if you know me at all, you know that's the option I preferred anyway. The only problem was: how to do it? I knew that it'd have to be relatively light given the load limit on the roof and that ruled out my usual steel construction - it would need to be aluminum.
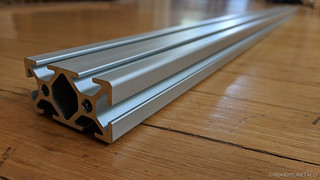
My very first order of business then was to order some 1"x2" extruded aluminum cross-bars that would build up the base I could mount the tent to. Since these would be the heart of the system, I figured it would be a good idea to have them take up space in the living-room-truck-part-storage-area for 6 months or so. Note: @mrs.turbodb didn't agree that this was a good idea.
Next, I'd need to figure out how to attach it to the roof. I thought about trying to bend some aluminum for the feet, but ultimately decided that it'd be easier for me to weld up some steel feet. All I needed to do was to figure out the exact right angle to make the top (which would attach to the aluminum cross bars) and bottom (which would attack to the roof rails), and then somehow make sure those angles were correct even after the heat of welding.
A challenge if I ever heard one... And yes, I fully realize that may simply show my lack of experience - don't burst my bubble.
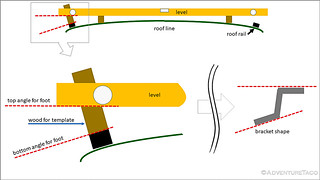
At any rate, I eventually realized that if I placed a block of wood on the roof rails, and then placed a level across the roof of the truck (itself held off the roof by approximately 2" blocks), that I could trace the line where the level crossed the wood. That line, in conjuction with the bottom of the block on the roof rail would be the two angles I needed for my brackets.
Of course, in my excitement and celebration of intelligence, I took exactly no photos. So, here's a diagram.
Next, it was time for me to gather the materials. I didn't have any good flat bar laying around, but I did have a length of 2.5" angle that was 0.25" thick, so I figured I could get the pieces I wanted out of that for a total cost of free. Nice.
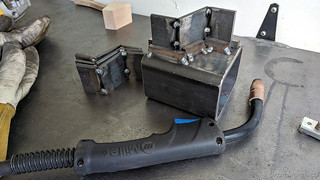
With all my little bracket pieces in hand, I knew the main challenge was going to be welding them up in a way that they maintained the correct shape. I'd need some sort of jig. So I laid everything out on a piece of rect tube, using the piece of wood I'd drawn the angles of the roof on and the corners I'd cut off the piece of angle to a jig.
A few tacks and it was ... ugly. But also hopefully functional


From there, I proceeded to tack everything up in several places in order to prevent movement during the full welding, and then decided that I'd even do as much of the full welding in the jig as I could - both as practice with downhill and to keep everything stable.
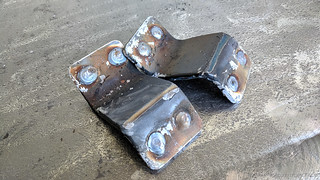
To my surprise - yes, I'm still easily surprised when it comes to metal fab - I seemed to stumble through successfully. Once ground, the brackets looked like a single piece. "Oooo, those are pretty." -@mini.turbodb

The drill press made quick work of the necessary holes* for the cross bars and roof rails, and then - with great enthusiasm, as I'm sure was the case the first time I got to use spray paint when I was a kiddo - I got some help getting them primed and painted.
* I just wished I'd measured their location twice before drilling.

Once the paint had a day or so to dry, I went to test fit one of the cross rails so I could start on the rest of the rack and that's when I discovered that I'd drilled the holes on the wrong ends of the bracket. That is - the hole spacing on the end which sits on the roof was drilled for the end which bolts to the cross rail and vise-versa.

As a woodworker I know better. Measure twice, cut once.
I figured that the best thing to do at this point was to fill in the holes rather than try to make entirely new brackets - the only downside being that I'd have to regrind and repaint everything. Grrrr. But, no use crying over spilled milk as they say, and pretty soon, I was once again ready to make forward progress.

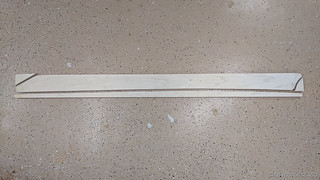
To make the side plates, I'd picked up a remnant piece of 3/16" aluminum the last time I'd been to the steel yard - my thought being that I could use my woodworking tools to create the shape I wanted. To make things easier, I started with a piece of 3/4" plywood to create a template - forming the wood much easier (and less expensive) than using the sheet aluminum right off the bat.
Tracing and cutting, cutting and sanding - it didn't take long to arrive at a shape I liked that followed the lines of the roof and would provide a bit of visual interest for the rack.

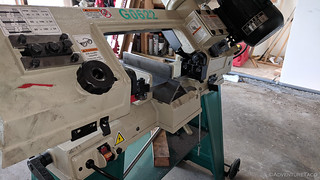
Finally, the moment of truth - time to start cutting aluminum. First, roughly on the tablesaw. Let me tell you - aluminum chips flying up and hitting you in the face is way different than sawdust! Once that torture was over, I headed over to the bandsaw to get the gentle curves.

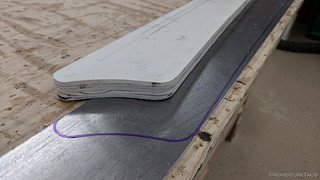
Finally, I clamped the plywood template to the roughed-out side plate and used the router with a flush-trim, templating bit to get the shape just-so, and the wire brush on the angle grinder to give it a nice brushed look.


Holy smokes - this might actually work. And that would be totally awesome.
I grabbed all the parts and headed out to the 4Runner, which had been patiently waiting for me for a few days - this project, like essentially all others, taking longer than I expected given the fact that life continues even when projects aren't complete! 

I made quick work of removing the OEM rack and made a mental note to pressure wash the roof of the 4Runner. It was a mess up there - lots of pine needles and pollen that don't exist around our place, so likely from the previous owner - probably not cleaned in years!
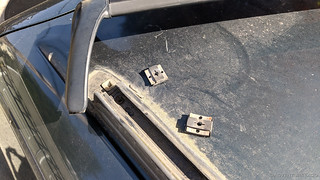
And then, it was just a few M6 stainless steel bolts to secure the feet to the roof rails, some ¼-20 stainless carriage bolts to secure the feet to the cross bars, and ¼-20 stainless hex bolts to attach the side plates to the cross bars.


Came out pretty reasonably if you ask me. And it's sturdy! I have only a small amount of lingering doubt that it won't be up to the task of holding the tent. ...which I still need to figure out a mounting solution for.
But that should be "easy." 
Update: Tent Mounted!
After cutting a bit of 1"x2" square tubing into "L" shapes, I got the tent mounted easily!

Ready for sleeping!
SO cool, Dan! My little (big) inventor from the cradle!
XO
Great write up! I've been toying with building a roof rack using extrusion as well, but couldn't figure out how to make brackets with the correct angles. Very smart how you were able to figure that out.
By chance do you sell those brackets? I'd love to learn metal work someday, but I don't have the garage space unfortunately. Your pieces look stout and low profile, which is exactly what I'm looking for.
Thanks Dennis, glad you liked it; it was a fun build! Unfortunately, we don't have the 4Runner anymore, so I can't really make any more brackets, otherwise, I'd be happy to make a few for you. I will say that they worked out really well, so if you could find a fabrication place that would template off your roof the same way I did, these were a great solution. Good luck!
Dang ok, I was hoping you kept a template. No worries! Maybe I'll give it a shot using your guide.
Great site, btw! I chanced upon this after researching bushings. I love the engagement with the community, makes for good resource reading.
I thought I might have kept that jig I made to weld them up, so I went out to the shop to check. I did keep it, but I've since used it for getting the welder settings dialed in for some other work, so it's no longer usable, unfortunately.
Making that little block of wood turned out to be the key for me, and was pretty easy to do with the level. From there, you could take it to any welder and they could create a much nicer jig than I did!