
Over time, rubber bushings wear out and need to be replaced. This happened for me recently when I Replaced All the Bushings on my Tacoma, and I figured that others could benefit from a quick little guide that shows the entire process and lists all the necessary parts for the front diff bushings.
Parts
- Durobump Front Diff Bushings are the only parts you need for this job.

Tools
- Misc sockets (I recommend this set from Williams, a Snap-On brand)
- 12mm, 14mm socket - to remove the skid plate.
- 19mm socket to remove front diff brackets.
- 21mm socket - to remove lug nuts.
- Ratchet, Extensions, as necessary.
- Breaker Bar
- Torque Wrench.
- A Propane (good) or MAPP gas (better) torch - to apply heat to melt out the old bushings.
- An impact wrench for lug nuts and various other tasks.
- A bit of primer and paint to touch up the brackets after burning out the bushings.
Doing the Job
The first thing to do is gain access to the front diff brackets, which need to be removed. Since these are common tasks, I'll outline them without going into too much detail.
- Make sure the parking brake is on, and at least one rear tire is chalked.
- Remove the skid plates.

Removing the Front Diff Brackets
The brackets are held on by a total of seven (7), 19mm bolts that need to be removed.
- Use a 19mm socket to remove the three (3) 19mm bolts securing the driver side bracket to the front diff.

- Use a 19mm socket to remove the two (2) 19mm bolts securing the passenger side bracket to the front diff.
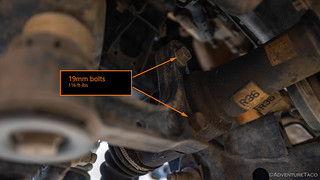
- Use a 19mm socket to remove the two (2) 19mm bolts that pass through the front diff bushings and secure the brackets to the frame crossmember.

Removing the Old Bushings
- Use a torch to heat the front diff brackets around the bushings until the bushings are hot enough to pop out of the metal sleeves, or be pushed out with a screwdriver. Note: Do not remove the metal sleeve from the bracket. Only the rubber interior of the bushing is removed.

- Once the rubber has been removed, use the torch to burn off any rubber that remains in the metal sleeves.
- After the metal sleeves cool, clean out any debris in preparation for the new Durobump rubber bushings.

Installing the New Bushings
Prior to installing the new bushings, clean off the brackets and spray them with a quick coat of primer and paint in order to protect them from rust.

- Coat the exterior of the rubber bushings with liquid dish soap to aid in easy installation.
- Insert the narrow end of the Durobump into the metal sleeve and press it in as far as possible by hand.
- Cover the wide end of the Durobump with a rag or thin piece of wood to protect it, and then use a pair of channellock pliers (or other method of your choice) to squeeze it in the rest of the way.

Reinstalling the Front Diff Bushing Brackets
- Use a 19mm socket to attach the driver side bracket to the diff using three (3) bolts. Torque to 116 ft-lbs.
- Use a 19mm socket to attach the passenger side bracket to the diff using three (2) bolts. Torque to 116 ft-lbs.
- Use a 19mm socket to install the two long bolts that pass through the bushings to secure the front diff to the crossmember. Torque to 101 ft-lbs.
Done!
Questions
1. What model of vehicle are you demonstrating with?
2. Do I need to support the front Differential when removing the brackets holding the bushings?
3. Does this procedure work for a 2006 Audi A8 with 4.2 engine?
Hey Kenneth, like the rest of this web site, this step-by-step guide applies to a 1st gen Toyota Tacoma. Have a look around, and I hope you enjoy!
Part number and website
Hi David, check out the Parts section for the link to the bushings.
Just a thought, but I wouldn't recommend using dish soap as lube. It acts a little bit like a humectant and has other compounds that can and will accelerate corrosion on metal surfaces, especially if there is any dissimilarity. A safer bet would be silicone grease, or water based sex lube. I've experienced this first hand. I know a lot of people also like to use it for leak testing, I used it use watered down dish soap for that as well. That's fine for pool floats and air mattresses when you can just hose them down, but doing it for an assembly like air fittings or natural gas you absolutely must rinse it thoroughly with distilled water. Leaving the soap residue in place has the same problem as above. I've switched to using an actual "leak tester" for all my manifold, pneumatic, and control systems testing. It's good at bubbling, but doesn't have the same issues with corrosion. I still rinse it off with distilled water to keep things from getting messy, but I don't worry as much about corrosion issues.
Thanks for the tip Bert! I was just following the instructions from the manufacturer on these, and they recommended "Dawn dish soap or hair spray (Aqua Net) should be used to lubricate the new bushing to help aid in easy installation."
I appreciate the tip on other pneumatic fittings as well - that's one I'll definitely keep in mind for future projects! 👍
Perfect write up! I’ll be using this next week👍😄
Awesome! Glad this can be of help!