

TL;DR - After not having issues for years, I've been having trouble with my alignment for a while now. To resolve it, I installed some cam tab gussets that I probably should have installed a long time ago.

I've been having a bit of trouble with my alignment, and I've mostly been trying to ignore it. I say mostly because I did purchase an All-Pro cam tab gusset kit, but of course, I just left it sitting in the "to be installed" pile of parts that any good Tacoma owner maintains.

But after my alignment went out again on the relatively tame roads we experienced on our most recent trip to Canada, I decided it was finally time to bite the bullet and get the situation taken care of.
I headed to Zane's @Speedytech7 place to tackle this one. That would give me a shop to work in - allowing the job to go overnight if necessary, without me having to worry that the Tacoma was left outside at home - and a bit of moral support. I used both, extensively!
I arrived mid-afternoon and immediately dug in on the project while Zane was still at work. The reason I'd procrastinated this job for so long is that there's a lot of "overhead" in getting this project done:
- The steering rack has to be completely removed, which means separating it from the lower ball joints (LBJs) and rag joint, plus disconnecting the hard-to-read power steering lines.
- The alignment cams - notorious for rusting themselves into the lower control arm (LCA) bushings - need to be completely removed.
- The LCAs need to be completely removed, which means separating the LBJ from the spindle.
- The CV axles need to be completely removed, from both the hub axle nut and front differential.
Once that's all done, the old, weak, OEM cam tabs have to be removed by drilling out spot welds, grinding, and a good serving of air-hammer-destruction. But I'm getting way ahead of myself. Let's back up.
The first order of business was getting the truck jacked up and ready to go. As I was doing this, I noticed that Zane had some heat shrink tubing sitting on a nearby workbench. It was unlike any heat shrink I'd ever seen.

With the truck jacked up and the wheels removed, the next item on my list was pulling out the steering rack. I've done this before, so I pulled up the step-by-step instructions and set to work disconnecting the outer tie rod ends (OTREs), unbolting the rack, separating the rag joint, and finally, disconnecting the power steering lines.
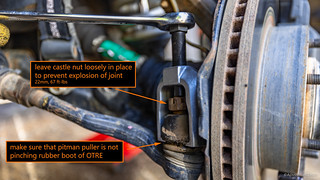
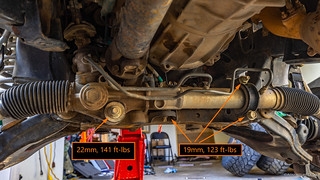


With the power steering lines draining into a catch-pan, I was making progress as I turned my attention to the front suspension. To remove the LCAs, I'd have to remove the coilovers, LBJ, and CVs. Only then would I find out if my alignment cams had permanently rusted themselves into place, a contingency that I'd not come prepared to address.

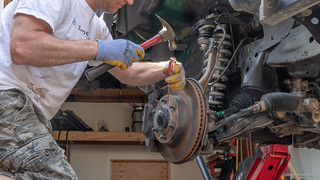
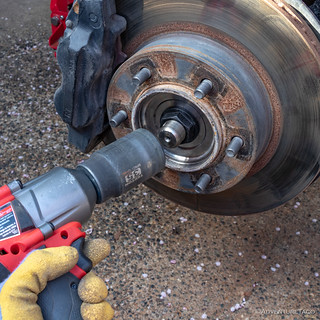

With all the major components removed, it was time for the moment of truth - would my alignment cams come out of their own accord, or would I be reaching for the carbide sawzall blades - and then my wallet - to replace them?
Not really wanting to know the answer, I considered just buttoning everything back up at this point and admitting defeat. But Zane was due home any minute, and I was sure he'd supply any moral support I needed to get the job done.
First, though, I remembered that I should record where the cam tabs were currently set, so I could get them back into the same position - hopefully maintaining a reasonable alignment - when I was done.


Finally, it was time...
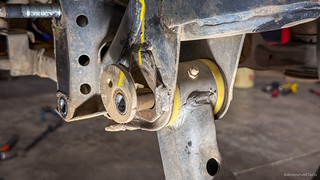
With everything removed, it was time to get down to the real project at hand - replacing the cam tabs with something a bit beefier. And that started with some drilling, cutting, and chiseling.


As with any project, time seemed both stationary and in short supply as I pushed toward installation of the new cam tabs. Cognizant that I could continue working right through dinner without even noticing, I wandered out of the shop at this point to find Zane and let him know that we should go get something to eat, lest he go hungry for the night. Mexican was on the menu, and a couple hours - and some carne asada - later, it was back to work. And this time - with earlier projects of the evening wrapped up - Zane tucked in as well. So cool.

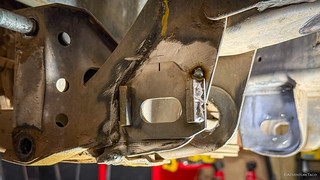
It was at this point - as we were fitting and tacking on the new cam tab gussets - that we discovered a rather unfortunate crack in the frame. I won't go into the details here, but suffice to say, I'm lucky that my wheel didn't fall off.
Sorting through the crack immediately took priority, and by the time we were done, it was well past any reasonable person's bedtime. The fact that Zane - who had to leave for work at 4:45am the next morning - had stayed up as long as he had was a testament to his awesomeness.
And so, leaving me with the cam tabs tacked into place and only needing final welding and painting, it was time for some first-class boogering of molten metal by yours truly.


With both the primer and top coat applied, there was nothing to do but - literally - wait for paint to dry, so I called it a night and headed off to bed. It was 2:14am. I'd tackle reassembly after a few hours of shuteye.
Later the same morning...
Knowing that it would take several hours to get everything put back together, I was back at it a little after 7:00am. This was far from the 24 hours for a full cure outlined on the rattle can, but longer than the dry-to-the-touch-in-one-hour, so I hoped for the best.
Reassembly was reasonably straightforward since - being less than 24 hours since I'd pulled everything apart - I still remembered where all the bits and bobs needed to be reattached. Along with my pitman puller, I'd also forgotten to bring along the magic anti-seize I'd used on the alignment cams the last time I'd replaced them, so I hoped that some high-temp grease that Zane offered would be a reasonable substitute.

A little after noon, I was on my way home. Miraculously, my attempt at repositioning the cam tabs based on the paint marks I'd made had resulted in a steering wheel that was - for the first time in years - perfectly centered. Surely, I'd need an alignment to ensure that everything was fully optimized in spec, but for the time being, I was extremely happy. Mostly because I'd never have to do that project again.
In this Series


Thanks! Great write up of something, I hope I don't have to do. Welding suspension parts is always a nail-biter. BTW what did you do about the frame crack? Kind of in the same category of folklore as losing 10mm sockets.
Maybe forgetting the anti-seize was a benefit, that nasty stuff gets everywhere.
That purple grease looks better than anti-seize anyway.
You can see more/read about the crack, here: My Wheel Almost Fell Off. So glad we discovered it when we did!
We joke that as soon as you open the antiseize, it's on the pair of pants you wore last week. And somehow completely covering every tool in the drawer, lol. That stuff works great though in my experience. I'm probably going to pull all the cam sleeves next spring and coat them in the silver stuff again (and hope the high-temp grease is a good substitute until then).
Also, I've never seen a 10mm socket. I think they're a myth. 😉
I enjoyed your project, mainly because I wasn't doing it! The joys of working on your own vehicle. I remember back in the day (pre-electronic everything) we all worked on our vehicles and somewhat enjoyed it. Now not so much. When I raised my truck doing the rear was not bad but I knew the front was going to be bad news so took all the parts to my master mechanic (been going to him more than 20 yrs) and afterward he said he didn't even realize what a big job it was but the front alignment was almost perfect when checked (a miracle). Now I only do little stuff but needed a better jack so bought a 3 ton floor jack last week, WOW, it weighs almost 80 lbs! But it works so nice. Thanks for your play by play and I hope that frame crack got remedied.
Thanks John! Definitely one of the things I like about having this (old) Tacoma is that I can still work on it. Newer vehicles, it seems like only oil changes and tire rotations are things that can really be done at home anymore, without a full computer setup.