
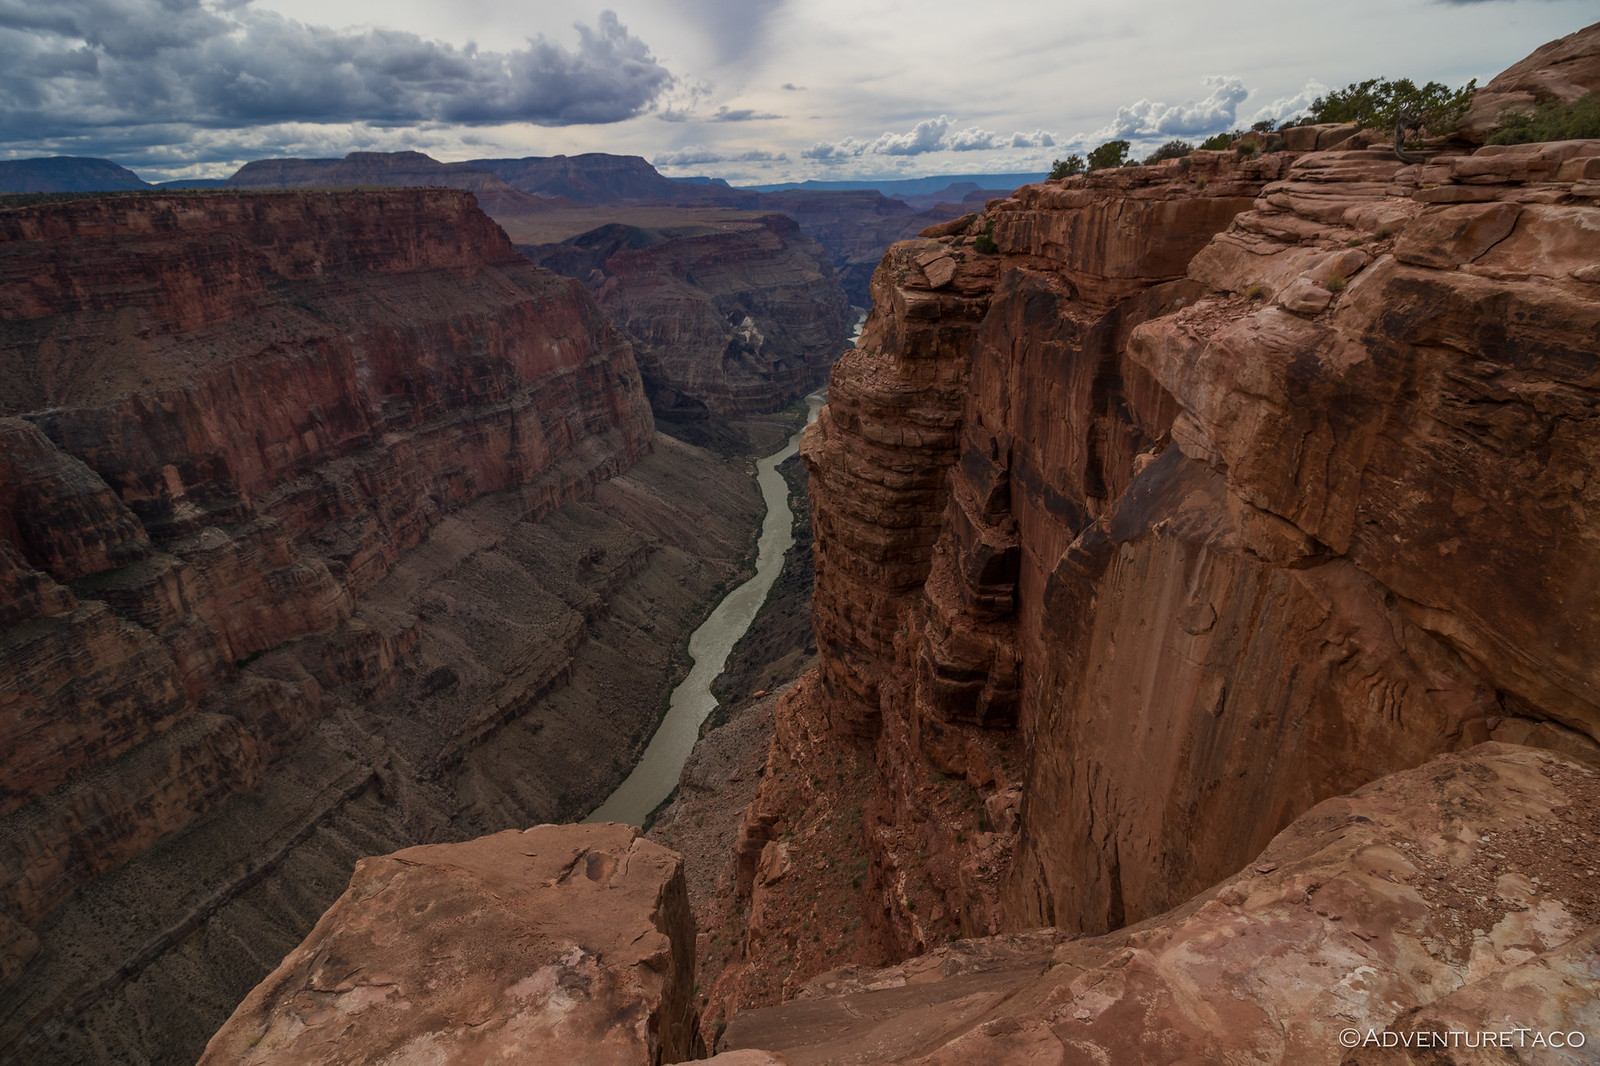
I wouldn't say the wind was calm as we went to sleep overlooking John's Hole in the San Rafael Swell, but it was definitely tapering off. By midnight, only a gentle breeze blew past our camp before cascading down into the canyon.
Until 3:00am. That's when we were sent scurrying for our earplugs. It's amazing how much difference a good set of these can make, and soon we were sleeping like babies, the flapping of the roof top tent muffled as our cliff-edge-cradle was rocked by the wind until just after sunrise.
Wanting to catch the canyon before too many shadows stretched across the floor, I'd set my alarm for way-too-early - especially given the hour we'd lost in crossing time zones - and set about trying to capture the scene before climbing back into bed to warm up for another hour.


We didn't have quite as far to drive on this leg of our trip, so it wasn't until just before 9:00am that we rolled out of camp and headed back towards I-70, where we'd turn east and make our way through the heart of the Swell before turning south for a jaunt along UT-191 through the zoo known as Moab.
For now though, we decided to make our route through the western edge of the Swell into a loop, experiencing the area around Cedar Mountain and East Cedar Mountain a bit more leisurely than we had on our way out to John's Hole.


South of Cedar Mountain, the road entered a series badland-esqe washes, pools of water - and the resulting soft, sticky mud - still present in many of the bends. Doing our best to avoid making a mess of the truck, we avoided what we could and took it slow through sections that spanned the entire road. Remember - even in most situations like this - it's important to stay the trail, otherwise we end up with a braid of trails. And that's what gets trails closed.


Eventually, we emerged from the washes as we rejoined Upper Last Chance Road and headed north towards Mussentuchit Flat. The views here, too, were dramatic, as wind and water have whittled away softer material to reveal dramatic ridges, narrow fins, and tall pillars.


By the time we reached pavement, it was nearly noon and the low fuel light was hesitantly illuminating as the last couple gallons of fuel sloshed their way too-and-fro in the tank. We weren't going to make it 69 miles to Green River, but rather than siphoning gas from the jerry cans immediately, we decided to hold off until we could admire the view at the same time.
When you're in the San Rafael Swell, it's never a long time before you have a nice view.

(Spotted Wolf Canyon and the distant La Sal Mountains)
Now, while the focus of these trips always tends to be what we'll see along the way, something that's always on our minds - and especially @mrs.turbodb's mind, as she absolutely loves to cook - is what we'll be eating for various meals. Over the years we've adapted our style. Originally, we approached meals much as we do at home - grilling chicken, steak, fish, or burgers, assembling salads from ingredients packed away in the fridge. It wasn't the time that it took to accomplish - though it did take a while - but rather, the resulting cleanup that pushed us to the taco-rittoes that became our mainstay for a few years. Simple yet tasty, we could pre-prepare everything but the guacamole, and even then, we'd have only a single pot to wash once dinner was done. That still works well for trips where the Tacoma starts out at home - so we can bring avocadoes that are perfectly ripe at the correct time for us to eat - but when it's in Las Vegas, chicken tender wraps have become our new go-to dinner.
But not this trip. On this trip we ate out every single meal. And there was no more anticipated meal than the one we were going to have in Moab. We'd stopped at Tey's Homemade Mexican Food when we'd passed through on the Utah Backcountry Discovery Route, and @mrs.turbodb had fallen in love with the breakfast tacos. So, when I mentioned that we ought to stop there again, she was 100% on board.


Searching for Juniper Tree Ruin

From Moab, we were headed to Bluff, and from Bluff to Comb Ridge. There, somewhere, is a ruin that I've been searching for over the course of several years. While not unknown, this ruin - with walls supported by a Juniper Tree trunk - is infrequently visited and photographed, and the location is kept well under wraps by those who have been lucky enough to visit.
And I'm fine with that. I appreciate it and understand why. Still, I'll keep searching until I find it.
Looking through the - relatively little - material I have been able to collect on the ruin, a note I'd either missed or not been able to follow up on in my previous research gave me a new idea, so it was with high hopes that we hit the dirt towards a spot I'd marked on the map.
Perhaps, finally, we'd find it!


As we neared the spot I'd marked, a short spur road appeared to take us almost all the way to the ruin. It was hard to believe it would be this easy, and both @mrs.turbodb and I took it as a good sign when we came to a carsonite BLM marker at the head of the spur that read NO VEHICLES.
Donning our hiking getup and heading up the road on foot, we started taking bets on whether we'd finally found it. I forget what the odds we each gave were, but it didn't matter. In a few short minutes we'd find out that the ruin at this site was not the one we'd been searching for!


It was still only 5:00pm at this point, so we decided that we'd spend the rest of the day - and perhaps a bit of the next - exploring the area. I didn't have any more "specific locations" in mind, but I did have some hints that would at least send is in the correct direction - or at least, hopefully, keep us from heading 180 degrees off course. And so, after following another spur road, we once again found ourselves on foot, exploring our way into a canyon and along the base of the cliffs, our eyes peeled and our heads on a swivel.


Settling into our nightly routine, we watched the light fade from the sky over Comb Ridge, a timeless view that's been enjoyed for centuries by those before us. Eventually, it was time to get ready for bed, and as we washed our faces and brushed our teeth, I wandered away from the Tacoma - down the spur road we'd parked at the end of - to go to the bathroom.
That's when I heard it. At first, I thought it was just a grass in the wind, but I still jumped just a little bit and moved to the other lane of the two-track road. Spitting out my toothpaste, I headed back to the truck and grabbed my flashlight.
There, hunkered down under a sage, was a foot-long baby rattlesnake, and I don't think he was all that happy to see me. Of course, now the race was on: could I get the camera and figure out what dials to turn and buttons to press in order to make it snap a photo at night? Probably not.

@mrs.turbodb did not approve. And that tells you all you need to know about which one of us is the smart one in our relationship.
The following morning...
Our night along Comb Ridge was the most pleasant of the entire trip. Temperatures were in the mid-50s °F. There was only the slightest of breeze to move air through the tent. It was still early enough in the season that the no-see-ums were nowhere to be seen. And so, when the sun came up the following morning - again, an hour too early if our internal Pacific Time clocks had anything to say about it - we were well rested and ready for our last day in Utah. And Arizona. And the Navajo Nation.


Our only plan for the day was to make our way west - towards Las Vegas - where we had a departing flight the following morning. Along the way, we'd stop for two short-ish hikes - just outside of Kanab and St. George - but otherwise it was just going to be another day of driving. So, after a quick consult, we decided that we might as well spend a few more hours along Comb Ridge, continuing our search for the Juniper Tree Ruin!
When we - or at least I - think of Comb Ridge, I think of the road system as being relatively straight forward. On the west side, Comb Wash road follows the base of the cliffs, and Butler Wash traces a similar pattern on the east side of the formation. Turns out that on both sides of the ridge, there are maze-like road systems, and we explored several - both in the Tacoma and on foot - as we continued our search.


Ultimately, we covered another 10 (or so) miles of sandstone wall that could have contained - but did not, as far as we could tell with our still-very-good eyesight  - the ruin for which we were searching. In the process, we encountered a few segments of reasonably technical road, and while I hadn't aired down all trip, I decided for one short, narrow section, that it would be a good idea to engage the rear locker.
Pressing the button, it engaged as it always has, and after driving through the obstacle, I pressed the button again to release the locker and didn't give it a second thought.
Until about 300 feet later when I noticed that the locker was still on. Strange.

Not sure what was going on, I performed the "usual" unlocking tricks. Forward and backward, some easy turns. Actuating the locker a couple of times. Nothing worked. Hmm.
After mentioning the issue to @mrs.turbodb, we decided that we'd better call it quits on the ruin search and get ourselves headed in the "back" direction, just in case we needed some professional help to get the locker disengaged.
The locked locker wasn't an issue as we headed south along Butler Wash, but as soon as we turned west on pavement, we experienced the telltale jumping of the rear end. It wouldn't be a problem on the highways - where turns are broad and I was aware of the issue - but I wasn't looking forward to dropping the truck off at the storage facility, where they'd have to make tight turns to park it until my next visit.

After a bit more discussion, we decided we had three options:
- Use the hi-lift to jack up the rear end of the truck until the tires were off the ground, and then try to rotate the wheels to jostle - and release - the locker. This wouldn't fix the underlying problem, but would at least allow us to drop the Tacoma in Las Vegas as we'd planned.
- Take the Tacoma to a shop and have them manually disengage the e-locker by removing the locker housing and prying the locking fork out of the differential. Or, try to do it myself in a parking lot.
- Drive all the way home - some 27+ hours - so I could diagnose and fix the underlying issue.
None of these were great options, but we figured we might as well start at the top and work our way down the list, since neither of us wanted to spend that kind of time on the road.
Option 1 turned out to be harder than it sounded. Trying to balance a 5500 lbs Tacoma with the rear travel of Chevy 63 leaf springs on a hi-lift inserted into the trailer hitch is nearly impossible, and no matter how we tried, it kept falling to one side or the other.
Option 2 also turned out to be impossible given the time. Already after noon on a Friday, every shop in Page, AZ was at least a few days from being able to take a look at the issue, much less solve it.
Option 3 still sucked.
So, we resulted to Option 2B - find a parking lot where I could take a look at the situation and try removing the locker manually. I was not looking forward to this option given that I've never performed this operation before, and I wasn't exactly dressed for the occasion.
As I slid under the truck , I took stock of the situation. All the wiring harness were plugged in and the connecters seemed fully seated. Still, before taking the whole thing apart, I had @mrs.turbodb press the RR DIFF LOCK button a couple times to see if I could hear it attempt to acuate; I could not.
And then, I saw it.

Finding that wire that'd broken was a huge relief. It wasn't something that I could easily fix, but it was something I could temporarily hold together with a pair of pliers while @mrs.turbodb pressed the RR DIFF LOCK button to disengage the locker!
Five minutes later, the diff was unlocked and we were back on the road. I'd have to fix the actual wiring later - the next time the Tacoma ends up at home - but we'd dodged a huge bullet and I thought we might even have time to do those hikes we'd planned for our return trip to Vegas...
The Whole Story


if you get to Hanksville pick up a "Wonderful Wayne County" map. it is chock full of cool things I still need to explore.
Thanks for the tip! I did a search for it online, hoping it might be mentioned somewhere, but came up empty. There are a few gas stations there, do they all have the map? Should I head to a specific one?
I think I got mine at Duke's. Either the RV park or the restaurant. They have the map online but only one side (and it isn't the side you want). the other side has a decent map of the region and a list of points of interest. drop me an email and I will send you a pic of the POI section.
👍, will check those places out. And, email sent!
Spectacular photos, as always. May have to look into this Tey's place the next time I'm in Moab!
Thanks! Hard to get bad photos in a place like that! I mean, I definitely got some bad ones, but at a much lower ratio than normal, lol. 😉
Tey's is one of @mrs.turbodb's favorite eateries that we've found while adventuring. Kinda a bummer that it's in the metropolis of meatheads but I guess it does give us something to look forward to when going there.
In addition to the breakfast tacos, the burritos (which they strangely call 'steak' instead of asada... I suppose due to location) aren't bad, and next time I'm getting a torta, which I saw someone order and it looked spectacular. Again, 'steak.' 👍
Dan, the Parallax video is the best I've seen you do yet!! That is some Nat Geo opening screen shot for real!! Rest of the trip showed some really great USA country. BTW, get you some wire jumpers with alligator clips. Saved my butt on a lighting issue once in Alaska.
Thanks so much Bill! I was pretty happy with how it came out, too. Next time I need to figure out how to make it a little shorter (even I get bored as it rotates around) but it's hard to beat that kind of view.
The alligator clip wire is a great idea. I wonder if I have one down in the shop that I can take down to the Tacoma for the next trip... hmmm. Thanks! 👍
Great photos as always! Personally I don't think that's a volcanic fin in the photo near the top- I believe it's the spiny plates on the back of a previously undiscovered species of giant Stegosaurus, emerging from its ancient grave. Lol...
Any theories about how that wire broke on the diff connector? From the photo it looks like it was snipped.
You have done an amazing job of selecting and cataloging on this site the tools and supplies you carry. Do you haul any electrical repair stuff along (no, I didn't look before typing this)?
A few butt connectors (my preference is Tyco/AMP, but anything will do in a pinch), several feet of wire- 18 gauge is usually plenty- and a basic combo cutter/stripper/crimper (Klein 1019 is a good choice) can save the day. And of course some 3M Scotch Super 88 electrical tape, just because.
Thanks Lars! I knew I should have dug a little around that fin. We weren't all that far from Jurassic National Monument, hahaha!
My best guess on that wire - because I felt exactly the same as you as far as the "cut" goes - is that it got mostly snipped somehow when I was doing the Chevy 63 swap or replacing the rear axle housing. Both projects were doing at essentially the same time, and of course, we had the bed off, all the wiring disconnected, and the various wiring harnesses were constantly being moved around to be "out of the way" of whatever we were welding or grinding or .... I think that at some point, the harness was pulled over a sharp corner, or nicked by a cut-off wheel, or something of that nature.
Strangely, it worked just long enough to engage the locker one last time, but not long enough for disengagement.
As far as electrical repair goes - I've got extra wire, butt connectors, and plenty of Super 88 in my kit, but the little stub of wire that's left on the connector (frame) side of the cut is less than a quarter of an inch, which makes it difficult to get any real purchase on it short of a single solder.
Given that (a) locker use isn't an everyday activity, (b) that I do still have the front locker in a pinch, and (c) that I can get it to engage/disengage by crawling under the truck and touching the wires together, my plan is to hold off on any sort of fix until I can get home and try to get the "final" fix to be the first fix.
If things go south even at home, I can always run a wire around the connector there to get continuity; or I can spend a few hours and figure out how to remove the wire stub from the connector and insert a new one.
Toyota, like probably all auto manufacturers these days, uses electrical connector systems that are all conceptually similar, though the bits n’ pieces are all proprietary.
There are the mating plastic connector shells, gray in your case.
There is a terminal crimped to the pin, obviously not visible.
Where the wire goes into the shell, there will be a seal. Sometimes it’s built into the shell, other times, like here, it’s a silicone donut slid over the wire before the pin is crimped on, and probably partly retained by the crimped terminal itself.
I’m confident you know how to separate the male and female connectors, duh. And in this case when you do it looks like the half of interest, with broken wire, is clipped onto a metal support bracket. Those can be easy or cause you to invent new language. Usually some sort of tang on the shell or bracket, difficulty of which is directly proportional to the bracket’s (in)accessibility.
With the connector free in your hand so you can see its face, there may be a molded piece visible that will appear to be a separate part of the shell. Not all manufacturers do that but it’s common. If there is one, it will likely be a different color than the shell body. Generally you can use a medium jeweler’s screwdriver to pop it out.
Molded into the connector shell will be little plastic tangs that retain the terminals. There will be some sort of feature- slot, groove, etc- to facilitate inserting a tiny tool (said jeweler’s screwdriver for example) to release it. You’ll need to be tugging gently on the offending wire while doing so. You will feel it when the terminal lets go and you should be able to remove the wire stub plus terminal out the back of the connector quite easily.
I am going to guess that once again, Toyota like most manufacturers, uses the same connector terminals across a whole spectrum of their product line. In other words a Corolla of the same vintage probably has connectors with the exact same terminals, even if the actual plastic shell is different. Once you have a terminal in your hand it’s usually easy to tell if an externally different connector contains the same terminals. Which is to say that once you have the terminal out, you can go to your friendly neighborhood Pick N Pull to grab a whole connector with several inches of wire sticking out the back. Back home, de-pin the connector, pick a terminal + wire and use it for the repair. Now you’ll have a nice long pigtail to make re-connecting much easier.
Of course it would be swell if you could just buy the terminals, and maybe you can. In Ford’s case (what I’m most familiar with) they are jealously possessive of their terminal designs and they are unavailable anywhere. Plenty of people have tried.
And maybe, probably, the whole procedure I outlined above is explained in great detail on the Tacoma World forum. Which I have perused extensively but have yet to post on. The sheer number of subforums, length of threads, number of threads, number of members, is mind-boggling to me. I do participate in a couple of forums, one for early Broncos and another for Van’s RV airplanes (what mine is) but the total membership and number of posts on both combined is probably less than one subforum on Tacoma World.
Anyway. Once you know what you are doing, most of the job in question here can be done in a few minutes, and other than a butt connector and crimper, probably the only needed tool is a small screwdriver, or possibly a small pick. And it will be so clean that even someone intimately familiar with that connector probably won’t be able to spot it.
I’m attaching a photo of a gray connector shell with the red terminal protector removed a typical terminal on a piece of wire. Not the best example because it’s a 104 pin powertrain control module connector for a Ford PCM that I’m working on and had handy, but conceptually it’s the same. In this case the cable seals are built into the back of the shell and not visible. It only took me about 15 minutes to pop the red retainer out and depopulate the entire shell, using only a small screwdriver. Betting it will be no challenge for you, besides the groveling under your truck.
Yep, 100% on all this! 😊
Biggest issue for me, I think, in this case is going to be access to - and removal of - the connector itself from its bracket. It’s “conveniently” situated only a couple inches from the bottom of the bed and next to the fuel tank. OF course, the right way to access it is to remove the bed, so I’ll have to decide if I spend 2 hours contorting myself - into positions that shouldn’t exist, while making up words that describe my love for the situation - as I attempt the job with the bed on, or if I skip straight to what I know will likely be the faster and less painful route, even if it “feels slower.” Because we both know, at the end of the day, slower is faster.