
Sooner or later, every Tacoma will need to have its leaf springs replaced. Most commonly, replacement is considered only when one of the installed leafs breaks, or when the rear end of the truck seems to sag under light - or even non-existent - loads.
With a few tricks to make replacement easier, the job isn't a hard one, but the same can't be said for deciding on which leaf springs to use as replacement. This guide will walk through several of the best options for the driver who wants new springs, but doesn't want to change the overall length of the leaf pack (a much larger job that requires modifications to the frame and/or mounting locations of the springs).
Leaf Spring Options
Note: While the concepts here apply to all models of Tacoma - and any other leaf spring vehicle for that matter, the spring options in this guide apply only to '95.5-04 Tacoma's of the 6-lug (4x4 or Prerunner) variety.
Additionally, leaf springs for 95-97 Tacoma's are shorter than those for 98-04 models, which is why they are addressed separately below.
When it comes to installing new leaf springs, there are several different options, though as our trucks become older, the options are beginning to dwindle. Regardless, each option brings tradeoffs in terms of cost, ride, additional lift, and durability.
When purchasing leaf springs, it is important to remember that you need to consider not only the springs, but also the following components:
- U-bolts - each time a new set of leaf springs are installed, new u-bolts should be used. Torquing the u-bolts to spec - in order to keep the leaf springs stationary on the rear axle - causes them to deform. As such, they should not be re-used. When purchasing leaf springs, it is best to buy new u-bolts from the same vendor, in order to verify fitment.
- Rear shackles - leaf springs attach to a Tacoma at two locations. The front location - called the front hanger - is a metal bracket welded to the frame, where a bolt secures the leaf spring. The rear location - called the shackle - is a flexible bracket that is bolted to the frame and leaf pack, allowing the pack to move as the leaf spring flexes. Over time, the bushings in the shackle can wear out, making it difficult to move. If that's the case, the shackles should be replaced.
- Extended rear brake line - any leaf spring that lifts the rear end of the Tacoma needs to be paired with an extended rear brake line. Otherwise, the (short) stock brake line could be broken as it is forced to stretch a longer distance between its two attachment points - one on the frame and the other on the rear axle.
- Extended rear shocks - Any leaf spring that lifts the rear end of the Tacoma above stock should be paired with a new set of rear shocks so that the leaf spring travel is not limited by the stock shocks.
Option 1: Stock Replacement
This is a good option if all you want to do if you use your truck as it was originally intended from Toyota and are happy with the performance. Likely, you are replacing the leaf springs because - over the last couple of decades - you've simply worn out your existing springs and they are now sagging. Replacing them with a stock replacement will mean that you maintain the relatively soft ride of a stock Tacoma, can carry moderately heavy loads rarely, and are not looking for additional lift (beyond lifting the truck back to its original height - which may be 2-3" higher than where it sits with worn leaf springs).
Cost of this option will depend on vendor, and you really have two options when it comes to replacement:
- Purchase new leaf springs from Toyota. These are expensive, but are the "truest" direct replacement. Part numbers are as follows:
- 95-97 - R: 48210-04053 | L: 48220-04060
- 98-04
- SingleCab or XtraCab: R: 48210-04340 | L: 48210-04340
- DoubleCab (w/o TRD): R: 48210-04330 | L: 48220-04130 (higher spring rate than XtraCab)
- DoubleCab (w/ TRD): R: 48210-04360 | L: 48220-04150 (higher spring rate than DoubleCab w/o TRD)
- Purchase a set of standard duty leaf springs from General Spring. These are significantly cheaper than purchasing from Toyota, have a good reputation for ride, and have weight/longevity ratings similar to Toyota.
- 95-97 - General Spring Standard Duty 95-97 Tacoma Leaf Spring
- 98-04 - General Spring Standard Duty 98-04 Tacoma Leaf Spring. Note: General Spring lists these as 98-00, but they fit 98-04.
Going with these options shouldn't require much in the way of additional parts that need to be replaced at the same time. Only the following will need to be replaced:
- (4) U-bolts.
- Toyota Tacoma OEM U-bolts (90117-14008)
- Aftermarket U-bolts that meet the following criteria: (ToytecLifts) (General Spring)
- Bend Type: Square
- Diameter: 9/16"
- Inside Length (width of leaf springs): 2.5"
- Length of bolt leg: 7"
Option 2: 0-3" Lift with Small-to-Moderate Intermittent Load
This is a good option if you still want to use your Tacoma as a daily driver - sometimes with moderate loads in the bed; sometimes empty - while also adding a few inches of lift and the ability to carry heavier loads (up to 350+ lbs) on a relatively infrequent basis, for reasonably short periods of time.
The ride of these options will not be as soft as a stock Tacoma.
- Old Man Emu (OME) Dakar Leaf Springs - These provide approximately 2.25" of lift over the original stock leaf springs, and provide additional support for approximately 200lbs of gear in the bed of the truck (without sagging).
- 95-97 - You must purchase leaf springs, bushings, and bushing sleeves separately, and can optionally add an additional leaf:
- (2) each of CS018R (single cab) or CS019R (xtra cab). Note that these are sometimes sold as a pair, with a part number similar to CS019R-P.
- (2) SB43 Bushing Kits. Each kit contains bushings for one leaf spring.
- (2) 181469 Bushing Sleeves, which reduce the leaf bushing inside diameter from 18mm to 14mm for the shackle pin.
- Optional: (2) of OME D6XL, and additional leaf that can be inserted into the EL122R leaf packs to provide and additional 1" of lift and up to 220lbs constant load.
- 98-04 - You must purchase leaf springs and bushings seperately, and an optionally add an additional leaf:
- (1) each of L: EL122RA | R: EL122RB. Note that these are sometimes sold as a pair, with a part number similar to EL122R-P.
- (2) OMESB121 Bushing Kits. Each kit contains bushings for one leaf spring.
- Optional: (2) of OME D43XL, and additional leaf that can be inserted into the EL122R leaf packs to provide and additional 1" of lift and up to 220lbs constant load.
- 95-97 - You must purchase leaf springs, bushings, and bushing sleeves separately, and can optionally add an additional leaf:
- General Springs Heavy Duty Leaf Springs
- 95-97 - General Spring Heavy Duty 95-97 Tacoma Leaf Spring
- 98-04 - General Spring Heavy Duty 98-04 Tacoma Leaf Spring. Note: General Spring lists these as 98-00, but they fit 98-04.
- Deaver Springs 8-Leaf Pack (J59). 98-04 only. This pack provides approximately 1.5" of lift over the original stock leaf springs, and provides additional support for approximately 200lbs of gear in the bed of the truck (without sagging).
All of these options require the following additional parts:
- (4) Extended U-bolts. The exact shape and length will depend on whether a u-bolt flip kit has been installed or not.
- Without u-bolt flip, bolts should meet the following specifications: (ToytecLifts) (General Spring)
- Bend Type: Square
- Diameter: 9/16"
- Inside Length (width of leaf springs): 2.5"
- Length of bolt leg: 8-9"
- With u-bolt flip, bolts should meet the following specifications: (General Spring)
- Bend Type: Round
- Diameter: 9/16"
- Inside Length (diameter of axle housing): 3"
- Length of bolt leg: 8-9"
- Without u-bolt flip, bolts should meet the following specifications: (ToytecLifts) (General Spring)
- (1) OME FK21 - tailpipe relocation bracket
- (1) Extended rear brake line, at least 20" in length.
- (2) Extended rear shocks - as appropriate. Exact shock will depend on shock mounting location, total overall lift, etc.
Option 3: Custom Lift with Heavy Constant Load
This is a good option if you are constantly carrying heavy loads (600+ lbs) over all types of terrain, and rarely using your Tacoma as a daily driver. Generally, a 2-4" lift while carrying heavy loads will also be incorporated. The ride with an empty bed will be extremely rough, and the lift may increase beyond even 4". This is by far the most expensive option, but also allows for complete customization of the performance characteristics of the leaf pack.
In this situation, the only real option is to arrange for a custom leaf pack to be built. The #1 company to do this - as of this writing - is Alcan Spring, located in Grand Junction Colorado. Expect to pay $1000 or more including shipping. When calling Alcan to place an order, you will want to know the loaded weight of your Tacoma, ideally over both the front and rear axles. You'll also want to inform them how much lift you'd like the spring pack to provide when those weights are present.
This option will require the following additional parts:
- (4) Heavy Duty Extended U-bolts. The exact shape and length will depend on whether a u-bolt flip kit has been installed or not. In most cases, a 9/16" u-bolt flip kit with custom bump stops should be installed with this option.
- (1) OME FK21 - tailpipe relocation bracket
- (1) Extended rear brake line, at least 20" in length; add an additional inch for every inch of lift that the leaf springs provide over 3".
- (2) Extended rear shocks - as appropriate. Exact shock will depend on shock mounting location, total overall lift, etc. In most cases, a shock relocation should be performed with this option.
Option 4: Custom Lift with Heavy Constant Load and High Performance
As opposed to bolting on new parts that provide additional performance/capabilities, this option requires significant fabrication - including cutting of the frame - in order to provide even more capability. As it is orders of magnitude more work, it is covered in different guide.

Tools to Replace Leaf Springs
There are not many tools required to replace the leaf springs, and no special tools are required. To do the job, you will need:
- Various sockets (this is a good kit) and/or impact sockets (this is a good kit)
- 19mm - to remove the bolts that secure the leaf spring to the front hanger and rear shackle
- 21mm - to remove lug nuts
- Various wrenches (this is a good kit)
- 10mm, 12mm - to hold brake line fittings as brake lines are removed/replaced/installed
- 19mm - to remove the bolts that secure the leaf spring to the front hanger and rear shackle
- 10mm flare nut wrench - to remove/replace/install brake lines
- Flat screwdriver or pry bar
- Breaker bar
- Torque Wrench
- WD-40 or another similar penetrating oil - to make loosening nuts and bolts easier.
- Floor jack
- (2) of 6-ton Jack Stands
- (1) 3-ton Jack Stand
- (2) heavy duty ratchet straps
The job is also easier with:
Doing the Job
With the requisite parts and tools gathered, the job of replacing the leaf springs entails disconnection and removal of the old leaf springs, and installation of the new. Optionally, extended brake lines and rear shocks may be removed or swapped at the same time. This guide outlines - but does not focus on - those operations, to the extent possible.
When replacing leaf springs, it is easiest - and safest - to do one side at a time. After completing the process on one side of the truck repeat it for the other side.
Securing the Truck and Preparation
- Park the truck on a flat surface and chalk both sides of both front tires.
- Lower the spare tire from under the bed and set it aside.
- Use a floor jack under the rear differential to lift the truck high enough to raise the tire off the ground.
- Remove the wheel.

- With the floor jack still in position, raise the truck high enough to position a fully extended 6-ton jack stand under the frame rail, approximately 12" in front of the leaf hanger on the side of the truck that will have the leaf spring replaced.
- Lower the floor jack until the frame is resting on the jack stand.
- Place a 3-ton jack stand at its lowest height setting under the rear axle housing, 4" inboard of the leaf springs. Note: do not lower or remove the floor jack.
- Check the tension on the rear brake line. If it is already under tension, or will be under tension if the rear axle is lowered to the jack stand, proceed to Replacing the Rear Brake Line before lowering the rear axle to rest on the jack stand; otherwise, lower the rear axle to rest on the jack stand, and remove the floor jack.

Once it has been confirmed that the rear brake line is not under tension, lower the rear axle onto the jack stand. Two jack stands are now supporting one side of the truck.
Replacing the Rear Brake Line with an Extended Line
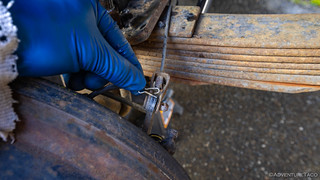
- Using a long flat screwdriver or a small pry bar, remove the brake line clip that secures the brake line at the driver side frame rail. Note: you may not be able to see this clip, as it is behind the frame bracket.
- Using a 10mm flare nut wrench on the hard line, and the appropriate sized wrench on the soft flexible brake line, disconnect the brake line at the driver side frame bracket. Note: work quickly at this point as brake fluid will be leaking.

- Using a 10mm flare nut wrench, remove the flexible brake line from the rear axle housing.
- Using a 10mm flare nut wrench, install the stainless steel extended rear brake line into the rear axle housing.
- Pass the stainless steel extended rear brake line through the bracket at the driver side frame rail, and thread the compression nut on the hard line into the stainless steel brake line by hand to prevent cross threading.
- Once the compression nut is threaded into the soft line, use a 10mm flare nut wrench to tighten the compression nut to the soft line.
- Secure the hard/soft line connection in the frame rail bracket using a brake line clip. Note: you can use the original clip if it is still in good shape; otherwise, use a new clip.
- Clean up any brake fluid that has spilled.
Disconnecting the Emergency Brake
This procedure is only necessary if your emergency brake cable passes above your leaf springs, rather than below.
- Remove the small clip that holds the pin that secures the emergency brake cable to the rear brake drum.
- Move the emergency brake cable out of the way.
Disconnecting the Old Leaf Pack from the Rear Axle
Disconnecting the leaf spring from the axle before disconnecting it from the frame makes the process easier.
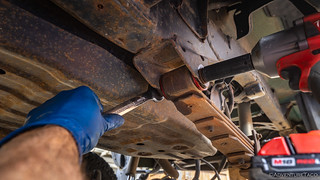
- Thoroughly soak the four nuts that secure the u-bolts with penetrating oil.
- Use a 19mm socket or wrench to remove the bolt that secures the lower shock eye to the shock mount. Note: you can leave the upper shock mount attached.
- Pull the lower shock eye off of the lower shock mount and move it out of the way.
- Using a breaker bar, remove the four nuts that secure the u-bolts.
- Remove the u-bolts as well as any hardware (bump stop, u-bolt plate, etc.) that they secured.
Disconnecting the Old Leaf Pack from the Frame
Tip: Disconnecting the leaf pack from the frame is significantly easier when there is no pressure on the leaf pack itself - that is, it is not being compressed, nor is it holding up the rear axle.
- Use the floor jack under the rear diff, to raise the rear axle housing off of the 3-ton jack stand slightly; remove the 3-ton jack stand.
- Lower the floor jack until the leaf pack relaxes and is not under pressure. When this occurs, you will notice that the leaf pack separates slightly from the mounting perch on the rear axle. Once it does, raise the floor jack until the leaf pack is just touching the mounting perch. Note: If you are not able to lower the rear axle far enough for the leaf pack to relax, continue with step 3; otherwise, continue with step 6.
- Using the floor jack, raise the rear axle back to a position where the 3-ton jack stand can be inserted, and insert the jack stand.
- Remove the floor jack.
- Position the floor jack and a sturdy piece of wood under the trailer receiver and raise the jack until the leaf pack relaxes and is not under pressure. When this occurs, you will notice that the leaf pack separates slightly from the mounting perch on the rear axle. Once it does, raise the floor jack until the leaf pack is just touching the mounting perch. Note: be very careful when performing this operation. Ensure that the floor jack cannot move, that the 6-ton jack stand is aligned with the frame, in case the floor jack does move, and ideally place a second 6-ton jack stand under the frame in a location where it is contacting the frame.
- Using a 19mm socket, remove the two nuts on the rear shackle, then remove the inboard portion of the shackle. Note the orientation of the nuts and washers for reinstallation.

Supporting the truck at a height where the leaf pack is relaxed.

Removing the shackle.
- Use a 19mm socket and 19mm wrench to remove the nut, washer, and bolt that secure the forward eye of the leaf spring to the hanger attached to the frame. Note the orientation of the nuts and washers for reinstallation.
- Remove the leaf pack from the truck.
Connecting the New Leaf Pack to the Frame
With the old pack out of the way, installation is mostly the reverse of removal. As with removal, the only real trick is making sure that the leaf pack is totally relaxed when it is installed, so you aren't fighting to get it into place. Usually, a new leaf pack will have more arch than the leaf pack that was removed, which means moving the frame and rear axle further away from each other in order to install the new leaf pack.
- Create additional space between the frame and rear axle by either:
- If the floor jack is under the rear axle, lower it an additional 2" - if possible - to move the rear axle further from the truck frame.
- If the floor jack is under the frame (or the trailer receiver) of the truck, raise it a couple of inches. Note: This is a dangerous operation as it raises the frame off of the 6-ton jack stands. Place additional jack stands and safety devices to "catch" the truck if the floor jack moves or gives way.
- Place the new leaf pack into position, setting the center bolt into the corresponding hole on the leaf perch. Note: it is unlikely that the front or rear leaf eyes will align with their respective mounting points at this time.
- Align the front leaf eye with the corresponding mounting location and insert the bolt through the mount to hold the leaf pack in place. Note: it is likely that you'll need to remove the center pin from the hole on the leaf perch in order to do this; that is fine.
- Observe the vertical position of the rear leaf eyes in comparison to the rear shackle. If it is higher than the shackle, lower the rear axle or raise the frame slightly (as in step 1a or 1b) so that the rear leaf eye is aligned with the rear shackle.
- Slide the rear leaf eye onto the rear shackle and reassemble the rear shackle, threading on the washers and nuts until they are finger tight.

Connecting the New Leaf Pack to the Rear Axle
Once the leaf pack is secured to the frame, it is a matter of aligning the center pin with the hole in the leaf perch and securing everything. A ratchet strap and second person will come in handy here.
- Ensure that the leaf pack is relaxed, or just slightly hanging from the frame; ensure that there is no pressure between the leaf pack and the perch on the rear axle.
- Observe whether the center pin of the leaf pack is too far forward, or backward, to fit into the hole in the leaf perch.
- Using a ratchet strap between the rear axle and a point on the frame, slowly ratchet the rear axle the appropriate direction, until the center pin of the leaf pack and hole in the leaf perch are aligned.
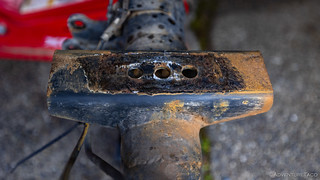
If there is more than one hole on the leaf perch, you want to align the center pin with the center hole.

A ratchet strap makes small adjustments easy and allows you to inspect the relation between the center pin and center hole of the perch independently from holding the rear axle in place.
- Reduce the space between the frame and rear axle by either:
- If the floor jack is under the rear axle, raise it until the center pin seats into the leaf perch.
- If the floor jack is under the frame (or the trailer receiver) of the truck, lower it until the center pin seats into the leaf perch. Note: This is a dangerous operation. Place additional jack stands and safety devices to "catch" the truck if the floor jack moves or gives way.
- Loop the new u-bolts around the leaf pack, axle housing, and through the u-bolt plate.
- Hand tighten all four nuts on the u-bolts

- After all four nuts are hand tight, torque them gradually and evenly to 80 ft-lbs.
- Reattach the lower shock eye to the lower shock mount.
Finishing up and Torquing to Spec
- Reconnect the emergency brake cable.
- Reinstall the rear wheel ensuring that all six (6) lug nuts are tight, but not yet torqued.
- Remove any jack stands and floor jacks, so that the truck is resting on all four tires, under its own weight.
- Torque the u-bolts to:
- Toyota OEM u-bolts: 90 ft-lbs.
- 9/16" Heavy Duty u-bolts: 110 ft-lbs.
- Torque the front leaf spring mount to 116 ft-lbs.
- Torque the rear leaf spring shackle (both nuts) to 67 ft-lbs.
- Torque wheel lug nuts to 89 ft-lbs.
- Torque the lower shock mount to 53 ft-lbs. Note: torque spec may be different if using relocated shocks.

Bleeding the Brakes
If you replaced the rear brake line with an extended line as part of this procedure, you'll need to bleed the brakes.
Note 1: always bleed from furthest-to-closest bleeder to the master cylinder. In Tacoma's and 4Runner's, that is passenger rear, driver rear, passenger front, driver front. In this situation, since we've only messed with the rear lines - and assuming you didn't drain the reservoir under the hood in the process - we will only do the passenger rear and driver rear, in that order.
Note 2: This can make a bit of a mess. Have a catch basin or shop rags positioned below the bleeder to catch brake fluid that comes out of the bleeder, or fit a clear plastic tube over the bleeder that funnels the brake fluid into a container, in order to keep things clean.
- Check the brake fluid level in the reservoir under the hood. If it is below the full line, add fluid to the full line.
- Have a second person sit in the driver seat and pump the brake pedal until it is firm - usually a few pumps.
- Place an 8mm box-end wrench over the bleeder valve and get the valve to "barely tight."
- Have the second person pump and hold the brakes in the following pattern - Pump, Pump, Pump, Pump-and-Hold. Note: it is helpful if they say this as they are doing it.
- While the brakes are being held, loosen the bleeder valve to slowly let out air and brake fluid for a short period of time, then re-tighten the bleeder valve. Say "again," to your helper so they know they can stop holding the brakes.
- Repeat steps 4 and 5 until only brake fluid comes out of the bleeder valve (no air).
- Check the brake fluid level in the reservoir under the hood. If it is below the full line, add fluid to the full line.
Repeat this process for each corner of the vehicle.
You're done!
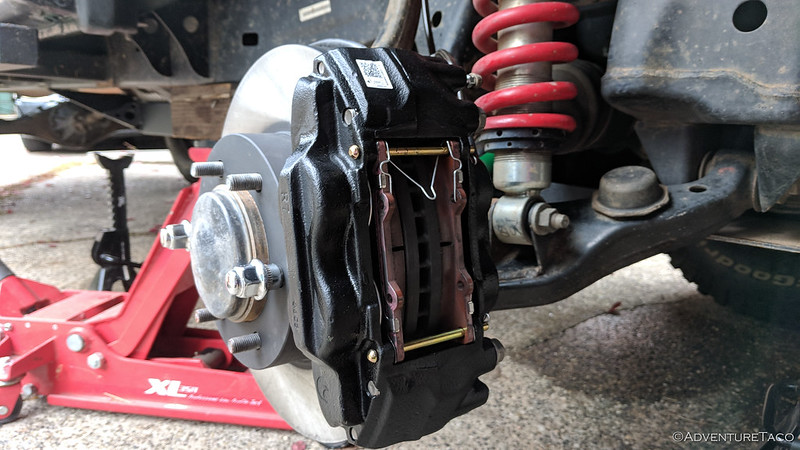


Nice writeup, thanks! Does your e-brake cable rub on the new leaf pack? It looks like it might from the final pic. Did you address that somehow?
Thanks Greg, glad you found it useful. My e-brake cables do rub on the new leaf pack (they rubbed on the first Alcan pack as well), since they go up and over the pack (I think 03-04 e-brake cables go under the pack, one of the few differences over the 1st gen model years). Anyway, I've kept a pretty close eye on the cable since I use it all the time - dozens of times each day when I'm out on the trail, which is a lot of the time - and I've not noticed any wearing of the cable at all. That said, I'm in a relatively corrosion-free area of the country, so it could be different in the rust belt. Still, to raise up the cables and prevent them from rubbing is pretty easy. You can use a piece of 1" angle to do it, as shown here:
Late to this post but very helpful. Do you know if this part can be purchased or is this a homemade fabrication? Thanks.
This is a homemade fabrication. You can just pick up a 1-foot long piece of 1 x 1/8" angle at your favorite Lowes Despot and cut a couple of them for yourself. There's about 2" of space between the holes, but that can be longer or shorter depending on how tall your leaf pack is.
Love how clean this set up is, just wondering what you did for bump stops with the U-Bolt Flip? Pictures would be awesome!
Thanks! You can see the setup I used for the rear (it's more than just the u-bolt flip, since when you do that, you also need to relocate the shocks) in this series. The bump stops I used are mentioned/shown in the first post about gathering parts. I should note that these bumps aren't sold anymore, but I think you can pick up bumps for a 2nd gen Tacoma and simply use those; there shouldn't be any difference...but call to verify first).
Rear Shock Mount Relocation
Ok cool man! Thanks for getting back to me! I recently did the U-Bolt flip and shock relocation and for the mean time I’m not running any bump stops so I was just curious! Thanks man!
Hello, thank you for all this neatly presented information not just on this write up but all of them! I have a question though…. I was planning to replace my frowning original leaf springs with 218k miles on them with a set of the general springs HD leaf packs. It was my understanding that they are supposed to maintain a “stock” ride hight? I noticed you have them listed as requiring an extended rear brake line and exhaust hanger relocation. Is this info accurate?? I had planned on replacing the rear brake hose while I was under the truck but I have a stock length replacement I picked up a while back when it was on sale. If those springs are supposed to sit at stock hight why the need to extend the brake line and move the exhaust hanger. For reference I’m working on an 04 tacoma prerunner double cab 3.4l automatic 2x4 and it has a shell (250lbs??) on the back full time.
Hey Alex, according to General Springs, the HD leaf packs will give you a 1-1/2" lift above stock height. On some trucks I've seen closer to 2", and that starts to get into requiring an extended rear brake line and exhaust relocation territory.
If you've got the replacement brake line already, you might as well give it a try. With that topper back there, you'll likely be totally fine at ride height, but you should make sure to fully droop out the rear suspension using a floor jack after you install it and the new line, to be sure the line is long enough, before you head away from civilization and find out on the trail! 😉
If you end up needing a longer extended rear brake line, I've started to stock them as of a week ago. They're on sale at the moment: Extended Rear Brake Line.
Awesome! Thanks for the info and quick response!! I just ordered all the parts for the rear leaf spring job, and I am aiming to install them over one of the next 2x weekends, which ever one I can get a free day to do it. I think I will take your advice and see how it goes with the brake line I have and if it doesn’t look kosher then I will probably buy one from you and get that sorted out! I honestly don’t do a ton of off roading in this truck, maybe the occasional tooling down a fire road, so I’m not to worried about the suspension getting maxed out extension wise, but I am also a firm believer that the braking system is by far the most important system on a vehicle and I don’t want to even tempt fate if it looks like the brake line could get stretched/broken.
Sounds good! Good luck with the install and by all means, shout if you've got questions! 👍
Hey I have one more question! Do you know if there is indeed a difference in leaf spring shackles of the earlier tacomas and the 01-04 tacomas?? I pulled a bone head move not paying attention and I need to replace the shackles but I keep finding conflicting information online. Some places say that 95.5-00 and 01-04 have different shackles and other sites say they are the same…. I know the springs are different, but the shackles listed for the 95-00 look identical to the shackles in my truck… just wondering if you had any experience on this subject. Thanks!
You don't need to replace the shackles, and as far as I know, they are the same. In fact, they are 100% the same from 98-04, but might be different for 95-97 (which had shorter leaf springs). Still, unless yours are totally rusted out, there is no reason to replace them IMO.
Well…. I sorta pulled a bone head maneuver and messed my original ones up…. Idk what I was thinking but I looked at the torque sheet in the FSM and saw 120 and tried to torque them to 120ft lbs…. It’s obviously supposed to much lower than that like 67 or something and I torched the threads both on the stud and in the nut….. it was on thanksgiving day and I was trying to hurry up before people came over. oh well…. Shit happens. I went ahead and ordered a set that were listed for 98-00. I also ordered an extended brake line from you!
I came across your instructions, printed them out, and just got done replacing my '01 leaf springs. Your instructions were awesome!
Under the section titled "securing the truck", might be a type in #8? Not intending to be critical, just mentioning it in case you want to check it out. I followed your steps exactly and it made the process so easy. Thanks for your efforts.
Awesome, glad to hear that the guide helped you! I took a look at step #8 and didn't see any typo, can you let me know what you saw there?
Oh, man, “Pull the lower shock eye off of the lower shock mount and move it out of the way” sounds so simple. I spent at least two hours moving the axle up and down on a jack, doing everything I could to try to take tension off the eye bolt, before finally just hitting the shock body laterally with a hammer to get it to come off.
Then I couldn’t get the front spring bolt to budge, went and bought a longer breaker bar, and had no better luck with that! Amazon delivers my Sawzall tomorrow.
Hopefully I will finish this project by spring 🤣
Oye! Those rubber bushings in the shock eye can really weld themselves onto the post. Be sure to clean up the post very well and apply a good dollop of antiseize to the new post and bushing when it goes on.
For the leaf spring bolts, use some penetrating oil and a nice hot torch to break up the corrosion, and if you've got an impact wrench, it can do wonders (just be careful of the gas tank on the driver side). Also, it's always easier to loosen the nut than it is the bolt, so when you can, put the breaker on the nut.
Good luck!
Hello, I appretiate the information here. Context: I have a 98 regular cab 2.7 4x4 with some badly sagging rear leafs with 240k on them, front shocks are also shot. My base weight has ~200lb in the bed that I would be at maybe 50% of the time, but I regularly haul tools and material weighing an additional 100-300lb and I have maxed out payload capacity 2-3 times this year (at least what my sad leafs could handle). I really dont want to lift the truck more than 2 inches, 1.5 would be perfect. Now my question:
If I put General HD leafs in the back do you think I would need to lift the front to get a relatively level stance (after breaking in the leafs) considering the payload Im usually carrying? I dont really know how much lift to expect from the HD springs and if I should preemptively lift the front at the same time to avoid excessive rake. Seems impossible to know much much lift in the front I would need until the new leafs get settled. Thanks for any insight or pointers
Hi Coleman, Given your description of the situation - and assuming you're carrying around that weight most of the time - I'd say that you probably don't need a lift up front to keep things relatively level. However, you will want to refresh your front suspension when you put the General HDs in the rear, because your current front suspension is probably down 1-2" from stock (just because it's old and worn out). Therefore, if you don't get it back to stock height, the new General HDs in the rear will have a 3-4" difference (back to stock, plus 1-1.5" with weight) compared to the fronts, and that'll look a little stinkbuggy. Bringing the front up those couple inches so it is back at stock height will probably leave you with a little bit of rake from front to back, but not too much. And a little looks good on our trucks! Good luck, let me know how it goes. I'd love to see some before/after pics! 👍
Thanks so much! Do suspension lifts with leaf springs increase overall travel or do they just increase uptravel at the expense of droop? I figure its the latter and the General HD basically is like increasing preload on a coil spring. Is the 1.5 inch lift they specify assuming 0 load?
I love the look of bigger tires on a truck that isnt dramatically lifted and my theory from running a sagged out rear end is that using droop gets you better articulation and traction than having to compress and flex with uptravel. I dont do any serious crawling and this truck is my daily, hardest stuff id do is like a 4-5/10 on OnX. Currently running 30.5" tires with 4.10 gearing, last pieces of the puzzle will be 235/85/16 (31.7), some armor and regearing and adding a locker to the rear. My truck had manual locking hubs on the front when I bought it and I didnt realize they werent standard equipment until almost a year later!
Ill take some measurements and let you know how it goes, not sure how to share pics with you but I will try. Thanks again!
Lift with leaf springs is a little different from the up/down travel perspective than it is up front with the coilovers. That's because you usually have a little more "extra length" in the rear shocks than you do in the front, so adding lift can actually allow you to take advantage of the full shock length, in effect, increasing your travel. That doesn't work forever - eventually you'll run into the same issue as up front - but with a mile 1-2" lift in the rear, you're unlikely to, and you'll really just be adding a bit of additional room for uptravel.
235/85R16s will be a great tire. Nice and skinny will be easy on the drive train as well as the overall weight. Plus, I really like that pizza-cutter look on these already-narrow trucks. They really are starting to look like mini-trucks next to today's behemoths!
Let me know once you've got some pics and we can figure out how to get them sent over! Good luck!
I ended up getting in touch with Deaver springs and sent them some General HD leaf packs that they installed their F85 overload replacement on. Being that I wanted to stick with 1.5-2" lift max they rolled out the F85s to have less arch. As far as I can tell I might be one of the few trucks running this sort of leaf setup and I am really pleased with it, but I think I ended up closer to 2" of lift in the end which gave me some troubles with the shocks. I went with the Icon 2.0 series that should have been compatible with up to 1.5" of lift, however, the passenger side came up about 0.5" short (driver side fit perfectly). I needed to get the job done so I jacked up the passenger leaf a bit and made it fit but I always have this fear in the back of my mind when Im wheeling that my shock is going to rapidly disassemble if I reach full droop. What would you do if you were in my shoes?
Anyway Im really stoked on the leaf packs I got. They feel superb with around 500lb in the bed with minimal sag, they ride a bit stiff with lighter loads but nowhere near as bad as I feared. I have yet been able to bottom them out either, or if I have they have been progressive enough to really smooth it out, the rear end feels bottomless I love it. If i could go back and do it over I would get a linear or progressive shock to pair with them, the digressive icons kind of add to the stiffness in compression when unloaded, I may re-valve them in the future.
I tried to attach some pics but the file size limit is 2mb and my files are too big
Awesome, sounds like you've got a great setup that you're happy with, and that's all you can ask for. "Bottomless" is such an awesome feeling, and not one that everyone is able to achieve, so kudos to you.
For the full extension in the rear - I'd say you mostly don't need to worry unless you're doing big jumps. Usually - at least for me - full droop in the rear is something that only happens when I'm going slow through some ditch or mogul-like terrain. In that case, your shock will be the limiting factor, but at such a slow speed, it'll be just fine.
Technically the right thing to do would be either (a) longer shocks or (b) limit straps. Obviously the second is cheaper, but limits droopability just a bit (you'd strap them about 1/2 - 3/4" before the shock would be the limiter, since the straps will stretch). That's probably what I'd do, but I might not get around to it for 6-12 months, and in the meantime I'd just be careful. In fact, that's exactly what I did with my front shocks for the first 15 months I had them installed!
Great content! I have a 2019 TRD OR, Double Cab Long Bed. My standard bed configuration is with a Leer topper (cab height, ~200lb) and maybe 40lbs of tools. In the winter (UT) I usually put 120lb of sand in the back too. I am rocking a slight frown in my stock leafs with this configuration. I seasonally load up a bunch of hunting + camping gear for 3-6 weekends a year (total bed load probably around 500lbs including topper + tools). I have already installed blue Sumo Springs. Don't really do any pulling.
I have been eyeing the General Spring HD (2005-2022) because of the affordability and ability to get a bit more weight capacity.
But was also recommended the Dobinson DOBINSONS REAR LEAF SPRING - L59-110-R or the 111-R's.
Planning on doing new U-bolts as well as Bilstein 5100's while I'm at it. Would love to opt for the more affordable GS leaf packs but have heard of a few red flags due to rust and broken leafs after a few years. I am not a big time car wrencher but am competent and would love to swap these once. Curious if you have input with regard to the General Spring vs Dobinson's? Appreciate all the helpful info!
Hey Peter, I've heard good things about both the General Spring HD and Dobinsons, so I wouldn't hesitate to go with either, as long as you get the springs that are designed for your truck (and obviously not the ones listed here, since these are all 1st gen Tacoma parts). I guess if I had to choose, I'd probably choose General Spring, but only because I know more folks running them. That though isn't much of a reason, since I'm sure it varies from circle to circle of folks.
I appreciate the input! One positive to the General Spring is that they come with bushings, Dobs dont. Is it ok to reuse the stock bushings? Otherwise dobs sells poly ones but im concerned about squeaking.
Nope, you can't reuse the stock bushings. IIf they are they are like 1st gen bushings, they will be fused into the leaf springs, and more importantly, they are likely worn out from the years/weight on the truck.
Poly bushings on leaf springs usually don't squeak that much in my experience. You're much more likely to get squeaking from the leafs/leaf spacers, usually.
Still, if you're worried about it, that's just another reason to go General Springs! 👍
I appreciate the input - thank you! Looks like I might be leaning that way.
I've got a lifted 96 Tacoma that's my daily driver and I need new rear shocks. I'm not terribly satisfied with my leaf springs, and if I'm getting Radflos custom valved for the truck, I may as well get the springs right. I'm trying to figure out what right looks like.
Currently the truck has a leaf pack from Northwest Offroad (long out of business). When I bought the truck the overload leaf (1/2" thick) was installed upside down, so the truck was constantly on it. The ride was terrible and it had an extreme stink bug look, even with 300 lbs of sand in the bed.. I pulled the leaf and the ride is better now (no more sand in the bed), though still quite stiff.
If I needed a new leaf pack, I'd go with option 2, but the pack is in fine shape.
Is it worth my time to measure ride height, add a known amount of weight to the bed, and re-measure? From that I should be able to back out the spring rate which can be compared to a known-good spring such as the Dakars. I'm trying to figure if the truck just rides like a truck, or if it's still overly stiff.
If the spring rate is significantly higher, I'll pull another leaf and repeat my measurement.
The next question, which I don't know if anyone knows the answer to, is what bushings will fit the Northwest Offroad leaf springs? Are bushings fairly consistent across different 1st gen Tacoma leaf springs? If they aren't, and sourcing the correct bushings will be a tremendous pain, I'd be tempted to just replace the whole leaf pack, which would be a solution, but I'd rather not spend the money if I don't have to.
Thank you for the help, I really appreciate it.
Hey Ben, I think no matter what, you're going to feel like the Tacoma rides like a truck. Even my heavy beast (5,600lbs) is reasonably 'trucky' on pavement and I have super-soft Chevy 63 leaf springs on it these days.
In your situation - which sounds to me like intermittent medium size loads, I'd probably try removing a leaf from your pack befor doing anything else. Remember, the lower (shorter) leafs hold more weight (and are stiffer) than the longer upppers, so I'd start somewhere near the bottom with removal. Only if you can't get it feeling good - and at a good ride height - by playing around with the leafs, would I go for a new pack. And then, Option 2 does seem like the right thing1
As for bushings - they aren't standard, but there are bushings of all different sizes. I'd use a set of calipers or tape measure to figure out what size you need (outer and inner diameter, sleeved, etc.) and then just head down to Napa (or your local part store) and see what they've got.
Thank you! I don't mind the truck feel, but it seems overly stiff compared to many trucks I've ridden in.
I'll pull another leaf, probably the lowest, leaving me with two leaves total, which doesn't seem like an unreasonably small number. In a couple weeks I'll have adjustable coilovers in front, so I've got a degree of freedom there, though I saw your post about keeping the preload as low as possible.
I'm not sure what I'd need to tell Radflo in order to get the rear shocks valved correctly. I can talk to the vendor and see what they recommend, have them tuned, try them, and then adjust as needed. I'm not sure what else I'd do.
That sounds good to me, I'll measure them and see what Napa has.
Thank you!