
I guess you can say that I'm a little gun-shy after having two trips to Death Valley cut short due to mechanical issues. The first one - when my transfer case started making noise - was a surprise, but the second trip - when the main leaf of my leaf pack broke - was something I could have easily avoided with preventative maintenance.
And so, I think it's time to stop putting off a bit more preventative maintenance work that I've been procrastinating: changing my timing belt (and the other associated components) and replacing my clutch.
I've done the timing belt work before, so there wasn't anything all that intimidating about the job, but I've been procrastinating because of the weather. That's meant that I missed my 100K mile interval - I'm now up to 128K miles on the current components - but I've been telling myself that it's OK since the actual age of the components is a bit under four years.
Of course, I played the same game with the leaf springs - waiting to replace them until I replaced my rear axle housing - so I know this is not really a valid approach.
Unlike the timing belt, I've never replaced my clutch before. With 218K miles on the truck, I knew I was probably approaching the service life of the original. And, while I knew I didn't have to worry about getting stranded by my clutch - since it'd start showing signs of wear as opposed to failing catastrophically - I realized that I'd much rather replace it at my leisure and with the help of some buddies, rather than feel rushed when it started to slip on some trip.
And so, it was time for a shop day. Lucky for me, Zane had just moved into a new house with a fabulous shop, and he graciously accepted after I invited myself to visit. Excited that we might turn it into a bit of a get together, I invited Ben @m3bassman, Mike @Digiratus, and Monte @Blackdawg as well. Stupidly, I forgot Dan @drr, but luckily Mike forwarded on the invitation.
I may have procrastinated the actual wrenching, but I sure seemed to excel at inviting a bunch of dudes to Zane's place! (thanks again Zane!)
Unfortunately, Monte and Dan were unable to attend, but the rest of us worked out the dates - a Friday, Saturday, and Sunday - when all the work would get done, and I started gathering parts. The plan was to do a different job each day - assuming each would take a day - though Zane assured me that I was allocating too much time! Still, the work I wanted to achieve was:
- Friday - Timing Belt Day
- Saturday - Clutch Replacement
- Sunday - Rear Axle Housing Replacement
Friday - Timing Belt Day
Friday rolled around and I set off for Zane's early. I wanted to arrive by 8:00am so I could get started on the timing belt while he and Ben were at work, and while Mike was still making his way to eastern Washington. To prep for the job, I'd purchased another 100% OEM Parts Timing Belt Kit from aircabinman on eBay, knowing that the parts I'd gotten from him the last time - and that many other of my friends have used - were genuine and high quality. I'd also rounded up all of the tools and special service tools (SSTs) that I'd used the previous go around and packed those into the Tacoma.
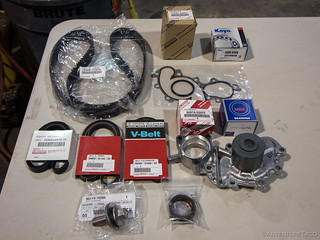
All the parts I'd be replacing, conveniently provided in a high-quality kit.
For a full list of the parts, tools, and SSTs - as well as a step-by-step guide on replacing the timing belt, water pump, thermostat, drive belts, idler pullies, and seals - this page has links and photos for everything you'll need: Step by Step Toyota Tacoma Timing Belt Replacement for 3.4L V6 5VZFE (also 4runner, Tundra, and T100)

The SSTs needed for the job.
As I pulled into Zane's shop, I was blown away. Jealous, really, of all the space he had to work. Thankful too though - that he was nice enough to have me (us) over, invading his space, for a full weekend. I set about unloading and getting ready for the job.

What a space! Even with the garage door closed, there was room to move around and work!

All the stuff I'd brought along for three days of fun.
I set about working through my Step by Step Toyota Tacoma Timing Belt Replacement guide, draining the radiator, unbolting fasteners, and setting parts aside as I made my way toward the timing belt itself. Having done it before, and working by myself, this was a relatively boring straightforward process, but there were a few things that went differently than the first time I'd performed this service.
The first was the removal of the crank pulley from the crankshaft. Last time, it had just slide right off, but this time it wasn't budging. Luckily Zane had two (2), 100mm long M8x1.25 bolts that I used with my OTC 4518 puller to work the pullies off.

When reinstalling these pullies, I used a bit of antiseize to ensure easy removal in the future.
The second change was to a part of the process that had troubled me the first time - installation of the camshaft seals. I'd prepped this time by getting extra seals, but as I started to push the first seal into place, I ran into the same problem - the seals starting to bulge.

This tool is problematic for camshaft seals. I don't recommend using it.
Initially, I figured I'd just keep pressing the seal in, but in an unusual twist, I took a step back and reevaluated the situation. After giving it a bit of thought, I figured I might was well try tapping the seal in the more traditional way - tapping around the circumference with a brass punch. It worked splendidly!
From that point on, it was mostly just reassembly of the things I'd already removed, and some way through that process I got a nice break when Mike showed up in the driveway. Or at least, I think it was Mike; it might have been Zane. At any rate, someone showed up, and soon everyone was hopping around the shop. With such good company, the entire afternoon was much more enjoyable!

The new timing belt went on without a hitch, since I knew the routing trick from the previous time.
I don't know what time it was exactly when I wrapped up the job, but it was something around 8:00pm when I started the last step - filling up the radiator with new coolant. Once again, I'd lucked out - I'd forgotten my Toyota Red Coolant Concentrate at home - but Mike had been able to bring some along, keeping me from re-using what I'd drained earlier in the morning!

This no-spill funnel is one of the best tools ever!
The job done, it was time to relax. Mike had brought along his propane fire ring, which we promptly deployed in the center of four camp chairs that materialized as pizza arrived. As usual, we chatted late(ish) into the night, about this, that, and the other, before heading off to our respective sleeping areas - mine being the tent, which I'd deployed in Zane's driveway.
Saturday - Clutch Replacement
It was just below 30°F overnight. Under down comforters and with earplugs in, I got a great night sleep, and was ready to go the following morning when everyone climbed out of bed and the day got underway. Today, we'd be working on my clutch. It was a job that Zane suggested - to my disbelief - would only take us a few hours. Technically - in that a few is more than two and less than ten - this would be true, but we'd be a lot closer to ten, than two! 
To prep for the job, I'd picked up all the necessary parts:
- A Marlin Crawler 1,200lb Heavy Duty Clutch Kit. This kit came highly recommended by everyone I talked to, and while it is often out of stock at Marlin, I signed up for notifications when it came in stock and jumped on the kit when I got an email notification. It contains:
- Seco clutch disc with a robust double-spring design, excellent heat and wear resistance, and circumferential grooves & nickel coated splines
- Aisin 1,200 ft-lb heavy duty clutch cover/pressure plate with a heat treated diaphragm spring, smooth pedal pressure for those long days on the trail, and a high torque rating for a sure engagement every time.
- A new pilot bearing
- A new throwout/release bearing
- A clutch disc alignment tool
- A Marlin Crawler Heavy Duty Shifter Seat & Socket - to replace the shifter seats and socket for the transmission and transfer case shifters, since they had to be removed anyway.
- A new Rear Main Seal (90311-A0027) - not strictly necessary, but if the transmission is being separated from the engine anyway, now's a good time to replace the rear main engine seal.
- A new Toyota OEM Clutch Flywheel (13405-62030) - because whenever you replace the clutch, you should resurface or replace the flywheel. Since I didn't want the hassle of resurfacing in the middle of the job on a weekend, I bought a second flywheel, and well resurface my original for the next time I have to install a clutch.
For a full list of the parts, tools, and SSTs - as well as a step-by-step guide on replacing the clutch and associated components - this page has links and photos for everything you'll need: Step-by-Step Replacing the Clutch on a 1st Gen Tacoma (or 3rd gen 4Runner)

A comparison of the old and new parts for a clutch job.
Working on the clutch was a ton of fun - at least, for me - since we all set about doing various bits of the job in order to make the whole thing take "a few hours." Starter removal, electrical harness disconnection, removing the shifters from the interior of the truck - Zane's shop was hoppin!

I took care of the work inside the cab, while everyone else was working outside.

Not too many tools strewn across the floor, yet!
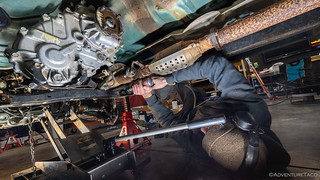
Ultimately, there were only a few things that held us up for any amount of time, but they were doozies. First, was accessing the six, 17mm bolts that secure the transmission bellhousing to the engine. The top two of these are a real bear to remove, but after what felt like a struggle, we got all the right wobbles and extensions onto the ratchet in order to access them.

You know, just your standard, 40" long extension.

Make sure to keep these in order, they aren't all the same length!
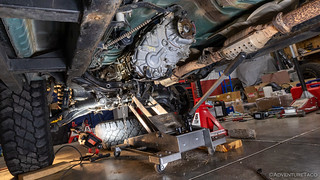
The second - and by far largest - roadblock was the removal of the crossmember that supports the transmission and transfer case. Secured by four, 14mm bolts, we thought this would be an easy task. At first, it was - the two outer bolts came out as though they were brand new. Unfortunately, the two inner bolts did not. These are the two bolts that the @RelentlessFabrication mid-skid mounts to.

I've had trouble with this mounting location - with the 3/16" steel ears of the skid plate breaking off a few times until I finally found a different mounting mechanism.
I think having the skid mounted to these bolts allowed water to penetrate the space between the bolts and sleeves of the crossmember, hopelessly rusting them into place. Zane and I ended up spending the better part of two hours with an air hammer, torch, and plenty of penetrating oil before we were finally able to work them out. Then, we drilled out the remaining rust and slathered on plenty of antiseize before reinstallation!
Neither of us could believe that the air hammer didn't just pound these puppies out!

Yeah, a bit of corrosion.

Drilling out the sleeves on the crossmember.
With everything apart, we were well into our "few hours," but we finally got a look at the original, 218K mile clutch disc. "Looks like you've still got about a third of the life left," said Zane. Which of course mean that I probably didn't need to do this at all. 
Still, I was glad I did, since now I don't have to worry about the clutch at all.
Even with much of the day behind us, we didn't let that stop us from pushing forward - hoping it would be mostly clear sailing from here. For the most part, it was. Like disassembly, there were two exceptions.
First, was a mistake - or maybe just lack of knowledge - on my part. I got the new flywheel installed, the clutch disc inserted with the special alignment tool provided by Marlin Crawler, and the pressure plate torqued down to spec in record time. At which point, we realized that the clutch disc wasn't perfectly centered in the pressure plate. I'd assumed the special tool would do a better job than it had, so I backed everything off and centered the clutch disc. Just as I finished torquing to spec, Zane asked if I'd used any brake cleaner on the pressure plate.

Once again, I backed everything off, cleaned the pressure plate, and for the third time, torqued everything to spec using the crazy modified-star torque pattern specified by the FSM.

Forty-five minutes instead of fifteen, but hey, I've got plenty of experience for next time.
The second issue was predictable for anyone who's done this job in the past. This time, Ben was helping to get the six, 17mm bellhousing bolts all lined up and started as we mated the transmission and engine back together. If I'd thought the separation was hard - well, then this was certainly a test of patience!
The transmission must have been on the jack for more than an hour as we fiddled it around to get everything lined up. The biggest problem - the only problem, really - was getting our hands into the tight spaces above the transmission for the top two bolts - and then getting a socket on them to torque them to spec!
Ultimately, it was close to 9:00pm when we wrapped up work on the clutch. It'd been a long day, and one that I'd been extremely glad to have three good friends around to help. From hands-on wrenching to muddling through problems, it made the job a lot less stressful - and a lot more fun - for me, having those guys around.
Dinner and more chit chat followed, but unlike the previous evening, we were all just a bit more tired, and by 11:00pm, we were headed to bed!
Sunday - Rear Axle Housing Replacement (...or not)
Well, Sunday morning rolled around a lot like Saturday - but with one major difference: we're all getting older. That of course means that we were sore from rolling around under the truck for 10 hours the previous day, and that none of us were all that keen to do it again.
So, we didn't!
After a bit of discussion, we decided that there wasn't any real rush to replace the rear axle housing - my patch had been working just fine and wasn't showing any signs of fatigue - so, we lazied around a bit and chatted some more. I spent a bunch of time putting away all the tools we'd spread out across the floor. I whined about the fact that I'd have so much less room when I got back home.
I'd say it was right around noon when Ben, Mike, and I bid farewell to Zane, each of us headed home at our own pace and in our own directions. It'd been a fabulous weekend, and I felt great about the work we'd accomplished.
Thanks guys!

")


Thank God that was you and not me! At 75 I no longer do any of the big/complicated jobs but I do miss the days 5 decades ago when my friends and I pulled engines and did rebuilds & other fun things with out trucks. Now I go to my local certified master mechanic and he puts things up on the lift and does a great job. Thanks Mike @ A+ Automotive. I can sympathize with you on all that work. I now have a 36" breaker bar from my side step job a few weeks ago. Only one cab bolt wouldn't come out and I was afraid that bolt was going to snap (making a simple thing a bummer) but the bolt finally broke loose. One thing I've learned over the years is that one should be prepared for problems like broken studs, etc. Glad to see you got everything done. I know there is a GREAT feeling of satisfaction when the work is done and you know that everything should be in good shape for many thousands of more miles!
Thanks John! I'm sure that someday I'll be in the same position as you - which is to say, a lot more knowledgeable than I am now, and also paying someone to do what I will (then) know how to do. It is, quite frequently, the way of life!