
May 10, 2019.
When I originally built my bed rack back in 2016, I was sure that the rack was going to be something that was only installed when we were out on an adventure. The rest of the time, I'd remove it using the pulley system in the garage so that the Tacoma could be it's natural self.
Oh how naive I was.
Turns out, there's no reason to stop adventuring in the winter, and quite frankly, the rear suspension on the truck is much more comfortable with the couple hundred extra pounds from the tent. Plus, I don't really have any changes I'd like to the design, so I don't ever really remove it - or at least I try not to.
But over the winter I did remove it at one point - I forget why now, one of the freebies that comes with middle age - and you can imagine my surprise when I noticed that the bed had cracked under the rack.
Ahh, I remember now - I was removing the bed to fix my rear suspension.

Well, I wasn't happy about that and tried to puzzle out exactly what was happening - clearly, there were stresses on that part of the bed from the weight of the tent, and after chatting with a bunch of folks, the best we could come up with was that it was a combination of factors:
- Like any rack system, when you've got 200 lbs on the rack and you travel over bumpy terrain at high rates of speed, you get some flex. And that flex is transferred down to the bed rails.
- The holes I'd drilled to attach the bed rack were essentially the same size as the bolts that secured it. That mean that any time there was any flex, the bolt put stress on the sheet metal because it would push/pull on the edges of the hole, rather than slide around in the hole.
- To protect the paint on the bed rails, I'd used some HDPE rubber between the bed rack on both the top and inside of the bed rail. This rubber would compress and expand over each bump, exacerbating #2.
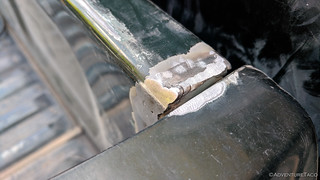
So, it was just a matter of fatigue of the metal. I ground off a bit of paint and rust around the crack, pulled out the welder, and put it on its "barely warm" setting to tack it up.
Let me tell you - welding body panels sucks! Kudos to the guys who do this for a living. 
Anyway, I got it buttoned up and re-installed the rack without the HDPE on the inside edges, to reduce horizontal movement. But as I was re-installing it, I noticed another crack - this one in the front passenger corner.
Dang. It was time to change things up to keep the truck from falling apart into one billion pieces.
I started by removing the tent and bed liner so I could access the front corner of the bed for a bit more body-panel welding. The joy.


Really, it was good though, because getting under the bed liner to rinse off the bed and make sure that it's still in reasonably good condition is a good practice IMO. And luckily for me, everything under there still seems to be doing just fine.
Well, I mean except for this crack.

With the liner removed, I ground down the corner crack like I had the bed rail and got to work with the welder, again. And again, I hated it - though I seemed to mostly fix it before hitting it with a bit of paint.

But now, I had to figure out how to keep this from happening again. Since the rack design in general has been superb, I decided on three changes to the setup. First, I'd extend the feet of the rack to the front of the bed, and add another piece of steel angle to the front of the rack that would - hopefully - keep the corners of the bed from flexing so much.
I hoped this would stop any corner cracks.

I should note - modifying the bed rack in this way also required me to modify the bed liner. From the factory, the bed liner sits over the front rail of the bed, which would now have a piece of angle spanning the same place. So that part of the liner had to be relieved of duty.


Second, I'd forget about the HDPE between the rack and bed rails altogether. A bit of metal-on-metal rubbing is better than cracking in my opinion. Plus, I'd never seen anyone else use HDPE, and despite my urge to yell "you're all wrong," I figured I should try without first. 
Third, I fabbed up some beefy brackets to sit behind the bed rail - sandwiching the rail between the rack and the brackets - to distribute the stresses away from the holes as much as possible.

I hoped those three things would mean that the bed will be a bit happier now.
Time will tell - I suppose I could be back next year, looking for a new bed.
But let's hope not. 
A triangular gusset welded on each the corners (side member to the horizontal bar) would help to minimizing the spreading. The triangles wouldn't need to be very big.
TW World INBONESTRIKER
Welcome!
You mean between the diagonal legs and the angle, or between the platform and the legs? (or both?)
Between the legs and platform. A short length of 1 X 2 tubing cut to the appropriate angle, weld with the open side up.
It's been my experience that it is very hard to weld any kind of tube frame w/o unseen pinholes that will let water get inside, causing corrosion or freezing expansion. Weep holes (or a small grinder notch - don't weld it shut) near the lower parts really help.
That gusset is an interesting idea, will consider it in the future.
I agree with you on the welding practice / phenomenon of it being hard to seal up any frame such as this. To try and counter the inevitable moisture, I drill a hole at each intersection of tubing so that all of the internal cavities are connected, and then also drill a breather hole near the bottom of one of the legs.
Has seemed to work well so far, and hopefully will into the future!