
It seems like it's been a lot longer, but it was only a couple of weeks ago that I noticed my rear axle housing was leaking at the passenger side leaf spring perch. On my way home from surveying the Aftermath of the Creek and Dixie Fires, I knew that this was not some maintenance item that I could just put off until there were no trips on the horizon. Nope, this is something that I needed to deal with right away.

After several fruitful discussions with my buddies on TacomaWorld, I immediately set about lining up the long-term fix - acquisition of a new axle housing - by contacting the good folks (Brian) at Diamond Axles (aka Front Range Off Road) to discussion my options and get a housing ordered.
And now, I have six weeks to wait for my new housing to show up. Oh, and then I have to finish fabrication of all the attached bits, install it.
Clearly, that's not going to work for me from a trip perspective - I'm already feeling antsy and with the weather changing, I've already missed a couple places I wanted to visit this fall - at least until next year.
So - as a stop-gap measure - I'm going to patch up the axle housing and hope that it holds long enough for the new housing to arrive!

Credit for this solution - at least, as far as my use of it - goes 100% to Ryan @Reh5108, who has already performed this fix on his truck with great success. The idea is to both weld the existing crack in the housing, and also weld a patch over the housing in order to reinforce that area.
Day 1 - Hoping for the Best, with Bits from the Trash
I got started by heading to the local steel yard to find a six inch long piece of 3" ID tubing that I could use for the patch. I was hoping for something in the 3/16" wall thickness range, but it turned out that they had no 3" ID round tube in stock at all! The could special order me a 20-foot long stick, but at $340, that was a little more than I was looking for.
I dug around a bit in the remnant bin, and was bummed to not find what I was looking for there, either. There were, however, four, forty-five-degree cut-offs that were 3" OD with 1/8" wall that seemed to be reasonably cleanly cut, and I figured that at a measly $4.94, I could at least give them a shot.

I have no idea if this will work, but it's not going to cost me much money! I started by cleaning everything with mineral spirits.
The idea - good or bad, I'm not sure - was to weld two of these pieces together, creating a single six-inch-long piece of tubing that I could then cut in half to sandwich the axle. And, I had enough for two sandwiches, in case - or for when - I messed the first one up.

Joints bevelled and polished, tubes aligned and taped for tacking.
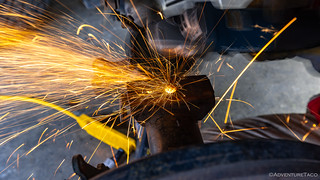
I started with two tacks - and then four - to make sure that everything remained aligned. I have to say, I was pleasantly surprised that everything did stay aligned, the interior seam hard to discern by feel. And so, I started welding.

Pretty sparks dancing in long exposure.
The welding went... fine, I suppose. There were a couple places where things got hot and I nearly burned through the tube, but most of the seam was properly glued together - I think. I broke out the grinder and set to work cleaning things up, and to my delight, I ended up with two straight lengths of 1/8" wall, 3" OD pipe!

A block of wood with a 45-degree groove makes for a good tube holder while grinding.
A bit of marking and some more grinding, and soon I had four pieces of half-pipe. Or half-tube, I suppose - ready for final sizing and shaping to sandwich the axle housing.

They almost look like they started as 6" pieces of tube.
Flush with success, I mostly called it a day. I'd deal with prepping the axle housing - a chore I was not looking forward to - later. So I removed the drain bolt on the rear diff and figured that a good 12 hours to drain would help to get as much out as possible before I started welding on the housing.

Oil looks pretty good for having been in service for ~30K miles.
Day 2 - I Really Hope this Works
I got started early the following day - or at least earlier. I'd left the rear diff with the oil draining overnight and so my first order of business was to get the truck up on jack stands and the wheel removed. A pretty standard operation, the difference this time was that I scooted the truck as far to one side of the garage as possible to give myself some room to work - since it was suppossed to rain all day, and just in case I wasn't able to finish the job for some reason.

Up on jack stands, in the most cramped garage ever.
Next, I started removing everything from the passenger side of the rear axle. Brake lines, shocks, ABS sensors - all came off. And then it was time for the leaf spring. I always hate removing the leafs because it always seems hard to get everything to line up again. But, with no choice, I used the Milwaukee M18 mid-torque impact wrench to ugga-dugga them off.

Well then, that explains all the squeaking from the rear end! 

Front eye certainly doesn't look any better. 
With the leafs removed, I finally had access to the troublesome perch. It's the welds between this bit of steel and the axle housing that crack, so I was going to need to chop it off before I could continue on.
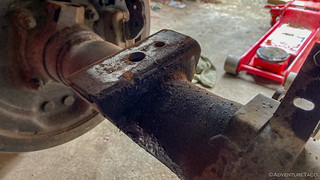
Gear oil apparently attracts dirt.

I wanted to make sure I got the orientation right when I burned on the new perch, so I checked the alignment of the original before continuing on.

Zip.

Zip.
Zip.

Boom.
No turning back now, I commenced grinding. I'll always remember when Zane @Speedytech7 looked at me like I was crazy for using a grinding disc when we were relocating my rear shocks. Even though they were significantly more expensive, he helped me to realize that both the speed and surface finish left by a flap disc was well worth the extra cost.

Shiny! And you can already see a crack if you look closely.
With the axle cleaned up, before I could put everything back together, I needed to fix the crack as well as I could. Drilling the ends - to prevent further cracking - and grooving the crack itself were the next step. Using my phone to magnify the surface, I found that there wasn't just one crack running around the housing, but there was another crack starting along the front of the leaf perch.

Crack ends marked for drilling.

Ends drilled, and old-eye-assist for grooving.

Ready to weld up, I used a torch to burn as much of the gear oil out of the crack as possible. A recommendation from Ryan. Thanks Ryan!
With the axle prepped, it was time for final shaping of the patches I'd created the day before. I measured - and cut - for length, and then also trimmed the corners. A bit of noodling - just a bit, too much makes my brain hurt - and I also decided to drill some holes in the top patch to add some rosette welds for additional strength.

Patch plates ready to go. Only the top plate has rosettes, since that's where the new leaf perch will attach. Since the patches are only 1/8" thick, I didn't want to rip the patch itself!

Looks like it'll work.

Ready for welding.
Was I ready for welding? No. Was the next step in the project welding? Certainly, yes. So, I pulled up my little boy pants and reminded myself that if everything went south, I could grind everything off and use the two additional plates that I'd purchased just in case. Assuming - that is - that I didn't totally screw up the axle housing.

I was actually most nervous that the housing would get too hot and ruin the axle seals as I welded on the plates.

Looking at these, I'm definitely not a welder. I'm more of a grinder.
Soon enough, the plates were on, and after a bit of grinding to get the surfaces smooth where the new leaf perch would sit, I used the metal-gluing gun to zip the perch on.

Almost looks like it was meant to be there.
The last step - well, before reinstalling everything I'd removed - was to give the whole situation a spritz of paint. Some primer, and then a bit of black, made it look - almost - like nothing had happened.

This might actually work.
My hope - as I reinstalled everything a half-hour later, the paint having dried quickly since the axle housing was still warm when I sprayed it - is that I'll get several months out of this repair. I don't need it to last forever, since I've already ordered a Diamond Axle, but I do want to start heading down to the desert as fall progresses. Death Valley, Owens Valley, and the wide open expanses are calling!
Update: Oct. 26, 2021 two weeks later
The first trip - to the Nevada/California border between Walker Lake and Mono Lake - is in the books. So far, the patch seems to be holding up well! The wheel didn't fall off, and I haven't seen any cracking or oil evident at the perch location. Fingers crossed that my success holds!
Update: June 2023
I still haven't replaced the axle housing, and my patch has shown no signs at all of failing. If I'd known how well this patch was going to work out, I wouldn't have ordered a replacement housing.
That means that the replacement housing I did order has been sitting around the shop for more than a year now. I'll probably end up installing it someday, but I'm in no rush.
Update: March 10, 2024
I finally replaced the axle housing. Check out the Related Posts below for details on the entire axle housing saga.


")

Excellent job!
Your welds look very good, especially for welding out of position. Enjoy your next trip,
Common problem This just happened to our 06 Tacoma. We arent capable of replacing the axle ourselves and the job through a shop is pretty stiff. Since you did this repair. Iam wondering how it held up almost 3 years later? This seems like a viable option compared the cost of replacing the axle. Please let me know.
Great article.
Thanks
Hi Ray! As far as replacing the entire axle housing vs. patching it like I did - personally, I think that replacing the housing is easier (since you're really just replacing parts at that point), but it would definitely be more costly to replace everything. As far as how the patch worked out for me - it worked out great! If you scroll to the very bottom of the post (or view this comment reply on the web site as opposed to in the email notification you receive), you can see a set of "Related Posts" that describe the entire "saga" with my rear axle housing - from discovery of the leak, to the patch, to how the patch was doing, to replacement of the housing after several years (for no good reason except that I had a replacement). Click through on any of those to read more about the particular part of the story.
Related Posts
All in all, I was very happy with the patch, and if I hadn't already purchased the replacement housing, I'd have had no trouble running it for many years to come.
Thanks for getting back to me. I’m glad yours held up. I thought there was some hope for ours. We called 2 welding shops and neither weld on axles due to liability issues.
We really don’t want to spend $3500 on the axle. On top of that we need a new rack and pinion. This one is only 2 years old. We’re looking at 5k between the 2 repairs about half of what the truck’s worth.
I’m beginning to doubt Toyota's legendary reliability. This one is acting more like a Jeep.
Thanks for your time.
Yeah, I can definitely understand that welding shops wouldn’t want to have anything to do with a repair like this - there’s a lot that could go wrong when you’re fixing something so critical to staying on 4 wheels. It’s definitely a shade-tree-mechanic job, for sure (or in my case, a no-tree mechanic, hahaha).
I’d suggest getting a used axle housing from a junkyard (you can try car-part.com). Around me (PNW) it looks like they go for about $800 each. Swapping that in (even if you wanted to keep your own 3rd member, axle shafts, etc. wouldn’t be too much work, since you’d really just be unbolting it from the leaf springs and disconnecting the various brake lines that run along the frame. Probably about 3 hours of work from start to finish with the right tools.
Good luck!
Thanks. The Estimate has the r&r of the axle plus new bearings swapping out the "components" which I assume are the dif , axle shaft etc. So as I understand it $1700 buys just a new axle housing.
This is all very disappointing.
Anyway
Thanks Again