
Squeaky bushings annoy a lot of people. I am not one of those people. And so, as my bushings have squeaked over the years, I've just let them do their thing - usually until I next wash the truck at which point the squeaking stops.
And so, my bushings have "lasted" for 20 years. In fact, with the exception of the bushings in the rear leaf springs - which were refreshed when I got a new leaf pack from Alcan - I think all of them are still original. Oh, and the upper control arms (UCAs) bushings have been replaced, since I installed new SPC arms (how-to).
But that leaves a lot of rubber that's been doing a great job for a lot of years, and has finally worn out.

- Lower control arm (LCA) bushings - After my last trip, I noticed that my LCAs were squeaking more than normal, and it felt like the alignment was out just a bit. I'd known that I wanted to replace these bushings for a while, so I already had some Strongflex Lower Control Arm Bushings from Sonoran Steel sitting in a box, ready to go.
- Front diff bushings - During my last rig review, I noticed that these were also in need of replacement. I reached out to Curtis at DuroBumps - who I should mention was awesome to deal with - and got a set of replacement Durobump Front Diff Bushings headed my direction.
- Steering rack bushings - I didn't realize I needed these until I took the truck in for an alignment and my alignment tech alerted me to the fact that the rack was all over the place when the wheel was turned. Since I have to remove the rack to replace the LCA bushings anyway, it's a great time to install some new Energy Suspension 8.10101G Steering Rack Bushings to take care of the slop.
Plus - as a bonus - Curtis sent me some DuroBumps 1st Gen Tacoma Front Bump Stops along with the diff bushings, so I figured I might as well get those installed at the same time. Did I mention that Curtis was awesome?
I should note - this post tells the story of my bushing replacement, but I've also created three step by step guides for anyone wanting to do this work themselves. Each guide has a list of parts, tools, and photo-heavy instructions on the job.
")
")

To do the work, I gathered up all the tools I'd need - mostly straight forward, since working on suspension is a reasonably regular activity - and dug right in.
- 20 ton press (sometimes Harbor Freight is cheaper) - used for pressing out the old LCA bushings
- Press/Pull Sleeve Kit - used to capture the LCA (and other) bushings as they are pressed out.
- OTC 6295 Front End Service Kit - contains pitman arm puller, used to separate the LCA from the lower ball joint (LBJ).
- OTC 4518 Stinger 5-ton Bar-Type Puller/Bearing Separator Set - to support the LCA while pressing out the bushings.
- OTC 7249 Ball Joint (and U-Joint) Service Kit - to press out the steering rack bushings.
- Floor jack.
- Channellock Piers - to remove the old bump stops
- (2) 6 ton jack stands.
- Misc sockets (I recommend this set from Williams, a Snap-On brand)
- 10mm socket - to remove the ABS sensor from the axle housing.
- 14mm socket - to remove nuts holding brake drum to axle housing.
- 19mm socket
- 21mm socket - to remove lug nuts.
- Ratchet, Extensions, as necessary.
- breaker bar
- torque wrench
- An impact wrench for lug nuts and various other tasks

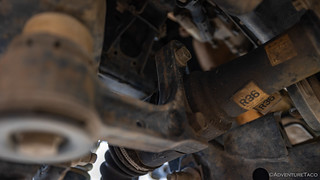
I figured I'd start with the LCAs, so the first order of business was the removal of a bunch of parts. Always looking for the easy route, the wheels came off first, quickly followed by the 19mm bolt from the lower shock eye and the limit strap. Then, I removed the OTRE and LBJ by loosening the 22mm and 24mm castle nuts before fitting the OTC pitman arm puller to press them out . Note: one could also leave the LBJ attached to the LCA by removing the 4, 14mm bolts that secure it to the spindle, but I figured it'd be in the way during the rest of my work, so I simply pressed it out.

Keep the castle nut on there when pressing out a joint like this!
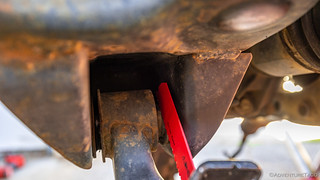
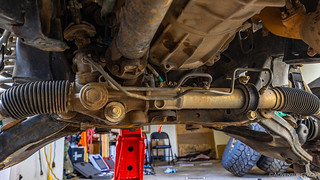
At this point, I simply needed to remove the four alignment cam bolts in order to free up the LCAs. Simple enough except that access to the driver rear cam bolt can only be achieved by pulling the steering rack off of its mounts. Luckily it can remain connected to all the lines, but it's still a bit of a pain.

Nothing can be easy, can it?
Of course, I needed to remove the steering rack anyway to replace it's bushings, so with 19 and 22mm sockets, I removed the four bolts securing it to the crossmember and then fanagled it away from the cam bolt so I could access it.

That's what we're looking for.
At this point, I knew I was either going to get lucky... or not. It's not uncommon for the cam tab adjustment sleeves to get seized into the LCA bushings, requiring a cut-off wheel or sawzall in order to remove them. I hoped - with my truck living its entire life on the west coast - that rust wouldn't be an issue. 
I wasn't lucky. So, out came the sawzall and some carbide tipped blades that Zane @Speedytech7 recommended. They worked a charm.

I found that putting a bolt back in to support the LCA leg after I cut the bushing helped to hold it straight for cutting the other side.
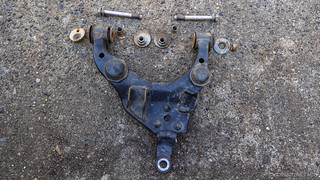
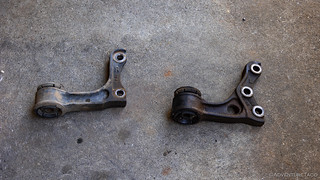
With the cam tab bolts and adjustment sleeves removed, I now had the LCAs in hand, and the Tacoma looked a little worse for wear. Definitely not ready to hit the trails, anyway.
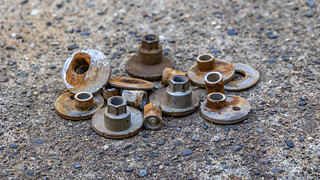
The carnage.
Victory, sort of.

An uncommon view. For me at least.
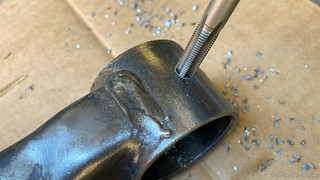
It was at this point that I took a closer look at the LCAs and made an uncomfortable discovery - on each of the arms, there was a small crack. Only about a centimeter long, the cracks extended from the lower shock mount where it is likely that the same forces that cause the shock tower to crack, had caused my LCAs to start to crack. (see Protecting the Front Shock Towers with Limit Straps)
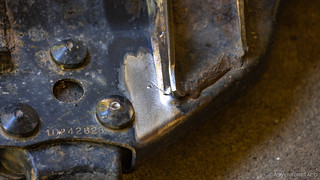
Well dang!

Some quick work with the welder got things looking better.
There are several ways to remove the bushings from the LCAs. Because it's cheap and doesn't require any special tools, a lot of folks use a jack between the two legs of the LCA to press out the bushings. In fact, this is how I'd helped to remove the bushings from Mike @Digiratus LCAs a couple years earlier.
The risk here is that if the bushings are seized into the LCAs, the pressure needed to push them out can actually bend the arms - something I'd rather not risk. So, I decided to use the 20-ton press and some press sleeves to push the bushings out of the LCA - eliminating the risk since there's never any force pushing the legs of the LCA apart.
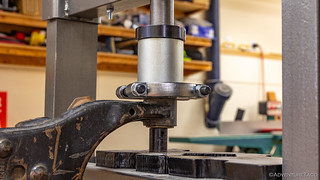
As always, the right tools make for an easy job. So much easier than using a bottle jack.
With a bit of heat and penetrating oil, this pressing worked like a charm and before long I was cleaning out the inside surfaces of the LCAs with some steel wool in preparation for the Strongflex Bushings I'd be installing.
However, I wasn't quite ready to install bushings just yet. Brett @Squeaky Penguin had suggested that while I was doing all this work to the LCAs, that I should drill and tap for some grease zerks to reduce squeaking in the future. As I mentioned earlier, squeaking doesn't really bother me all that much, but with not much extra work, I figured I might as well take his (good) advice. After all, who doesn't love a good grease zerk?! So I picked up a few M8x1.0 zerks and set to work.
Tapping for some zerks!
There are really three options when replacing LCA bushings on a 1st gen Tacoma - or, I suppose, a 3rd gen 4Runner:
- Completely new LCAs. This is how Toyota wants you to do it, since they don't sell replacement bushings. But dang, OEM Toyota LCAs are expensive (L: 48069-35120 | R: 48068-35120), if all you need are bushings. Of course, you can always get aftermarket LCAs, which people seem to have reasonably good lucky with and are much less expensive (L: Left | R: Right).
- Whiteline LCA bushings. Lots of folks go this route, and the Whitelines install very similarly to the OEM bushings - rubber inside of a metal sleeve that presses into the LCA. These work well, but have the possible drawback of the metal sleeve rusting into the LCA just like the OEM sleeves do.
- Strongflex Polyurethane LCA bushings. These are made of a higher performing polyurethane rather than rubber, but the real reason I chose to go this route was because the poly bushings insert directly into the LCAs, with no pressing in of a metal sleeve. This should - in theory anyway - make future replacement a piece of cake. I will of course, keep an eye on them and report back.
Everything ready to go, I spread some grease on the new bushings and pushed them into place. Easy peasy.

Pressing in the new bling.
And, while I had the LCAs out of the truck, I figured there was no better time than the present to install the DuroBump front bump stops - a very straight forward process. All I needed to do was use a bit of penetrating oil on the old bumps before removing them with some channel-lock pliers and cleaning off the surface of the lower control arm.
Then, I used the supplied flange bolts and a dab of the supplied Loctite (Blue 242) with my 14mm socket to install the new bump stops in place, snugging them up close enough to the 15-18 ft-lbs that I didn't feel a need to pull out the torque wrench.
Hopefully these DuroBumps will give my aging rear end a cushy ride  .
.
Update June 2021: An astute reader may notice that the photo above shows the front OEM bump stop removed, to be replaced with the Durobump. This is what I did, but it is incorrect; the Durobump should replace the rear bump stop on the LCA. After this was pointed out to me, I corrected the situation. I've also updated the front bump stops, so that both are now Durobumps (see below).
All that was left was re-installation of the LCAs!
Regardless of whether the cam sleeves and bolts removed easily or needed to be cut out, I'd gone ahead an purchased all new hardware for the reinstallation. This consists of four of each of the following parts, which make up a nice new hardware sandwich:
- Toyota OEM Alignment Cam Sleeve (48409-35050)
- Toyota OEM Alignment Cam Nut (48452-35020)
- Toyota OEM Alignment Cam Bolt (90080-11283)

Mmmm, hardware sandwich.
I figured that after 20 years, it was cheap insurance to make the next removal of these parts easier since even if the old ones are removable this time, they have a lot of wear and tear on them and any rust is only going to get worse with age. New hardware - and of course, a little antiseize - will give the best chance for future success!

Not an easy process to get here, but one set of bushings done!
All that was left then was to reinstall everything I'd unbolted from the LCA and torque things to spec:
- LBJ.
- Lower shock mount.
- Limit strap (aftermarket).
- Alignment Cam Bolts.
Next, it was time to deal with the steering rack that was still hanging out under the truck. The process here was a little easier than the LCA bushings, as there are no metal sleeves that secure the bushings in the rack, so I simply pressed the old bushings out using the C-clamp in the OTC 7249 Ball Joint (and U-Joint) Service Kit and cleaned out the races in preparation for the new bushings.
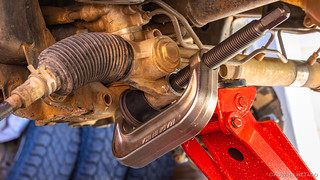
A much easier process than the LCA bushings.
One thing to be aware of when replacing the steering rack bushings is that 1st gen Tacomas have two different bushing configurations depending on the model year - with the change happening around the 2000 model. Earlier trucks - it seems - use a smaller diameter bolt to secure the rack (which is the same across all years) to the frame, while later years use a larger diameter. Luckily, the good folks at Energy Suspension have included sleeves for both in their kit, as long as you purchase the kit for the 2000 model year (black | red), regardless of the actual year of your 1st gen Tacoma.

Old vs. New.
Like the LCA bushings, these new bushings simply push in to the steering rack, and before long everything was nicely buttoned back up on the Tacoma.
Second set of bushings replaced. Check.
My last order of business on the day was to install the new DuroBump bushings for the front diff. I had no idea if this would go as smoothly as the front bump stops, but the instructions on the web site showed fire, so I was excited. 
The process did turn out to be both fun and straight forward. Rather than install the bushings in place, the first step is to disconnect the brackets that house the bushings from the diff itself. This is done via three (3) 19mm bolts on the driver side, and two (2) 19mm bolts on the passenger side. Then, simply remove the two 19mm bolts that secure the brackets to the front crossmember.

Driver side.
Passenger side.
Toyota sells these brackets with the bushings installed for $250. Yikes!
With the brackets removed, the next order of business is to remove the rubber from the old bushings. I say rubber because the metal sleeve from the old bushing needs to stay in place inside the bracket - it will be re-used with the replacement DuroBump bushings.
To remove the rubber, I used a torch to heat the bracket around the bushing until it started to make audible crackle and pop sounds. At this point, I was able to push out the bushing and clean out the inside of the metal sleeve with some steel wool.

Fire as a tool? Yes please!
After the brackets cooled, I sprayed on a quick coat of primer and paint before pressing the new bushings into place using a piece of wood to protect the rubber as it squeezed into the sleeve.

A little soap and they slide in easily.
And with that, all I needed to do was reinstall the brackets to the diff. Torque specs here were:
- Five (5) 19mm bolts securing brackets to diff: 116 ft-lbs
- Two (2) 19mm bolts securing brackets to frame: 101 ft-lbs

Back in and ready for years of service.
And with that, I've refreshed a whole bunch of the rubber on the front of my truck. Will the new stuff last 20 years like the originals? I wish that were the case, but I suspect that I'm a little harder on them now than I was for the first 17 years of the Tacoma's existence so I'm really just rooting for five years or so.
Oh, and I need an alignment! 

Well, that ( / \ )looks a little wonky!
After having the Durobump front bump stops installed on my LCAs for a while - and really liking them, I had a chat with the creator, Curtis. Technically, we were chatting about other products that he makes for Tacoma's - specifically the rear bump stops and u-bolt flip kits for 1st gens - both of which I installed and love, but that he no longer offers. Through the flow of that conversation, he mentioned that he was working on a set of bump stops for the front mount of the LCA, and asked if I wanted to give a set a try.
Liking his other products, I jumped at the opportunity, and had a set sent my direction. As usual, it took me several months to get around to installing them, but installation was simple and I must say, the ride is fantastic!

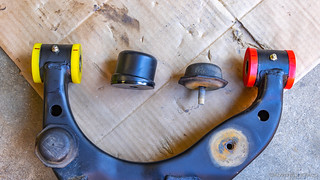
1st gen Tacoma front LCA Durobumps. The bump on the left is for the front hole of the LCA; the angled bump on the right is for the rear.

A much nicer cushion than the stock hockey-puck style bump stops.
I believe you installed the front durobumps on the wrong side of the LCA. They should replace the rear bumps, not the front.
? I think you may be right; I'll need to go out and look. I even read the instructions twice. Luckily, easy fix, I suppose. LOL.
I do wonder why they are supposed to go on the rear, rather than the front...
Hello! Seems you've had these installed for a few months now. Would you still recommend this over the other options? (Whiteline bushings or full replacement by Moog or Mevotech) Also, the link that you provided shows that the product was designed and is marketed for 4-Runners. Is that indeed what you purchased?
Hey Charlie, So far, all the bushings I installed seem great - no issues or concerns at all. I've actually got a rig review coming (that encompasses the last several trips) that says as much. Would I go this way in the future? Well, I would definitely install these Strongflex bushings over the Whitelines - simply because the process seems easier if you do it multiple times.
That said, polyurethane bushings don't last as long as rubber, so if what you're going for is low maintenance - and you're willing to sacrafice a bit of performance (which is probably a very small bit - unnoticable to most people), then going with the Moog )L: Left | R: Right) or Mevotech (L: Left | R: Right) is probably a good choice as well.
As for the bushings being marketed for 4Runners - the front end of a 3rd gen 4Runner and 1st gen Tacoma are essentially the same, and the place that I purchased them from is mostly focused on 4Runners, which is why they have them marked that way. Rest assured, they work just fine.
Hi,
Would you still recommend these Strong Flex bushings over the Whiteline bushings a couple years later? Do they squeak much? How often do you grease them?
Thank you!
Hey Danny, I've only had the StrongFlex installed for a little over a year now, so I don't know how they will be a couple (or few) years down the road, but so far I am quite happy. No significant squeaking, and I've greased them once since installing them. The seem to hold an alignment great (though, I never had a problem before, either). The thing I'm looking forward to most is that replacement should be very simple when the time comes.
Let me know if you have any more questions, and sorry for the slow reply... I've been out on the trail, and just got back into town.
What kind of grease do you use? Im installing them in the morning. I got my arms off and old bushing pressed out. They sent me some grease but curious what you have greased them with!? Thanks
Danny
Hey Danny, you can use most greases - the one that will work best is the one you apply regularly ? - but the best thing to use is probably this Superlube with PTFE in it. Personally - because it's what I have in the grease gun - I use Red-n-Tacky Grease. It's been just fine. Don't forget - if you want to make greasing easier, you need to modify the bushings a bit and add a 90° grease zerk!
I noticed Energy Suspension has a different part number to what you have. I seem to come up with 8.10103G vs the 8.10101G you have. Not sure what the difference is but when i go to Energy site and select my year with 4wd thats what i get. Could you tell me where you got your SKU?
Hey Brett, As you discovered, there are two kits. I cover the differences between them in the "Parts" section of this guide: Step-by-Step Steering Rack Bushing Replacement on a 1st Gen Tacoma (or 3rd Gen 4Runner).
(this post where you left the comment is just the "story of how I replaced a bunch of bushings at once," so it's missing some of the nuanced details that are covered in the guides)
Hope that helps!