")
Adding Tundra brakes to your 1st gen Tacoma (1996-2004) or 3rd gen 4Runner (1996-2002) is one of the easiest upgrades you can make. The larger calipers, pads, and rotors give your truck significantly more stopping power and at the same time decrease brake fade since the larger rotors are able to better dissipate heat.
The entire process takes only a couple hours, and requires little in the way of special tools. After doing this work on both my 1st gen Tacoma and 3rd gen 4Runner, as well as helping several friends with their brake upgrades, I figured that it was worthwhile to put together a step-by-step guide for the process in order to share some of the tips and tricks I've learned over the years.
If you're interested in reading stories of actual experiences and background information, here are a few worth reading:
- New-to-me Tires and a Tundra Brake Upgrade - the day I did the work on the Tacoma.
- Making It Right: Tacoma-to-Tundra Brake Upgrade - converting to hard-lines, which are speced for the 13WL calipers.
- Installing Tundra Brakes on a 3rd Gen 4Runner - the job is even easier on a 4Runner than it is on the Tacoma.
- Hard to find Specs, Info & Measurements on 231mm 13WL Tundra Calipers & Rotors - everything you ever wanted to know about how OEM parts compare to aftermarket.
- Which Wheels/Rims Fit the Tundra Brake Upgrade (13WL 231mm rotors) on a Tacoma? - wondering if your wheels will fit the larger calipers; find the answer here.
Done with that? Let's get started.
Whatever the reason for replacement, it's not a hard job, requires no special tools, and is one you can save a lot of money by doing yourself. So let's get started.
Parts

Using 13WL Brake Calipers (Recommended)
- 2 Toyota Tundra OEM rotors (L/R: 43512-0C011) Note: amazon is sometimes out of these, and the Bosch QuietCast line is another good (and cheaper) option (L/R: 50011223)
- 2 Remanufactured Tundra 13WL calipers. Any of the following will work just fine and are all generally remanufactured by Cardone:
- TRQ: (silver) (red)
- A-Premium: L+R set
- Napa Adaptive One (L: ADC 1766XA) (R: ADC 1766XB)
- or 13WL calipers from another parts store. Note: if they carry multiple lines, I recommend getting a line that has a lifetime warranty in case you ever need to replace a caliper.
- 1 set of Toyota Tundra OEM brake pads (L/R: 04465-35290)
- 1 set of Toyota Tundra OEM brake pad shims (L/R: 04945-35120 or 04945-0c030)
- Brake lines
- Tacoma: 1 kit of AdventureTaco Tacoma-to-Tundra Hard Brake Line Upgrade Kit (not needed for a 4Runner)
- 4Runner: 1 set of AdventureTaco 4Runner Front Stainless Steel Brake Lines (will not fit Tacoma)
- Some DOT4 brake fluid, and brake cleaner
Note: alternatively, if you want to buy a kit that contains rotors, calipers, and pads, you can purchase one from either Callahan or Power Stop (red) (silver). The components won't be quite as high quality as the OEM components listed above, but many people go this route to save a bit of money. If you do go this route, you still need the Tacoma-to-Tundra Hard Brake Line Upgrade Kit (or for a 4Runner, the 4Runner Front Stainless Steel Brake Lines), some DOT4 brake fluid, and brake cleaner.
Using 13WE Brake Calipers (Option)
In 99% of cases, the parts listed above - utilizing the13WL caliper - are the recommended parts to use. However, with a very limited set of wheels (most notably, the 3rd gen 4Runner Double 3-spoke), one may want to install the slightly smaller S13WE caliper casting. For the parts needed when going that route, click here to show the 13WE Brake Calipers parts below.
Tools
You don't need much from a tools perspective either. Gather these up and you'll be good to go.
- A few different size sockets/wrenches (though expensive this is a good kit that has nearly everything you'll ever need)
- 12mm - to remove the brake line from the bracket on the spindle.
- 14mm - to remove the brake line bracket from the spindle.
- 17mm - for the caliper itself.
- 21mm - lug nuts.
- A 10mm flare nut wrench for the caliper-brake line fitting.
- A 8mm box-end wrench for bleeding the brake calipers.
- Impact wrench (or large breaker bar) - for removing your lug nuts.
- An angle grinder - for cutting the dust shield. Note: you can also use a dremel, hacksaw, or other metal-cutting tool.
- Torque wrench - to re-torque the caliper bolts and lug nuts.
- Some rubber vacuum caps - to keep brake fluid from leaking everywhere while swapping the calipers.
Doing the Job
With all the parts and tools gathered, it's time to get to work. Perhaps obviously, the job is mostly a bunch of removal of parts, and then a bunch of installation of those same parts - or rather, installation of replacement parts. This list of steps is just that - a list of steps (which makes it a great resource to print off and reference when you're doing the job).
Removing the wheels
- Jack up the front of the truck using a floor jack and place a jack stand under each side of frame, just behind the front wheel well.
- Remove the lug nuts securing one of the front wheels. Note: While it's not required for the job, I really do love this Milwaukee impact wrench. I debated for several months whether or not I should get it, and it's one of my favorite tool purchases to date. I smile every time I use it.

Disconnecting the brake lines (Tacoma)
- Using a 10mm flare nut wrench, loosen but do not disconnect, the connection between the hard and soft brake lines at the frame.
- With the connection loosened, use a screwdriver, pliers, or any tool necessary to remove the clip that secures the soft line to the frame.

- With the clip removed, complete removal of the soft line from the hard line.
- Push the flare nut half an inch up the hard line and use a rubber vacuum cap to cap the end of the hard line to stop any drips. Note: this is important so you do not drain all of your brake fluid as you complete the job.

- Locate the bracket that holds the soft brake line (and ABS line if equipped) to the spindle.
- If you have ABS, remove it from the spindle bracket by pushing the clip out of the bracket.
- Use a 12mm or 14mm socket (year specific) to remove the bolt securing the bracket to the spindle. Note: there is no need to remove the bolt securing the soft brake line to the bracket, you will be replacing the bracket with one from the Tacoma-to-Tundra Hard Brake Line Upgrade Kit.
Disconnecting the brake lines (4Runner)
- Locate the bracket that holds the brake line to the spindle.
- Using a 12mm socket, remove the single bolt so that the line is free to move.
- Using a 10mm flare nut wrench, remove the hard line from the brake caliper. Note: When you do this, brake fluid will want to start leaking out, so use a small rubber vacuum cap to seal off the end of the line (Hint: push the fitting up the line so you can get a tight fit on the flared end of the line itself).
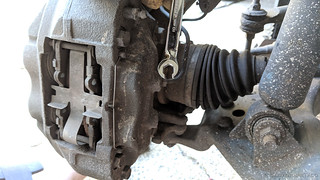

Removing the Caliper and Rotor
- Locate the two 17mm bolts that secure the caliper to the hub and remove them.

- Set the caliper aside. Note: If you need a core for your new 13WL calipers, you can use these.
- Slide the rotor off of the lug studs and set it aside. Note: The rotors are essentially paperweights; keep them or discard them.

Trim the Dust Shield to fit the 13WL Caliper
- Using the side-appropriate Tundra 13WL caliper, hold it approximately in place and note where it overlaps the dust shield that is still attached to the hub assembly.
- With a sharpie, mark a cut line. Note: Check both the top and bottom corners of the caliper - you may need to trim the dust shield only for the top, or both the top and bottom.
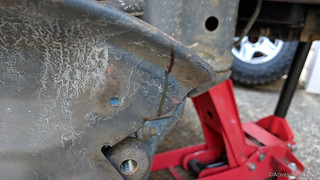
- Using an angle grinder, dremel, hack saw, or other cutting tool, remove the material necessary for the caliper to clear. Note: Don't worry too much about this cut, get it close but it doesn't need to be perfect.

Fit the Rotors and Check for Clearance
- Install the new rotor over the wheel studs with two lug nuts that are just tight enough to secure it to the hub assembly. Note: usually this is finger tight.

- Rotate the caliper several times to check for clearance of the dust shield by listening for rubbing/grinding.
- Bend the dust shield as necessary to prevent any rubbing.
- If there is still rubbing/grinding after you're sure that you've bent the visible portions of the dust shield away from the rotors, remove the rotor and check the portion of the dust shield that fits "inside" the center of the rotor. That seems to rub sometimes / for some people - but not for others. For me, it's rubbed one of six times. If it is rubbing, use an angle grinder, dremel, or file to remove/file off a bit of material from the entire radius.

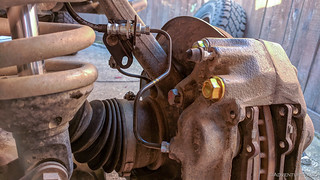
Install the Tundra Calipers
- If it isn't already, install the new rotor over the wheel studs with two lug nuts that are just tight enough to secure it to the hub assembly. Note: usually this is finger tight.
- Hold the caliper in place and secure it with the two 17mm bolts. Torque the bolts to 90 ft-lbs.
Note1: In rare cases, the Tacoma caliper bolts may be too long to fit into the Tundra calipers. If this is the case, pick up four (4) Tundra caliper bolts (90080-10298) which are slightly shorter.Note2: Make sure to install the caliper so the bleeder valve is on the top half of the caliper for proper bleeding.

Install the Brake Pads and Shims
- Using the supplied grease, spread a thin layer on both sides of the slotted shim, and on the outside of the solid shim.

- Assemble the brake pads and shims by creating a sandwich of brake bad, slotted shim, solid shim.

- Slide the pad/shim assembly into the caliper, next to the rotor.
- Repeat for the second pad/shim assembly.
- Install the bottom pin that secures the pads to the caliper by sliding it through holes that align on the two components. Secure it with a small retention clip.
- Install the top pin, while also installing the small spring that pushes the pads away from the rotor. Secure it with a small retention clip.
Note 1: The easiest way to do this is to install the two ends of the spring into the pads, making sure the "ears" of the spring are on the narrow edge of the pads. Then, slide the top pin through the caliper, pads, and spring at the same time.
Note 2: Some people report not getting the wire brake pad anti-rattle spring with the calipers that they purchase. If this is the case for you, you can pick these up separately from one of the following locations:
- Amazon: Disc Brake Anti-Rattle Clip H4749 or Raybestos R-Line Anti-Rattle Spring for 13WE, 13WL
- Toyota Dealer: Disc Brake Anti-Rattle Clip (47748-0C010)
- Local parts store: (O'Reilly - BrakeBest Anti-Rattle Clips - H4749)

Install the Brake Lines (Tacoma)
- Use the 12mm or 14mm socket (year specific) that was previously removed to attach the side-specific bracket from the Tacoma-to-Tundra Hard Brake Line Upgrade Kit, securing the bracket to the spindle. Torque to 20 ft-lbs. Note that the bracket is oriented so that the hole for the ABS clip is on the bottom, and hole to attach to the spindle is on the top, with the hole for the hard brake line toward the front of the spindle.

- Using a 10mm flare nut wrench, install the side-specific hard line from the Tacoma-to-Tundra Hard Brake Line Upgrade Kit into the Tundra caliper so that the other end aligns with the hole in the bracket. Tighten securely, but do not over tighten the flare nut.

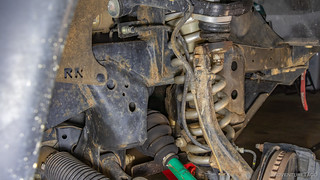
- Insert the stainless steel brake line between the spindle bracket and frame bracket, using a brake line clip to secure it to each bracket.
- Note 1: Reuse the brake line clip earlier removed from the frame bracket, and a new clip supplied with the Tacoma-to-Tundra Hard Brake Line Upgrade Kit.
- Note 2: Route the stainless steel line behind the spring of the coilover, and in front of the spindle to the bracket, as shown.
- Note 3: Do not secure the stainless steel brake line between the brackets (with zip ties, etc.) as the line needs to flex and move as the suspension cycles.

- Finger tighten the hard line to the soft line at the spindle bracket. Once finger tight, use a 10mm flare nut wrench to tighten securely, but do not over tighten the flare nut.
- Remove the rubber vacuum cap from the hard brake line at the frame and finger tighten the flare nut into the stainless steel soft line attached to the frame bracket. Note: This may be difficult as slippery brake fluid will be dripping at this point. Work as quickly as possible.
- Using a 10mm flare nut wrench, tighten the flare nut securely, but do not over tighten the flare nut.
Install the Brake Lines (4Runner)
- Use the 12mm or 14mm socket (year specific) that was previously removed to re-attach the bracket to the spindle. Torque to 20 ft-lbs.
- Using a 10mm flare nut wrench, install the hard line into the Tundra caliper. Tighten securely, but do not over tighten the flare nut.
Re-install the Wheels
- Re-install the wheels and secure with lug nuts.
- Remove jack stands.
- Torque lug nuts to 89 ft-lbs. Drive a bit. Re-torque lug nuts.

Bleeding the Brake Lines
Note 1: always bleed from furthest-to-closest bleeder to the master cylinder. In Tacoma's and 4Runner's, that is passenger rear, driver rear, passenger front, driver front. In this situation, since we've only messed with the front lines - and assuming you didn't drain the reservoir under the hood in the process - we will only do the passenger front and driver front, in that order.
Note 2: This can make a bit of a mess. Have a catch basin or shop rags positioned below the bleeder to catch brake fluid that comes out of the bleeder, or fit a clear plastic tube over the bleeder that funnels the brake fluid into a container, in order to keep things clean.
- Check the brake fluid level in the reservoir under the hood. If it is below the full line, add fluid to the full line.
- Have a second person sit in the driver seat and pump the brake pedal until it is firm - usually a few pumps.
- Place an 8mm box-end wrench over the bleeder valve and get the valve to "barely tight."
- Have the second person pump and hold the brakes in the following pattern - Pump, Pump, Pump, Pump-and-Hold. Note: it is helpful if they say this as they are doing it.
- While the brakes are being held, loosen the bleeder valve to slowly let out air and brake fluid for a short period of time, then re-tighten the bleeder valve. Say "again," to your helper so they know they can stop holding the brakes.
- Repeat steps 4 and 5 until only brake fluid comes out of the bleeder valve (no air).
- Check the brake fluid level in the reservoir under the hood. If it is below the full line, add fluid to the full line.
Repeat this process for the driver front (and/or any bleeders that still need bleeding).
You're done!
Bedding the Brakes
With new brakes installed, I recommend a process called bedding the brakes, a process by which you deposit a layer of pad material evenly across the braking surface of the rotor. This minimizes squealing, increases braking torque, and maximizes pad and rotor life.
This process is technically optional - the brakes will bed themselves over time even if you don't do this - it'll just take longer, and they won't work quite as well until they are bedded.
Advantages
- Gradually heat treats the rotor and eliminates any thermal shock in the rotor.
- Burn off volatiles and moisture from the resin that is near pad surface. This will eliminate “green fade.”
- Establishes a layer of transfer film about a few microns thick on the rotor surface. Shearing of the film during friction is an effective source of friction force. Otherwise, when using a freshly ground rotor without the transfer film, the main friction force would come from cutting, plowing, or scoring the asperities on the rotor surface. This leads to inconsistent braking effectiveness.
- Mate the two surfaces to a near perfect geometrical match, so that the contact area is high, and therefore the friction force is increased.
- The performance of a fresh rotor/fresh pad system would be inconsistent. This is due to ever-changing structures and properties of the two mating materials. Bed-in of pads and rotor will form a stable transfer film.
- If bedding in procedure is not applied, a stable transfer film may not be established for a long time. In other words, the rotor surface would have to be constantly regenerating a film that is not quite stable for a long time. This effect would reduce the performance and increase the wear.
Bed-In Procedure:
- Make a series of five gentle slow-downs from 60 to 45mph. Do it GENTLY to bring the brakes up to operating temperature. This prevents you from thermally shocking the rotors and pads in the next steps.
- Make a series of eight near-stops from 60 to about 10 mph. Do it HARD by pressing on the brakes firmly, just shy of locking the wheels or engaging ABS. At the end of each slowdown, immediately accelerate back to 60mph. DO NOT COME TO A COMPLETE STOP!
Note 1: With less aggressive street pads and/or stock brake calipers, you may need to do this fewer times. If your pedal gets soft or you feel the brakes going away, then you've done enough. Proceed to the next step.
Note 2: During this process, you must not come to a complete stop because you will transfer (imprint) pad material onto the hot rotors, which can lead to vibration, uneven braking, and could even ruin the rotors.
Note 3: Depending on the pads you are using, the brakes may begin to fade slightly after the 7th or 8th near-stop. This fade will stabilize, but not completely go away until the brakes have fully cooled. A bad smell from the brakes, and even some smoke, is normal.
- After the 8th near-stop, accelerate back up to speed and drive around for as long as possible without using the brakes. The brakes will need at least 10 minutes to cool down. Note: Obviously, it's OK to use the brakes to avoid an accident, but try to minimize their use until they have cooled.
- Repeat steps 1-3 for a second break-in cycle. This may not be entirely necessary in all cases, but is good insurance to ensure a good break-in. Additionally, if you've just installed a big brake kit, the pedal travel may not feel as firm as you expected. After the second cycle, the pedal will become noticeably firmer.
After the break-in cycle, there should be a blue tint and a light gray film on the rotor face. The blue tint tells you the rotor has reached break-in temperature and the gray film is pad material starting to transfer onto the rotor face. This is what you are looking for. The best braking occurs when there is an even layer of pad material deposited across the face of the rotors. This minimizes squealing, increases braking torque, and maximizes pad and rotor life.
Another excellent write-up. I plan to do this within a year and buy your Tacoma-to-Tundra Hard Brake Line Upgrade Kit.
How much of an improvement have you noticed since the Tundra brake upgrade on the road and off road?
Any difference when stepping on the brake pedal?
Thanks Brandon. The biggest benefit of the Tundra brakes (in my opinion) is the increased pad and rotor size. The larger size gives you more surface area for heat dissipation, which makes it much less likely that you will ever overheat the brakes (warping rotors, boiling brake fluid, etc.)
As far as stepping on the brake pedal - I never had a problem stopping once with Tacoma brakes, it was the prolonged braking that I was after. So, I do notice a difference - there's a lot more braking going on, but that wasn't my reason for the upgrade (or the reason I recommend to others).
Hope that helps!
When going with the bigger calipers and rotors, I am assuming I will not be able to run the standard 16” wheels I have now and will have to get a bigger size?
Hey Tyson, this is a pretty common question and the answer is "it depends." I put together a page that lists wheels that are known to work with the Tundra Brake Upgrade. You can access that page here: Which Wheels/Rims Fit the Tundra Brake Upgrade (13WL 231mm rotors) on a Tacoma? (or 3rd gen 4Runner). At the top of the table is a search box if you know the brand/model of wheel, or you can just look at the pictures. The [source] field takes you to "proof" (someone else running that setup) for each wheel. Hope that helps!
Hi there. I am hoping to do this mod. I am running American Racing Baja 16" wheels. I see from your list of wheel compatibility for the 13WL calipers that I will need a spacer. I am hoping to not use spacers. Is there a similar list for wheel compatibility for the S13WE calipers? What/where is the difference in size between the two?
Hi (and sorry for the delayed response, I just got back from a trip to SE Oregon),
There's no similar list for the 13WE calipers, but I've not seen a set of 16" wheels that required spacers for those. I think they are a good alternative. That said, I'd give the following a try:
I'm 99% sure it'll fit, but that will give you a 100% for sure answer.
And let me know how it goes! Would love to include the info in the list! ?
I am running late model Taco 16” OEM wheels and having no problems with this Tundra brake upgrade.
Great to hear Mike. Can you reply to this email with a photo of the wheels you're running so I can add them to the list? Thanks!
I just watched a video where a guy did the same swap out but also used this,
-Toyota 1.25" Thick Wheel Spacers from spidertrax.com.
Can you tell me why you didn't need to use a spacer?
I'm just wanting to get all the parts needed to get the job done in one day so I can go back to work the following day without worrying my truck will be down.
Thanks
Hi Bill, whether you will need a spacer or not is based on the wheel that you choose. The wheels I chose are able to fit the calipers inside the wheel, and so don't need spacers. What wheels are you running (or planning to run?) This page has a searchable list of the wheels that are known to work with the Tundra Brake Upgrade, and also lists whether spacers are needed to make the wheel fit the calipers: Which Wheels/Rims Fit the Tundra Brake Upgrade (13WL 231mm rotors) on a Tacoma? (or 3rd gen 4Runner) Hope that helps, but please do post what wheels you're planning to use!
Just the stock 16" factory wheels
No real plans to change them, if so I would go for roughly the same.
If they are the stock 16" snowflake wheels, then they will fit just fine with no spacers. You can see those in the table as "Tacoma 1G Snowflake"
Thanks.
I just did the upgrade and the new brakes are great, your brakeline kit worked perfect. Each of the Callahan calipers came with 2 copper color washers, I can't figure out where they go, do you know?
Banjo bolt crush washers?
Hey
Great write up. Is there an option for Gen 2 Tacomas? I have a 2012 XSP-X
Thanks
Hey Jim, I'm not sure if there's a 2nd (and 3rd) gen upgrade to bigger brakes, though I've heard that 4th/5th gen 4Runner brakes might be an option. My suspicion is that they have larger brakes already.
Thanks for your time
Sure thing. The best way to find out for sure is to ask over on TacomaWorld. If there is a big brake upgrade for 2nd gens, someone will have done it. In fact, a quick search turned this up for me: Big brake kits.
I just did the upgrade and the new brakes are great, your brakeline kit worked perfect. Each of the Callahan calipers came with 2 copper color washers, I can't figure out where they go, do you know?
Just did the upgrade everything fit perfect and the brake line kit worked awesome. I am getting the clunk from the floating pads, is that something you experienced or were your pads tight?
Glad to hear the upgrade went well Josh! I didn't get any clunk (that I noticed) from the pads. Are you getting it when you let off the brakes, or something else? Could it be that the pad springs aren't fully seated, pushing the pads back out? Did you grease the pins and shims?
Is there any reason to think that the Tundra dust shields won’t work?
I am replacing my hubs, bearings, spindles, CV’s, etc. and was going to upgrade brakes at the same time.
Figured I would put Tundra shields on while everything is disassembled.
I would think that Tundra dust shields would be just fine. Not that very much modification is needed for the Tacoma ones - so if you weren't replacing everything else, I'd say it's not worth the trouble - but I don't see any downside to go the Tundra route. Come back and verify that they work (or don't) if you don't mind!
hello, i just did the swap yesterday along with replacing my abs sensors on my 994r. now i notice that when i am coming to a complete stop, my breaks will release and reapply (abs?) when i am under 10mph, but before the complete stop. totally clueless as to why this is happening. any ideas?
Hey Leon, It's hard to know exactly what's going on. If it's the ABS, it should be a pulsating that you can feel in the pedal (rather than what I would call a "release and reapply," which sounds to me more like letting off and then pressing the brake again). You should also hear the ABS system "pulsing" if it's ABS, and the pulsing should continue for a second or so if you let off the brake pedal completely. Is that what you're feeling, or something else?
Hi I was looking at ordering the same Napa eclipse calipers that you got when I looked at them it say one is a 4 piston fixed caliper and the other is a 4 piston floating caliper is that right or should the both be the same
Hey Eric, The Napa descriptions are just wrong/inconsistent on their page. Those calipers are both the same style (fixed) and are the correct ones (13WLs) for this upgrade!
I have a 97 Tacoma and want to upgrade from rear drums to disc. Does this upgrade do that or is there another upgrade info available? Thanks
Hi Vernon, This upgrade doesn't change the rear brakes on your Tacoma at all (as you can probably see by reading through it, it's completely focused on the front). There are kits out there that will convert the drum brakes to disc, but in my opinion (and experience) they are not worth (on 1st gen Tacoma's or 3rd gen 4Runners) it for several reasons:
Taking all those things together, upgrading the rear brakes to discs is really just a waste of money and a loss in performance/functionality in most cases. You'd actually be much better off making sure that your rear drums are properly adjusted so that you're getting as much braking power out of them as possible. I've outlined the adjustment procedure in this guide: Step by Step Tacoma Rear Drum Brake Shoe Replacement (also 4Runner).
Hope that helps!
Appreciate the guides you have up here, all very thoroughly detailed.
When bleeding the brakes, do you not have to also bleed the load sensing proportioning valve as well?
Thanks, glad you’re finding the guides useful! When you are bleeding the brakes, you are technically supposed to bleed the BPV, however unless you’ve done something to the rears, I’ve never had the need. If you do bleed the BPV, it is bled between the rears and the fronts.
This writeup was completely helpful. I just did this upgrade on my 3rd Gen Hilux Surf. I have done the proper bleeding at all wheels.
Only issue I am having with this upgrade is my brake pedal now goes very down as it was not the case with old callipers.
Pedal will get hard but if u keep holding it will just goes further down.
Am I missing something.
Any suggestion will be helpful.
Cheers
With the Tundra upgrade, your pedal will go down further than it did prior to the upgrade. This is because the 13WE and 13WL calipers use a larger volume of brake fluid, so more needs to be pushed into the system by the pedal. However, if your pedal continues to move once it has firmed up, it means that you have something "compressible" (like air or water) in the system. Assuming of course that you don't have a leak, which it sounds like you don't, since you haven't mentioned losing any brake fluid. Here are the most common things that I would start with in order to figure out what's going on:
Hope that helps, and please do reply when you figure out the issue so others can benefit from your investigation! ?
For anyone who purchases calipers and doesn't get the little Clips that are spread the pads apart, there are a couple options:
1. The calipers should come with them, so you should be able to reach out to the place of purchase and they should either give you some springs or replace the calipers/box with a box that isn't missing the springs.
2. If it's quicker, you can pick up springs from Toyota for ~$5 each. They are Toyota OEM Anti-Rattle Spring for 13WE, 13WL (47748-35010). Even though it looks like two can be installed on each caliper, you only need *one* per caliper/side.
Fits in 17” Icon Compression wheels!
Getting ready to do the upgrade on my 3rd generation. My question is do I reuse the caliper mounting brackets for the larger calipers ?
Hey Mike, I'm not sure what you mean by caliper "mounting bracket." In my experience, the calipers mount directly to the hub/spindle, and both the OEM calipers and Tundra (13WL or 13WE) calipers mount to the same holes. If you have a photo of what you're wondering about, I'm happy to give you more/better info.
There’s a bracket that holds the calipers to the wheel assembly, it’s separate from the caliper itself. Not sure how else to explain it . I’ll try adding a picture.
That didn’t work, if you have a second, pull up the caliper bracket and you’ll see what I mean. I just need to know if the 02 bracket will work with the 04-05 tundra caliper
Hey Michael, sorry for the slow reply, I've been out exploring in Utah the last several days. If you can just reply to this email with a photo, that would be great.
As I think I mentioned, I've never seen a 3rd gen 4Runner for 1st gen Tacoma that had a separate bracket for the caliper, so I while I can picture what you're talking about, I have never seen it on a truck.
Finished the upgrade today, went with the Napa parts that were listed . Much easier than I thought, the information in the post was spot on. Brake pedal doesn’t seem to be as stiff as before, but doesn’t effect braking. Hoping this will remedy the issues I’d been having
Glad the upgrade was successful (and reasonably easy) for ya! You do have to move a bit more fluid around with the pedal, so having it be a little different than it was before is totally fine/normal. The key - as you've noted - is that you can still brake quite well (and now, for prolonged periods of time with less concern about rotor warpage).
Just bought the set for 04 tacoma today , can I reuse the old brake line, the hose pressure botls can fit with new caliper brake tundra
Hi Thang, Your kit is already on the way (check your email for the tracking number). While you technically can reuse the old brake lines, there are a couple good reasons not to. You can read a post about it here, and a summary of the reasons below:
Hope that helps!
This is a spectacular post! I almost feel like I could do it myself--but I don't have (some of) the tools nor the workspace.
Are there shops (West Coast? SF Bay Area? BC?) that are experienced doing the upgrade using your kit and parts list?
Would love to do this for my 1999 Tacoma (4wd off-road, ext. cab)!
(I have not been able to identify my wheels off your spreadsheet: they are double 3-spoke like the ones identified for a 4-runner--one of the few that requires a spacer!--I suppose that could be correct also on my Tacoma?)
Hey Thierry, I don't know about specific shops, but I'm sure that if you went to a local mechanic with a printout and parts in hand, they'd be able to give you a good quote. That said, the work is so straight forward that I'd urge you to consider purchasing a few tools (if you only need a few) in order to do it yourself. It's easily doable in a driveway or even the parking lot of your local Napa/O'Reilly/etc. in an hour or two. Heck, I did it parked on the side of the road in the middle of a trip to Montana, once! The cost of the tools - even if you had to purchse them all - will likely be less than the labor a shop will charge, and when it's all done, you get to keep the tools! 👍
As for the wheels - if the ones you have are the stock Tacoma double 3-spoke (that look like the 4Runner double 3-spoke) then they are 15" rims (those are what I originally had on my truck as well; here's a picture) and they won't fit either of the Tundra caliper options, which require 16" rims or larger. You can tell if you have the 15" variety by looking at your tire size. That'll tell you the diameter right on the sidewall. Good luck!
Thank you for your response!
Oh darn! They are indeed 15" wheels.
Whoops, this just got way more (and too) expensive: plus new wheels and tires. Darn.
I was SO looking forward to this upgrade! Would you recommend another, second best option? (Perhaps there are better rotors or pads for the existing Tacoma calipers?)
And thank you for the encouragement to DIY...
Cheers!
While getting new wheels (and tires) can seem like an expensive change, it doesn't have to be *that* expensive, depending on the route you're able to take.
I personally am a fan of Toyota wheels, and it seems that you can always find a full set (with tires) on Craigslist for something in the $200 range (and probably less if you're not in an expensive area like Seattle, as I am). Now, those might not be the tires you want, but sometimes you get lucky there as well.
If they aren't the tires you want, an option is to wait for your current set of tires to wear out. Then, since you have to buy tires anyway, you can pick up tires that would fit the new Craigslist wheels, and put everything on together. It's more money at one time, but it's money you'd have to spend anyway.
Anyway, I say all of that because there isn't really a good option for the front brakes on a Tacoma besides the Tundra upgrade. That's because the main benefit is the larger rotors, which can absorb more heat, thus preventing warping. As such, stickier pads or slotted/drilled "normal" size rotors just aren't going to give you the same benefits.
Anyway, hope that helps!
Thank you, it totally does. I was thinking about the same thing: take some time to find a set of wheels ( is 17" better than 16"?) and when it's time to replace the current tires, do the brake swap then. Unfortunately, that may take a while--I could really use great brakes, I'm carrying a lot of weight on the Tacoma.
I like the Toyota wheels too. I just need to make sure they are at least 16", correct? Not sure if they come bigger (like 17").
If you can get 17's, you'll definitely have more tire choices. The tradeoff is that many 17" Toyota wheels have a tad too much backspacing (on the order of 5" - 5.5") and so require a spacer on our 1st gens to keep them off the suspension.
Not sure if you've seen it, but I maintain a list of wheels that are known to fit (along with links to the person who is running them). It mostly covers 16" wheels, since there are very few 17s that won't fit (with the right backspacing, lug pattern, etc.) I really like the "Sequoia Double 5-spoke" and the "TRD Pro" that are 17x7" though, and both of those would give you the slightly larger diameter.
Very cool. Will start looking on Craigslist and Kijiji for a set of wheels, see what happens...
Yes, I did see the compatible wheel spreadsheet. Will need to look at that more closely to narrow the choices...
If what I found is correct, a 1st Gen 1999 4WD has a 6 x 139.7 bolt pattern, and that's what I need to look for also.
Thank you again for all the info and this incredible resource!
So when purchasing your Tacoma to Tundra brake line set up, is there anything else from your site thats needed? I've got an '04 1st gen with a 3.5" OME lift in the front. (1/2" spacer and 3" heavyduty coilover). The rear already has an extended brake line. So just the standard line conversion right? I don't need an extended travel one.
Hey Noah, thanks for reaching out. With your truck, all you need from my site is the Tacoma-to-Tundra Hard Brake Line Upgrade Kit, you do not need the Long Travel option. And no need to get a rear line either, if you've already got an extended line back there.
Perfect! Been looking at this for years and after smoking yet another set of stock front brakes... its time!
Thanks for your help!
Great write up and really appreciate all the links to the right parts. That is half the battle right there.
I just did the upgrade and like several here did not receive the springs. However, the one thing I was wondering if is absolutely necessary is the shim kit? I bought it but cannot seem to get the pads installed with the sandwiched shims, per the provided picture. I tried to us a C-clamp to compress the cylinders more with no luck. With the calipers being new, I imagine there should not be much if any more room for the cylinders to retract. I may have just been a little too nervous on destroying the new calipers and could have compressed more. Figured I'd play it safe and see if I could get advice here first.
Thanks Bo, glad the write-up has been useful. As far as the shims go - they are largely to reduce friction (and thereby reduce noise). As such, it won't affect braking performance to run without them, but you may notice that you have squeaky brakes, or that you get some "chatter" between the brake caliper/pad/rotor. It should be a pretty snug fit with the pads and shims when everything is new, as well.
I'd try a couple things:
turbodb,
Appreciate your quick response. Yeah, the calipers were still disconnected when I was trying to compress the cylinders. I suspected that the c-clamp might be too much at this new/unused state so thank you for confirming my suspicion.
I was actually thinking the same action; running the pads for a bit and then insert the shims after some wear. Great minds think alike. Just needed a sanity check on it though.
V/r,
Bo
Great EASY upgrade! I've installed QUALITY rotors several times due to warping. My hope is that this is the fix. Won't know for a while, or perhaps I'll just forget it was ever an issue. Braking definitely feels MUCH smoother and more controlled.
One tip... Not being a mechanic, I tried to deal with removal of the brake line clip and nut from the wheel well. SO MUCH EASIER when I figured out I could reach over fender into the engine bay to access those. It may be noted in the instructions... if so, I missed it.
I did "bed" the brakes, which not only finished the job right, but also gave me complete confidence that they're working GREAT!
Awesome, glad you found the guide useful Ed! I’ve learned so much from the community as I got into my Tacoma that it’s been nice to be able to give back a bit.
If you have a chance, I'd love a positive review on Google (even just a copy-paste of your comment), it turns out they help with search results lot more than I originally realized they do!
And as always, please feel free to reach out any time with questions - I'm always happy to help with this stuff! 👍
G'day... This is from far down under, in Tasmania. Your to do's instruction's are one of the best I have comes across mate. Great work. I have a 1999 Land Cruiser Prado, similar to 3rd Gen 4Runner. They share most of the front end of the wagon.
I'm very keen on upgrading to the Tundra brakes. However, it is very difficult or next to impossible to get parts here in Tasmania or even to be shipped. I can get DBA Rotors delivered, but they come in a variety of diameters 275mm, 318mm & 354mm.
https://dba.com.au/search-results/?_product_no=db1838ss%2Cdb1838sp%2Cdb1838xp%2Cdba2740e%2Cdba2740s%2Cdba2740x%2Cdba47420%2Cdba47420s%2Cdba47420xs%2Cdba2724e%2Cdba2724s%2Cdba2724x%2Cdba42724%2Cdba42724s%2Cdba42724xs%2Cdbas1660&vehicle_description=4D%20Utili%2C%204WD%205TBDT4#1%20%20%5BUSA%5D,%20AT&vehicle_id=154616900&_sort_woocommerce_2=shop_order
Any possibilities to know what size rotors I can use for the upgrade. I'll have to figure out a way to get the rest of the parts delivered to Tasmania.
"Cheers mate, I really appreciate it!"
Hey Julian, Glad to hear you've found the write-ups that they're useful for you! As far as rotor diameter - I'm not sure of the measured diameter, except to say that they should be the same diameter as your stock rotors. The difference with the Tundra rotors is that they are thicker. You can see a comparison here: Hard to find Specs, Info & Measurements on 231mm 13WL Tundra Calipers & Rotors (archive). Of course, besides diameter, you'll also need to be sure to get the right bolt pattern and positioning of the rotor on the hub, so it's centered on the caliper correctly, as the Tundra rotor would be.
Hope that helps!
Thanks for the reply. My 99 3.4L 5VZFE Prado has stock S13WM calipers and I’m running 319mm slotted rotors which has 6 lugs.
Thanks for the write up and the quality kit. I just did the swap on my '03 Taco 4x4. We had experienced brake fade and crazy shimmying/ shaking of the truck (probably due to warped rotors) trying to slow down in mountain passes while loaded and it was a dangerous situation. Seeing how much larger and thicker all the new gear is gives me no doubt it'll solve the issue.
The hardest part of the swap for me was fighting with those clips that hold the flex brake lines to the brackets for attachment to the solid brake lines. The factory clip is almost twice the thickness of the clips that you supplied with the kit and would only go on with a hammer and brute force to smash it into the groove of the flex line. That was on the first line. On the second I took the factory clip to my grinder and made it thinner. It wasn't perfect but was a lot less of a struggle. I put the factory clips on the lower attachment points as it was easier to get at. There was no way I could have gotten an unmodified factory clip to go on the upper attachment point. I'm curious how nobody else seems to have had this problem.
Other than that I'd say it would be a good idea for people to do the passenger side first. It's easier to get access to the back of the top attachment clip and threaded junction. (There were coiled lines and other stuff in the way on the drivers side.) I might also recommend spraying a little Kroil or other penetrating lube onto the clips as well to help loosen them. On the passenger side I used a hammer and a 4' piece of copper pipe to reach down from the engine compartment where I could get a good angle on the hooked up part of the clip to get it moving. The drivers side had to be done from inside the wheel well.
My calipers did not come with the little anti rattle springs and I almost got stalled out on that detail. I was doing the swap on a Sunday and got lucky that the local parts house had some in stock. I might recommend just putting those in the parts list to begin with as they only cost a couple bucks but can hold you up if they aren't supplied.
Lastly I noticed on my brake pads that there were clearly inner and outer pads for each side but neither was labeled. I had to watch some youtube vids to see that the pad with the little metal tab is the inner pad and that little tab goes up. I'm not sure how much it matters but never saw any mention of that in any of the write-ups or questions. Hopefully I got it correct.
So hopefully that can be of help to the next person doing this job. It's not hard and you can do it. Also I was surprised to find that there's nothing that holds the rotor onto the hub. It can't fall out due to being trapped by the caliper but it just floats in there and gets sandwiched by the wheel to the hub. To remove the old one just take a rubber mallet and slap it from the backside, rotate, slap, rotate, slap and it'll pop off.
Apologies to the exasperated guy who came out with his hands up on my final bed in 60-10 mph braking run out on the rural road... Another satisfied customer 😉
Hey Alex, thanks for the note and tips! I've got a few questions / clarifications, and I'm happy to make updates to the write-up pending the outcome 😁.
For the brake clips - the ones I send in the kit are clips that I purchase from Toyota, so they should be identical to any clips you've got on your truck already. I don't know if you have (or can get) photos of the difference between what you had already and the clips I sent, but I'd love to see them, if you could send along a photo!
For the anti-rattle springs - you're only the second person I've heard of who didn't get those with the calipers, but two is enough to add them to the parts list, at least as an "fyi, make sure you got some of these" sort of thing!
For the brake pads - the inner/outer orientation doesn't really matter at all. That little metal tab is the wear indicator - when the pads get to the point where they are ready to replace, it will start rubbing (and squeaking) on the rotor. It doesn't damage the rotor in any way, but it lets you know that it's time to place an order for new pads.
Hope that all helps, and shoot me a photo of the clips if you can!
Hey Man! So happy to have found your site. I can't imagine the amount of effort you put into this and making it all available to the community is next level.
Getting everything together to do the tundra brake upgrade. Before finding your site I knew of this upgrade and your write up has given me everything and then some to feel confident.
Appreciate you my man! Once done I'll follow up with a pic of the finished product.
Awesome, glad to be of help for ya Brandon!
Love this website, so much work to produce and so well maintained. Thank you.
Can you tell me a part number for Toyota calipers? I read that everyone says the aftermarket parts are great but I have never ever found that to be the case even once. The dealer near me says he can’t help without a vin to get a part number. One of your posts says just ask for calipers for a 2007 ( if I remember correctly, it’s not in front of me now) 4x4 tundra. Dealer wants vin or part number. Says 13wl doesn’t help either.
Also, last time I looked two of the three links for the calipers listed above were no longer active/available/produced. Only Napa had something I think. Are there any updates of other options available?
Thanks again for all the help!
Oh man, thanks for the kind words David, I really appreciate them. I’ve learned so much from the community as I got into my Tacoma that it’s been nice to be able to give back a bit.
For the OEM calipers - I don't have part numbers, unfortunately. Mostly, I think, this is for two reasons:
As far as your dealer needing a VIN, that sounds a bit weird. Let them know it's for a 2005 V8 Tundra, and they should be able to look it up. Or, perhaps a different dealer could look it up for you.
As for the linked aftermarket calipers - those go in and out of stock as folks purchase them on amazon. I think that currently, the A-Premium: L+R set is in stock, but the Callahans are sold out. Those A-Premiums are pretty good, so I'd go that route, with some OEM pads and shims and a set of Tacoma-to-Tundra brake lines.
Hope that helps! Definitely shout if you have more questions!
Tundra 13wl calipers fit the 16” fuel vectors on my 02 taco! Thanks for your page and advice.
Thanks Thomas, I'll get them added to the list. Any chance of attaching a photo of your setup that I can use as the preview for folks? Thx! (You can attach one photo in a comment reply.)
Passenger side went great for me, driver side is giving me some trouble though, with the lugs securing the rotor, I couldn’t install the shims. Installing the pads without them and then rotating the rotor, I am getting a sticky spot where I can’t turn the rotor. If I loosen the lugs, everything will spin freely, no problem. Not sure what the issue is but it just seems like the driver side rotor doesn’t sit in the same flush spot the passenger side did.
Hey Patrick,
A couple things to check:
And, a question - can you rotate the rotor freely (with it snugged up using the lugs) when the caliper is not installed? If so, I'd just recheck everything to make sure you're getting everything aligned as it's installed; it should be a lot like the passenger side.
Good luck, and let me know what you find! 👍
Step 1 is what I’m going to do next, hopefully no damage has occurred while having to drive it home from the shop like this.
I CAN rotate it with just the lugs, the sticky spots are still there, but just less so, I assume because I don’t have 80 something ftlbs on the lug torque.
No dust shield is contacting, not even the inner part, it wasn’t nearly as close as yours was. All the contact seems to be side to side with the rotor and pad.
You should be able to get a sense for where there is the possibility of debris between the rotor and hub by noting (on both, with a marker or something) where the contact with the caliper happens. That contact should happen where there's space between the two, and 180° from that point, since the debris will push one side away from the center of the vehicle and the other, towards the center.
Also, if you can't find anything and suspect the rotor itself, you could always try moving the passenger rotor to the driver side. If you can't repro the issue, you may have gotten a bum rotor.
Just took it all apart and made sure the surfaces are clean, everything fits together fine and spins freely until tighten the caliper to the knuckle with the rotor tightened down with the lugs. Then it locks up and doesn’t move
Try the passenger side rotor on the driver side hub. If that has the same issue, it’s the hub (or debris/mounting); otherwise it’s the rotor.
Fixed it, swapped the caliper out for another I had on hand. It was immediately apparent that the first caliper was bent in some way. Everything is now working perfectly.
Awesome man, glad you got it fixed!
I'm replacing my wheel bearing and plan to upgrade to the 231mm 13WL calipers while my truck is apart. I plan on replacing my dust shields as well. Will the Tundra dust shield fit a 3rd Gen 4Runner? Or is there an aftermarket 4runner dust shield that is already adjusted for the Tundra Brake upgrade?
Hi Isaac, you’ll need the 4Runner dust shield on a 4Runner, but it’s only that one small corner shown in the guide that you need to cut off in order to fit the tundra calipers. It’s super easy and takes less than two minutes with either an angle grinder or some tinsnips. Definitely don’t let that part of the project worry you!
Good luck, and happy to help with a set of brake lines.
Just ordered everything for my 02’ Tacoma. I bought it recently and am doing all the suspension anyway so figure I’d do this as well. Particularly because when I was driving it home I almost rear ended someone because the brakes were so bad. They could have been glazed or it might be because the truck wasn’t being driven much. Nonetheless, I’m a fan of going big on things that make you stop and make you go. Thanks for the stellar write up!
Awesome, glad you found the guide and that it's been helpful so far. Shout if you have any questions as you're doing the work!
Hello Again,
I commented above about finding part numbers for toyota calipers. I thought I'd check back in with an update and problem.
I found Part numbers for remanufactured OEM calipers: 47750-0C022-84
They cost $184 so compared to the aftermarket ones I personally thought it was worth it. Thanks again though Turbodb for your detailed response to my question above.
Everything with the upgrade is working great. MY PROBLEM is that my brake fluid has suddenly stated pumping directly in to my booster diaphragm housing. Drains the reservoir in a half hour of driving. I assume there's bad seal in the master cylinder piston mechanism, so gonna replace both booster and master cylinder. Other ideas or parts to replace?
Has this happened to anyone else?
Could it be related to the upgrade?
My booster and master appear to be original so 230K miles and 22 years of service is more than I could ask for so I assume replacing with OEM should be good for another decade or two.
But while I'm replacing it, is there an upgrade over OEM for either anyone has seen? I have an 03 extra cab 2.7 manual 4x4. 33" wheels, 2.5" lift. In case cheats relevant.
Thanks again for all your help.
Hey David, Thanks for popping back in with the updated part numbers and pricing, that's great to know! And, bummer to hear about the leak you've got, that's gotta be no fun.
IMO, what you're seeing is just a result of the age of the parts as opposed to somehow being related to the TBU, since the master/booster really don't have any idea of what they're pumping fluid into. Replacing those two components should get you back up and running for a long time to come, I'd suspect. And, stick with the '03 Tacoma variants of those components vs. trying to install something "upgraded," especially if you weren't having any issues before. You can wrangle in a 1st gen Tundra master, or even an earlier 1st gen Tacoma master, but they aren't a direct fit and they also require reworking the hard brake lines, for no real benefit.
Thank You!
I just finished reading the threads on Tacoma World (many with your input!) and I'm running into the same issue as many others, of these toyota parts being discontinued. So I went with aftermarket. My mechanic friend assures me buying from napa, advance, etc makes no difference these days, even though you can select a cordon, or raybestos, or duralast, item, you never know what's gonna come in the box. Not sure how true that is, but ill be back on the road, and hope to find someone who can rebuild the original booster and master. I read a thread on TW about a guy in California who does. Maybe there's someone near PA. Thanks again!
When doing this upgrade for a 2000 tacoma, do you need to upgrade the brake booster with it? I've watched plenty of videos and havent seen anyone upgrade it when doing this kit.
Nope, you do not need to upgrade the booster (which is why you haven't seen anyone do it).
How imperative is it that i get the tundra hard brake line upgrade as well instead of just using the stock soft brake lines?
Hey '03 Taco, it's reasonably important to convert the brake lines from the stock banjo bolt connection to the hard-line setup that the Tundra uses from the factory. The Tundra calipers (both the 13WE and 13WL variants) were explicitly designed for that hard-line union, and while it is possible that a banjo will work under very specific conditions, it's more likely that it won't, or won't reliably work over time.
In fact, I initially tried to use the banjo bolts, and ran into an issue on the trail that was difficult to resolve because of it. Had I used a Tacoma-to-Tundra Brake Line Kit, I would have been up and running with significantly less hassle and back on my way.
After the fact, I wrote up a post on the various options, and why the brake line kit is the way to go. Check it out and by all means, let me know if you have any questions.