
I've done a lot of work to the suspension on the Tacoma - with good reason since it is what helps to make our trips more comfortable, and what helps to isolate most of the truck from the harsh terrain over which we travel.
In doing that work, one of the things I knew that I needed - at least technically - was a good set of limit straps. But - as with many who focus on the bling of a new shock, and less on completely finishing the job - I never installed any. Not on the back, and not on the front.
And then, a rude awakening. As we were making our way up Mt. Antero - a 14,000 foot peak in Colorado - Mike's @Digiratus shock tower exploded.

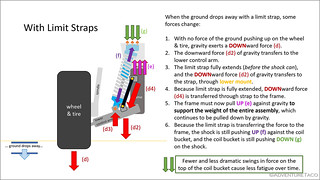
We don't know exactly why this happened, but after much discussion, I think several of us generally agree that one of the contributing factors was over-extension of his front shocks. When this would happen - essentially the lower control arm (LCA) wanting to extend further than the shock would allow - the downward force from the LCA would transfer through the shock and to its only other attachment point - the top of the shock tower.

Compensating for this sudden, downward force, is not what the shock tower was designed for. Over time, it caused fatigue and eventually failure. Or, at the very least, contributed to it.
Limit straps could have helped to prevent the situation, and since I can hear my shocks reaching full extension on the trail from time to time, it's time for me to get some limit straps installed!
What do limit straps do?
At their most basic, limit straps act like a lot like bump stops, in that they limit the travel of a vehicle's suspension. Bump stops do this as suspension compresses; limit straps do it as suspension extends - protecting not only suspension components (shocks, etc.), but also protecting non-suspension components (shock towers, hydraulic brake lines, etc.) that may be affected by overextension.
Let's look at the previous diagram again, this time with with limit straps installed.
A quick way to know if you need straps
So, how do you know if you need limit straps? Here's a dead giveaway:
- Jack up the front of the truck so the front suspension is fully drooped out and place a couple jack stands for safety.
- Remove the front wheels - you'll want to do this on both sides of the truck, since they aren't identical and may have differing travel abilities.
- Remove the lower bolt of the front shock using a 19mm socket and wrench.
If, at this point, the LCA drops down below the lower eye of the shock, that means the shock is limiting the travel of your front suspension. You need limit straps.
Even if the LCA doesn't drop down below the lower eye, if you can push it down below the lower eye without a ton of effort, that shock is still limiting your travel - and you would benefit from straps. This is because the additional weight of the wheel+tire, and momentum when the suspension is cycling, will result in more downward movement than when the suspension is just sitting on stands.
Ultimately, my recommendation if you are doing a lot of driving where your suspension is fully extending, limit straps are a good idea.
Installing straps
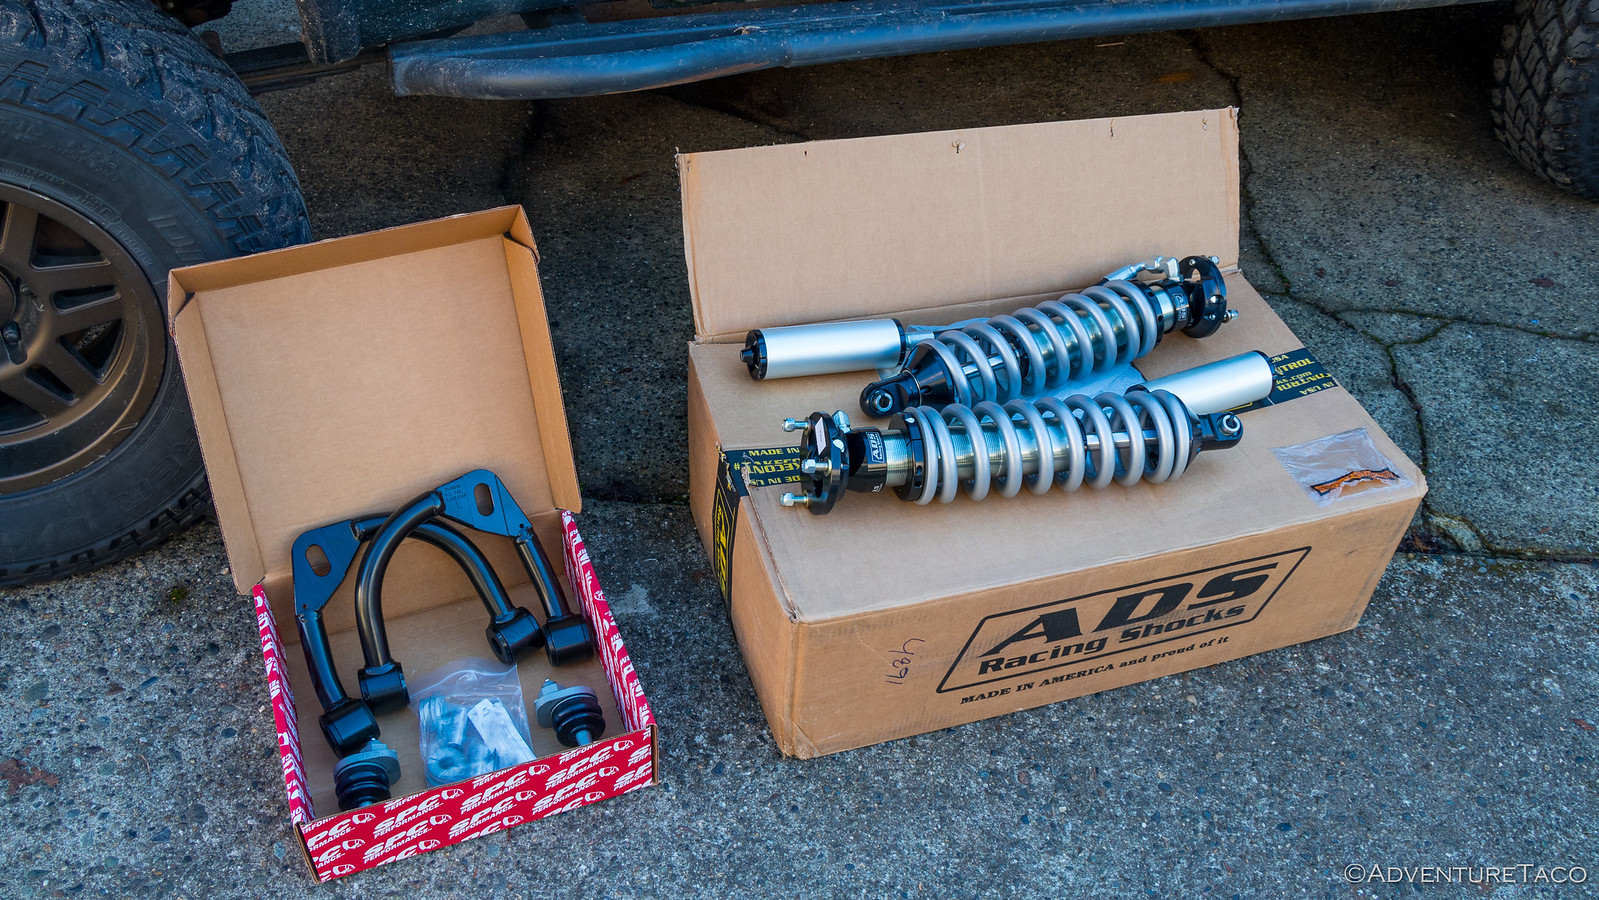
Strap installation is reasonably straight forward. The first step is to figure out the length of straps that will fit and then purchasing them. For a 1st gen Tacoma with OEM LCAs and the sway bar removed, 7" straps are about right. I ordered up a set of 7" Kartek straps, two clevis' to secure the top of the strap, and two clevis mounts, which arrived a few days later. I also picked up a couple of Grade 10, 9/16" bolts and nylock nuts to secure the bottom of the strap.

With this configuration, the clevis mount is welded to the frame of the truck, and the bottom of the limit strap is secured to the LCA using the sway bar mounting point. I got started by taking off the front wheels.

With the wheel removed, the next step was to lay out where the clevis mount would attach to the frame. This is done by
- Assembling the limit strap with the clevis and clevis mount. Make sure that the lock nuts at the top of the clevis are at the very end of the threads, such that the strap can be tightened over time by threading them further down the clevis shaft.
- Installing the bottom of the strap in the sway bar mount.
- Allowing the shock to extend (droop) fully. Note: This fully extended point is the point at which the strap needs to be protecting the suspension. Since a strap stretches slightly, it needs to both engage and reach full stretch before this point.
- Note the location of the clevis mount on the frame.

Having noted the location, I used an angle grinder and flap disc to remove any paint and rust from the frame in order to prep for welding.

Everything prepped, I welded the clevis mount to the frame, and hit the entire area with a couple coats of primer and paint.


All that was left after the paint dried was to reinstall the clevis in the mount and adjust it so that the strap reached full stretch when the brake rotor was about ¼" above full extension. This is something I may adjust over time, but I figured that a ¼" buffer was a good starting point for limit strap stretching and to compensate for additional stretch due to weight and momentum of the tire on the trail.
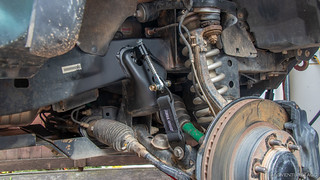
And that's it. Insurance installed! Reinstallation of the wheel and everything is good to go.
I've got an upcoming trip to Death Valley where I plan to put it all to the test...
In this Series

")


")

")
")
")
")

Thanks a bunch for this write up.
I have been on this never ending saga with the front suspension on my reg cab 1st Gen Taco. After swapping out the suspension for the 3rd time due to ride height issues with OME stuff (either way low with 881 coils or way high with 882 coils) I finally swapped in icon coilovers to to adjust the height. Just by chance I was rotating the driver CV at full droop and it is binding. I don't get why as it's almost identical to the measurement with 882 OME coils but perhaps just a little bit is enough and a mm or 2 error in measuring before could explain.
So I was swearing under my breath needing limiting straps and not wanting to figure out what worked. Wrote ups for 1st gens are almost non-existent these days. Then I stumbled on to your write up.
How has this been working for you and how much have you had to adjust it over time?
Hey Chris, glad you found the write-up. The straps have been working fantastically for me - no complaints at all, and frankly has made driving much more enjoyable since I don't have to worry about over extension and all the havoc that can cause to the LCA and shock tower.
I've not had to adjust anything yet, which means relatively little stretch in the straps - a good thing obviously, and just another great reason to go with Kartek straps.
Along the knuckle are those OEM brake lines and routing or were those something modified from a Tundra brake swap?
My brakes lines and routing are totally different and are hitting the limiting strap bolt on the upper strap mount. Gonna have to see if I can tweak the bracket for the line or get a different line.
Hey Chris, those brake lines are not stock, they are modified for the Tundra brake upgrade using this Tacoma-to-Tundra Hard Line Brake Upgrade Kit. The kit works with stock Tacoma calipers as well, if you're interested in picking one up.
Thanks. I might just do that. The stock Tacoma lines and the limiting straps want to be in the same place lol. I totally forgot about your upgrade when looking at the pics and then I didn't notice mine were different untill too late.
Yeah, I never realized that they would be any different either. I'd love if you could send me a photo of what you've got; I could update the write-up with that for others who end up here.
Never mind all is well. I feel stupid. I went to unbolt the the brake line bracket and there was something obstructing the bolt. Turns out this bracket had got whacked by a branch and a chunk of wood had gotten under it and bent it about 45 degrees out from stock location. I checked it with the passenger side and sure enough while the brake routing is totally different it is still fine clearance wise. Removing the wood and straightening the bracket will give enough clearance. Still close but enough room to keep the stock lines.
I had my lines tied out of the way for welding so I did not notice the clearance issue until I was all finished.
Thanks for the quick responses though.
Nice! I was wondering how it would route differently, since the brackets are similar. Glad to hear you got it sorted!
Would this also protect the CV boots in some way? Is there a way of installing this WITH the sway bar still installed or does the sway bar already protect the truck from extended droop?
Hey Abraham, limit straps won't do much to protect your CV boots, since they rub well before you get into a position where you'd want to limit your suspension with straps. I suppose that you could *techically* set the straps so short that you'd never have the fins of your CV boots rubbing/the rubber stretching, but you'd essentially have to "remove" any lift you'd added and all downtravel of your suspension - totally not worth it!
The healthier thing for your CV boots is to reboot them with OEM boots (which is really the highest quality rubber out there - here's a post with the parts and tools you need to do it, it's pretty easy) and then keep the lift on the front of your Tacoma to about 2.25" or less.
As for installing limit straps with a sway bar - you can do it, but you'd have to weld another tab onto the lower control arms to attach the bottom of the limit strap, since - as you've realized - you can't use the tab for the sway bar. Oh, and the sway bar does limit travel a little bit, but whether it totally replaces the need for straps will depend a lot on the wheels/tires you are running, as well as the suspension you've got.
Hope that helps!
Thanks Man! It does, ive read your rebooting article several times in the past. Super helpful. I'm running 882 springs in the front with the 5100 on zero setting. About 100lbs of bumper in front. Driver wheel well is 38" from ground 39" passenger side. I think this is about a 3" lift, no spacers. Stock tires and wheels. Can you discern any need for the strap here with this info?
Thanks!
Whether you need straps is really less about lift and more about the shocks themselves, and your ability to overextend them when you go over a jump or drop off a rock - that kind of thing.
In general, I'd say that with 5100s and 882s, you're probably OK without straps. One benefit of those 5100s is that they have rubber bushings at the bottom mount, and those help to absorb over-extensions a little bit as well.
If you upgrade to shocks that use spherical bearings in the lower mount (like Icon, King, Fox, ADS, etc.) then I'd look into adding limit straps as well.
Excellent thank you!