March 15, 2022.
Time flies when you're having fun, and the last several trips have been exactly that. A regular reader may recall that my last rig review was just as the transfer case blew up on my Back for More trip to Death Valley. Since then, the truck has been out four more times (which obviously indicates that at least something has gone right! .
The New (to me) Transfer Case (resolved)
TL;DR - the new transfer case seems to be working great so far.
After the input shaft bearing in my transfer case gave out on a trip to Death Valley, I quickly picked up a new (to me) transfer case from a local junkyard and swapped it into the Tacoma. My priority - of course - was to get back out on the trail as quickly as possible.
So far - some 5500 miles later, seems thing to be really great. As in, the replacement transfer case seems to be in much better shape than mine had been for the last several years. Ever since I initially had trouble with it, mine was a bit noisier than it'd been from the factory, so it's nice to know that I wasn't just hearing things when I thought something was awry.
From here on out, my plan is to rebuild the original case, but I'll be doing that when the days are longer and the weather warms up a bit, assuming I don't have some other trip planned into the wilderness!
In goes the new (to me) transfer case, which seems to be working splendidly.
My Alternator Failed (new, resolved)
TL;DR - the alternator failed as I was about 90 minutes from home, and it was because the brushes had worn out. Luckily, I was carrying a spare set and swapped them in about an hour, completely fixing the issue.
Unlike many of the topics in a rig review, where I go into a little detail in the original post, but most of it in the review, I covered the alternator failure pretty well when I told the story. In the end, I'm not really all that surprised that the brushes wore out - they'd been rubbing in there for more than 200K miles - but it's a good reminder that wear parts need to be replaced on a regular basis so you aren't left stranded by something that would have been easy to fix back home.
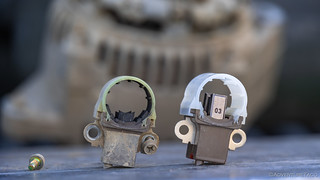
Worn out brushes in an alternator. A $15 part, and a 45 minute service - in the comfort of your garage - can mean the difference between completing a trip and being completely stranded.
The Core Support is Cracking Where the Battery is Secured (new, resolved)
TL;DR - The battery tie down that bolts to the core support has cracked core support as a result of all the rattling around. I've reinforced it, and will monitor it going forward.
As I was pulling my battery to make a bit more room to remove the alternator and service the worn alternator brushes, I was greeted with a rude surprise. Upon loosening the 12mm bolt that secures the battery tie-down, the nut underneath just started spinning. At first, I thought the tack welds that secured the nut to the core support had broken. If only I'd been right!
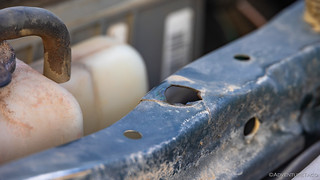
A cracked core support. Not good.
Unfortunately, the entire core support had cracked around the nut. For the remainder of my paved trip home, I simply snugged everything back together as best I could, but I knew that I needed to do something better before hitting dirt again. My solution - since it's hard to weld something to the underside of the core support in that area - was to fabricate a reinforcement plate - with nuts welded to the bottom - that is secured in three locations on the core support. Hopefully this spreads the load and solves my problem.
My reinforcement plate, fabricated with a cardboard template, an angle grinder, and the metal glue gun.
Hopefully this spreads out the stress points a bit and lasts me for many years to come.
I Need New Seats (resolved)
TL;DR - the new scheel-mann Vario R seats are good, but they aren't for everyone due to cost.
I'm adding this entry just to be able to remove the item from my list of "unchanged / still an issue" below. For all the details on my new seats, you can read my post here: Replacing My Seats with scheel-mann Vario R. At the bottom of the post are my first, second, and third impressions after several thousand miles of use. I plan to do a "one year later" review as well... in about a year.
There's no question that scheel-mann seats look good. And so far, the comfort is better as well. Time will tell if they are really worth the hefty price.
The Drawer in the In-Cab Battery Cabinet Rattles (resolved)
TL;DR - I replaced the only metal component in the cabinet with wood, and the rattling is gone!
The inside of the cab is remarkably quiet(er) ever since I sound deadened everything. However, my dual battery cabinet has been rattling almost since I installed it. The problem is that the ball bearing drawer slide - the only metal bit of the cabinet - isn't stiff enough to resist the constant shaking, and so rattles as I go over bumpy terrain. I've tried a couple things to prevent the rattling, but nothing has worked to my satisfaction.
These metal drawer slides move easily, but have too much play in them for a bumpy environment and make the interior of the Tacoma way too noisy.
The solution - I realized - was to remove the metal drawer slide completely, and replace it with wooden runners. These runners can be nice and tight, and because they are wooden, any "rattling" will be absorbed and deadened by the wood itself.
Prepping the wooden runners.
I used the installation of my new scheel-mann Vario R seats - when I ran the seat heater circuits to the electrical control panel in the drawer - to perform this upgrade, and the cabinet has been rattle-free ever since.
Peace and quiet on adjustable wooden runners.
My Bussmann Melted (new, replaced)
TL;DR - I've replaced my Bussmann fuse/relay box because the old one melted around some of the connectors.
This issue has been ongoing for a while, but initially I didn't understand what was going on. Initially, I thought that I was having a problem with my HID-modified Hellas (see previous rig reviews) and so I contacted the manufacturer to see about replacement ballasts, and verified that all the pins were properly seated in the back of the Bussmann.
After reseating a couple pins, I tried replacing the relay that was powering the Hella's, and that seemed to solve the problem... for a while. However, a trip or two later, two relays stopped working:
- The one that powers the Hella's - an 10A draw on a 30A relay.
- The one for my hi-beams - also a 10A draw on a 30A relay. Note: Hi-beams don't usually route through an aftermarket relay, but they do for me as a result of my halogen headlight upgrade, which I love.
After replacing the relays (again), everything worked (again) for a little while longer until I ran the hi-beams for the better part of 8 hours on a trip down to Death Valley - at which point, they just "turned off." A fourth relay had failed, and this clearly wasn't a coincidence.
I decided it was finally time to take a much closer look at the Bussmann, which @Sandman614 had built for me, and at the very least, upgrade all of the wiring from 14ga to 10ga. However, my closer inspection showed me that the wiring seemed to be OK, it was the connections themselves that were causing a problem.
Note how several of the holes seem to have melted. The correspond to circuits where I was having issues.
At this point, I realized that I wasn't going to be able to fix this Bussmann, so I had a decision to make - direct replacement, or upgrade to something like a SwitchPro? For now - mostly because I didn't want to re-wire the entire truck, as opposed to due to cost - I decided on a replacement, figuring that I could clean up the wiring - primarily by adding longer pigtails - a bit at the same time.
My original Bussmann was functionally sufficient, but hard to work with when the pigtails were only 6" long.
A few taps on the keyboard and clicks of the mouse later, I had a new Bussmann in hand and set to work wiring it all together.
Bigger wires everywhere.
A much cleaner package to work with in the engine compartment.
So what went wrong with the original? I don't know for sure, but my suspicion is that all of the rough roads and bouncing around was just too much for the mechanical connections between the relays and the pins that push into the rear of the Bussmann. Over time, that jostling caused the connections to become loose, resulting in poor contact. Poor contact means heat, and that heat both melted the Bussmann and overheated the relays, causing them to fail.
That means my second Bussmann will - likely - also meet the same fate, but I hope to have secured another couple of years before that happens (the first one lasted 5 years). At that point, I'll likely figure out a different solution.
Broken Leaf Spring (new, ongoing, and resolved)
TL;DR - I had to cut my trip short when another leaf - this time the main leaf - broke on the first day of a 4 day adventure. I've now replaced the leaf springs, solving the problem.
For the second time in six months, a leaf spring broke. In fact, a second leaf - this time the main leaf, and the only one that spans from the front hanger to the rear shackle - broke from the same leaf pack, and in the same location as the first leaf that'd broken.
Obviously there must have been some sort of irregular stress in this location, since two leafs broke in exactly the same place.
The situation this time was a bit more dire, but we were lucky that a jerry-rigged-ratchet-strap-bush-fix was able to keep the rear axle from sliding out from under the truck, eventually making it all the way home before I quickly replaced the leaf springs with another brand new leaf pack from Alcan Spring.
I'd planned to do this at the same time that I replaced the rear axle housing with a new fabricated Diamond Axle housing, but apparently that was the wrong call. At any rate, problem solved.
Hopefully this set doesn't break (the previous set were Alcan's as well), and provides support for years to come.
I'll also be adding a couple plates and some grade 10.9 bolts to the OSK (Oh Shit Kit) so that should something like this happen in the future, I can apply a bit more robust repair. I really like this solution because it's not heavy - especially compared to carrying a full leaf, for instance - but is quite effective.
A clever solution to a broken leaf spring.
Center Console Comfort (resolved)
TL;DR - I've raised the height of the center console by 1½ inches, and it's much more comfortable to lean on now, since it's the same height as the arm rest on the door.
You know how they say it's bad to keep your wallet in your back pocket because it makes you sit crooked and messes up your spine? Well, I haven't kept my wallet in my back pocket for more than 20 years, but I've still messed up my spine by sitting in my Tacoma for so long.
The problem is that the arm rest on the door, and the arm rest on the top of the center console are at different heights, the center console being about 1½ inches lower than the door. That means I'm constantly hunched toward the center of the vehicle - so much so that with my old seats, I could feel a deeper hole on the right side of the driver seat than the left.
While I'd regularly try to adjust my position, and resist the use of the two arm rests at the same time, in the end, I realized the only solution was to fix the problem - I needed to raise the top of the center console.
At first I thought I might do this by somehow upholstering a thicker pad for the top of the lid, but I'm no upholsterer and I knew it would come out looking a bit ... lame. After thinking about it for way to long - though admittedly never all that hard - I realized that I might be able to extend the lower compartment, and simply attach the lid to that extension.
I got started by taking measurements. Inside, and outside of course, so that I could make a small box that would fit into place.
As with anything, it took some finessing of the initial product to get something that fit just right - for instance, the top of the console has a slight crown to it, which I needed to mirror in the bottom of my riser - but in the end, I was quite happy with the appearance, fit, and snugness of my solution.
My walnut-with-maple-spline center console riser.
A couple notes for anyone wanting to do this themselves:
- I used all the same mounting holes for the riser as the original lid used, thereby securing it well and not adding any extra holes that need to be dealt with should I ever want to "undo" my modification.
- The back side of the center console - where the lid hinges - has a recess where the lid mounts. By creating a tenon on the back of the riser that fits snuggly into this recess (mortise), a lot of stability is generated for the riser.
- I wasn't sure how to secure the front of the riser at first, but as I was building it, I realized that I could use a small piece of steel angle to hook into the latch mechanism that the lid originally latched into. Works perfectly.
Performs perfectly, and now I sit much more evenly in the driver seat when I've got my elbows resting on each side.
Seemingly solved from previous Rig Reviews
- I Need New Seats - If you have the dough, scheel-mann might be the ticket for you, as noted above.
- The Drawer in the In-Cab Battery Cabinet Rattles - addressed as noted above. Wood doesn't rattle (for the win).
- Transfer Case Input Shaft Bearing is Imploding - addressed as noted above with a new (to me) transfer case.
- Hella HIDs fail to turn on - resolved by replacing the Bussmann as noted above. Hopefully for good, since I've misdiagnosed this several times - first suspecting the HID system, then by replacing the relay (which had failed, but as a result of the Bussmann itself).
- Broken Leaf Spring - got broken worse, and is now fixed, as note above.
Unchanged / Still an issue from previous Rig Reviews
There are some things that have been featured in Rig Reviews that are - as yet - unchanged from when I originally reviewed them. Rather than highlight those things again, I'll simply link to them here.
- Front ADS Coilover Spherical Bearings - I'm giving the new FK stainless steel bearings several thousand miles to see if they perform better.
- The Zipper on the CVT Tent is Shit - I don't know how I'll ever address this, short of getting a GFC.
- My Suspension Squeaks - still squeaky. I'm not all that worried about it, so I'm in no rush to fix it.
Check out older Rig Reviews
Your riser solution is genius, could be a cottage industry for someone with a 3D printer.
Thanks Ralph! I was thinking that it'd be really useful to know how to use a CAD program and to have a 3D printer as I made the riser, hahaha! Oh well, the old school way of using a tape measure and some woodworking tools came through in the end, even if it's a one-off! I really can't believe that Toyota overlooked this bit of their design. Seems so obvious to me...
Always interested is upgrades and "fix-its" that people come up with even though my truck is very different. I do need to do something with my front seat but it will certainly be a rebuild by a local auto upholstery fellow since new seats too expensive plus have air bags all around among other things. I'm not concerned about suspension since it's strong and have overloads on the leaf springs. Still, enjoy the good read on your experiences and looking forward to your next trips.
Another great write-up! Thank you for sharing and continuing to inspire us.
Where did you get the new built bussman? I didn't think sandman was making them anymore?
Hey Jonathan, I thought I mentioned it in the little blurb - I put it together myself (after a few taps on the keyboard and clicks of the mouse, ordering parts). ?