
Well, this post is a long time in the making. In fact, I assumed this was a project I'd get taken care of in the dead of winter, since much of it would be done in the wood shop, and none of it required the truck to be outside in the rain and cold.
But like many well-laid plans, mine got comfortable and took a six-month nap. So let's start at the beginning...
My Battery History
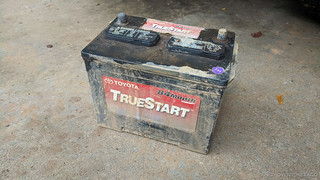
To date, I've only had to replace the battery in the truck once. I did that back in 2011 after owning the truck for 11+ years, but I've known since I got the fridge that I was always sort-of pushing my luck. I mean sure, the 50qt ARB fridge will shut off when the battery gets below a certain voltage, and sure, I had a Lithium Ion battery pack that could (theoretically) jumpstart the truck, but still. So, when my Toyota Truestart battery started going out on The Re-Tour in the fall of 2018, I knew the time had come to upgrade the battery system.
My first step - of course - was to jump on a TacomaWorld group by for two, Northstar AGM 24F batteries. This was in November - the perfect time to start a winter truck project. Or - as it turned out - to exercise the UPS delivery driver. See, the first two batteries that were delivered were not size 24F, but were instead size 35 batteries. The seller was great about it however, and within a couple days the UPS driver was back to drop off two more 70 lbs batteries, and take the original ones with him.
Unfortunately, upon opening the second batteries, I found that the posts on one of them had been crushed during shipping. Well, that was no good, but a quick set of emails to the seller and I was left impressed. While a replacement 24F was going to take a few weeks due to being on back order, everything was taken care of as quickly and professionally as I could have asked.

Finally - in the middle of January - I had my new power packs.

Since at that point I was running a spare battery from Mike @Digiratus in the truck, I promptly replaced that with one of the Northstar batteries and assured myself that the second wasn't far behind. And then I started contemplating where to put the second battery.
Where to Put the New Battery
My contemplation took months - and brings us to the present day. Nearly. See, there were a few places I could put the battery:
- Under the bed, where the spare tire was originally mounted. This was where I thought I wanted the battery - in a custom fabricated steel box - but I didn't love the idea of putting that weight behind the axle or having the battery in what seemed like a reasonably vulnerable - and hard to seal from the elements - location.
- My next attempt was above the frame just in front of the rear wheels. This was suggested to me by a couple of folks and would keep the battery further forward and be less vulnerable. It would however still have the "exposed to the elements" problem, and of course when I finally measured, it wouldn't fit.
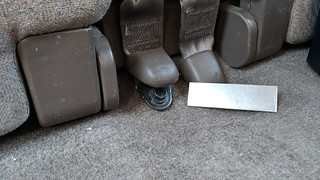
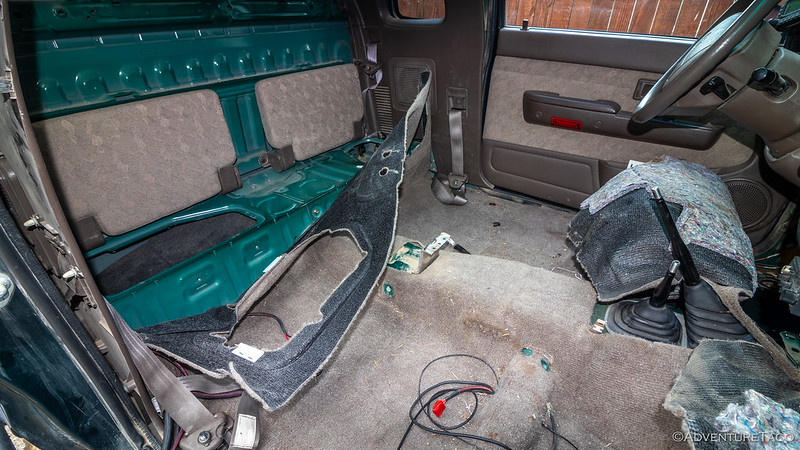
- In the cab, behind the passenger seat. I originally shied away from this since I wanted to keep the inside as spacious as possible, but it would solve the problem of the elements, and keep the battery further forward. My final admittance that the truck is no longer a daily driver and is really just an adventure vehicle sealed the deal. This is where the battery would go.

Parts - More Than Just Batteries
At that point, I also had to gather all the other parts that go into a dual battery setup and account for just as much cost as the batteries themselves. I'll list what I used here, since it's likely to be similar for just about anyone planning to add a second battery to their Tacoma.
- A Blue Sea Systems ML-ACR - the controller that manages the charging and isolation of the two batteries in the truck depending on their voltages and associated loads.
- 20' each red and black 1/0 welding cable - to connect the batteries to each other, creating a battery bank capable of several hundred amps constantly moving between batteries, with higher short-term loads.
- 10' each red/black 4 gauge welding cable - to run off of the second battery to a fuse block for various loads (fridge, communication equipment, etc.)
- Wire lugs - for both the 1/0 wire as well as the 4 gauge wire.
- A Blue Sea Systems 12 circuit fuse block - to centralize the termination of circuits for the second battery (similarly to how the Bussmann RTMR centralizes circuits for the primary battery).
- A Bussmann 80A circuit breaker - to protect and allow isolation of the fuse block from the second battery.
- Miscellaneous wire connectors and the necessary 12-16 gauge wire - to connect the various loads (fridge, etc.) to the fuse block.
- ¼-inch and ½-inch wire sleeving and miscellaneous glue-lined heat shrink tubing - to protect the runs of cable and wiring throughout the vehicle.
- Aluminum battery terminals - a set for each battery, to connect the batteries together, as well as the loads to each battery.
I purchased everything over time - a sure way to make the cost less noticeable - and by June I was finally ready to get started with the install.
Building a Cabinet
I knew I needed to secure the battery well within the passenger compartment - I didn't want to have it flopping around on the trail, much less if I ever got in an accident. And, I figured that this was a good time to build a bit more than just a battery box - I could also build a place for the fuse block, and some other odds-and-ends that were previously just floating around behind the front seats on our trips.
The problem of course was that there are essentially no 90° angles in the extended cab portion of a 1st gen Tacoma, so building a cabinet would be a bit of cut-a-piece-at-a-time affair. So, I found a scrap piece of ¾" plywood and got started.


Of course, I also needed somewhere to attach the cabinet, and my goal was to be as nondestructive as possible. As such, I hoped I could use the two captured M8 nuts that secured the small fold-open shelf, and one of the rear M10 seat belt anchors - three points that I thought would likely be enough to secure everything well.

Eventually, I had the minimum number of prototype pieces cut and assembled to have confidence in the design and knowledge of the various angles I was working with, and I moved on to a more precise plan in Sketchup - really, just as a way to learn the 3D modelling tool that I'd never used before.

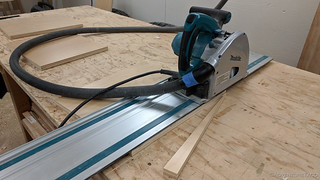
And then, it was time to get started on the actual cabinet. I happened to have a nice piece of ¾" prefinished A1 grade maple plywood hanging around from some previous projects, so I broke out the Makita track saw and started breaking down the pieces.


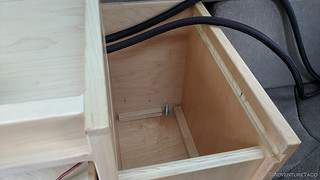
To strengthen the joints, the next step was cutting dadoes and rabbits in various locations to accept mating pieces, as well as cutting an access hole for the storage compartment that would eventually be below the cabinet (and that I still wanted to access). Then, it was time for basic assembly.


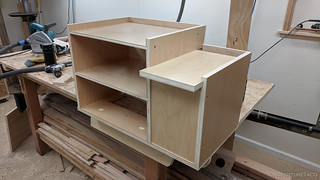
The cabinet was definitely starting to come together - the battery would sit in a compartment on the right, my small recovery and air-up kits in the bottom left cubby, the wiring and fuse block in the middle left-cubby, and then there would be two shelves on the top to store various items I take on my adventures.
At this point, I'd planned to be done - but something was nagging at me. I realized that I can't leave a project "mostly finished" - in this case, the exposed plywood edges are just "undone." So it was back to the table saw to make some edge banding, and of course a finger-jointed, pull-out drawer - for the electronics that would be housed in the middle compartment.

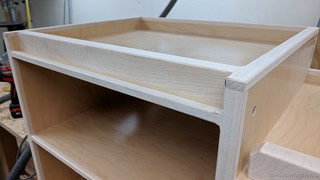

Again, I planned to be done here until I realized that I was still rushing. The edge banding and a few pieces of solid maple needed finish in order to look right next to the prefinished plywood. So, a couple coats of wipe-on polyurethane were in order before calling the cabinet done.


Installing the Cabinet
With the cabinet put together and all the necessary parts for the electronics already in hand, I had no excuse for procrastinating the actual install. But that didn't stop me! Quite the opposite - I procrastinated a good week or two, building a few bed racks for folks, and helping a friend with a 4Runner storage system on his truck. Oh, and there were wheels to be painted.
Turns out, I can procrastinate anything! 
Eventually though, I had an upcoming trip where I knew the truck would be sitting all day, and the fridge would benefit from a second battery - so I broke down and got started with the install.
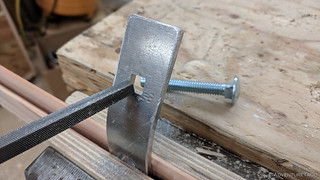
Up first was making sure the cabinet was secure. The two lower mounting points were easy - a couple longer M8 bolts could secure the cabinet to the captured nuts - but the upper mount, to the seat belt anchor, was going to need a custom bracket. Using some of the 3/16" aluminum I had laying around from the 4Runner roof rack, I set about making a bracket to accept a carriage bolt that would pass through the bottom of the cabinet to keep it in place.


Bracket made, it was time for cabinet installation. Were my measurements correct? Would everything line up? Or, would it be a case of measure once, try it, and measure again? I prepped the area and then moved the cabinet into place. And low and behold - everything lined up the very first time! Sweet! 


And Finally - the Battery!
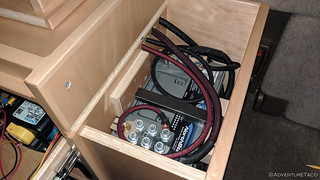
Cabinet installed, there was only one thing left to do - install all the electronics. I mean, that's what this whole project was about - right? The way I saw it, there were a few steps - first, removing the circuits from the Bussmann RTMR that I'd be powering off of the secondary battery, then, running the two main power wires that connected the two batteries through the Blue Sea ML-ACR, and then wiring all of the circuits up to the Blue Sea circuit breaker and 12-circuit fuse block. Oh, and of course, there was turning everything on!
Removal of the circuits from the Bussmann was - of course - easy. That's the whole point of having a Bussmann, after all. Perhaps most rewarding was removing all of the negative wires from the ground screw I'd been using in the engine bay.

Next, I ran the 1-0 gauge man-that's-big-cable from the starting battery, around the engine bay, through a grommet in the passenger side of the firewall, along the door threshold, and up into the cabinet. I was quite glad at this point to have use the mesh sleeving, as it made me much less nervous as I pulled the wire by and through the various crevices.


At that point, I could start using the 16-ton hydraulic crimper to attach the lugs onto the ends of the cables as well - something I'd hesitated to do until I knew the lengths I needed, and gotten the cables through the various grommets.

I could smell the finish line as this point. As I routed the accessory circuits for the fridge, ham radio, and CB radio to the fuse block, I was sure that I'd be done in 30 minutes. This of course was a gross underestimation, but I could definitely see the light at the end of this project. Assuming it all worked when I flipped the proverbial switch.


The only thing left to do at this point was to wire up the switch that controls the ML-ACR. this switch allows the operator to either join together - or isolate - the batteries as charging conditions change, and also allows for an automatic mode with the ML-ACR handles the connection itself.

And with that, the electronics - at least for now - were complete, and it was time to hook everything up; hopefully not electrocuting myself or burning up the truck in the process. So, I attached all the appropriate cables to the starting battery, and did the same for the secondary battery, and then connected the two through the ML-ACR.
And it all just seemed to work! I'm not sure it was a miracle, but I sure wasn't complaining. 

Wrapping Things Up
With everything working, I got things cleaned up - there were still a few things to wrap up, but those would have to wait for another day - because in less than 12-hours, we were headed off on an adventure...
...(a few days later)...
Wrap up is complete. A small box to hold the ML-ACR switch, and a hold-down for the secondary battery are now in place and everything is working swimmingly.
Plus, @mrs.turbodb loves the fact that she's got a place for her bag on trips, and I like the perfectly-sized camera storage shelf atop the battery compartment. All-in-all, a successful project - assuming it works that is...

Summer 2020 Update
I've added solar to this setup as well, to make base-camping - when the truck is not running all day - a possibility. It's great, and was easy to add since all the electronics are centralized in this cabinet. If you'd like to do the same, or are just curious about the process, check out Infinite Free Power - Adding Solar to the Tacoma.
In this Series
 House Electrical - 3 month review")


")
")
 Battery Replaced")
 Battery Seems to be Low")

Filed Under

Kinda sad to lose that interior storage space but function trumps form and the ability to lay the seat back for a nap! It would not fly in my squadron..many things that "work" usually don't! Your Mrs. is more flexy than mine 🙂
Nice work sir!
Thanks! We don't lean the seats back for naps, and I think it could still make it most of the way back even with the cabinet. Usually there's so much stuff behind the seats on a trip, that the cabinet might actually let it lean back further! hahahaha 🙂
you are having WAY too much fun! UJ
Would you mind sharing your Sketchup file? I love this build, and I am planning on putting a dual-battery system in a 2000 Tacoma this winter.
Anybody….. Which would be better….an AGM or a flooded deep cycle battery when used along with a power inverter as a back-up power supply into which you can plug a basement sump pump when there is a power outage?
Hi James,
A flooded deep cycle battery is probably best in that case. While you'll need to monitor the liquid in flooded batteries and maintain it in order for the battery to perform properly, this battery type will last longer than many of their counterparts.
Pros: Wet Cell batteries are typically the best choice for backup power applications, utility, and grid energy storage.
Cons: Most of the cons of the flooded battery stem from the fact that they contain free liquid that requires periodic inspection and maintenance. Flooded batteries can also be inadvertently damaged in forceful movement. Extreme climates can have a greater effect on the battery life due to the electrolyte solution inside the battery having the ability to evaporate or freeze.
AGM batteries on the other hand are beneficial when the battery is in a location that is hard to maintain or where it is subjected to forceful movement.
Hope that helps
Hi turbobd,
very clean and ingenuitive built !
I am curious, where did you find/purchase the 6 point battery terminals?
Thank you, Stefan.
Thanks! Those aluminum terminals are available here. They've worked out much better than I originally thought they would (I was originally after military terminals) and I quite like them.
thanks so much. Keep up the great builts !
Hey Turbo,
Great project, well thought out as per usual. It looks as though your access to the lower cubby, is via a cut out in the lower shelf? I don’t recognize the tool box, assuming the shelf is based on the dimensions of it, might it be a dewalt drill box?
Liking this idea, might build something similar next summer when I get back up north.
Thanks for sharing the info.
Cheers,
Arctic Taco- an Alaskan in exile
Thanks. That storage box is this DeWalt TSTAK
This is awesome, was planning on adding a 2nd setup and this will help assist me with my setup.
Thanks for the awesome info!
You got skills! Great job!
LOL, thanks! This was an easy project for me, since I've grown up woodworking. Feels like such a more forgiving medium than metal to me...but that's probably just familiarity speaking. ?
How's the Northstar batteries working out for you? I will be giving my two year old Duralast Gold battery to my wife for her Subaru Outback to replace her unreliable OEM battery. Luckily, for me, her Subaru car battery died in the driveway twice and that's it for me with Subaru batteries. My Tacoma will get a manly battery I like highly rated Northstar and Odyssey batteries.
The Northstars are working out great, I did have to warranty one of them because it wouldn’t hold a charge for some reason, but that process was so easy that I can’t really say anything bad about Northstar.
They seem to have plenty of juice for me and with two of them, I never have to worry about a thing.
I will say that if I was just doing a second battery again, I would consider going with a lithium battery pack, just for the ease of installation and use.
I did read a lot of comments about Northstar AGM batteries and it appears second and third generation Tacoma owners say you need to boost the alternator . I also read that most first generation Tacoma owners were not concerned as the first generation alternators properly charge AGMs.
Thanks for reply. It looks like I will be ordering a Northstar AGM for my Tacoma. Thanks again!
I bought and installed my new X2Power Premium AGM battery and it came with a 5 year replacement warranty. I bought it at my local batteries plus dealer. It's Northstar battery just sold under a different name. I saw a few YouTube videos on Lithium batteries and a popular setup with the RV community. It appears a Lithium battery is a perfect match with a solar setup like you have.
Yeah, those X2 AGMs are great. I have one in the 4Runner and couldn't be happier. They are a great deal especially if you can get them on sale. I think I got mine for 20% off stacked with a $30 coupon or something. Amazing!
Did you upgrade your battery terminals on your starter NorthStar battery using the same terminals on your second battery?
Today, I did the headlight upgrade and found my factory Toyota battery terminals were bit loose with my X2 AGM battery posts. I had to put the WWF clamp down on them so they would fit snug. I also found the Toyota battery battery hold down bracket not the ideal fit for my new AGM battery. It's meh.
Hey Brandon, yes - I used the same GP Audio terminals on my starting battery as I did on the secondary. I felt that they were a bit bulky at first, but over time I've realized that it really doesn't matter, and they do a great job - allowing each cable that's attached to them to have a unique anchor point.
How did you go about grounding the aux battery? Did you ground to the frame? Or run a second cable back to the battery? I have heard pros/cons for both
I ran both the positive and negative back to the starting battery in the engine bay. You can sort of see that here, where I ran them in the threshold of the passenger door. I figured that it was better to have the direct connection through high-gauge wire, than to rely on the existing ground wires that already exist (and are relatively small). It's a bit of a pain to run two wires, but in the end, gives you a cleaner circuit. 👍
Just out of curiosity, with all the mods and weight of the added accessories, what kind of fuel mileage are you getting?
Hey Mike, That's a great question! At 5500lbs loaded and full of fuel, the Tacoma is quite a bit heavier than stock, though I try to be as careful as I can about adding weight - including attempts to remove it whenever I can - since all that extra weight is hard on the entire truck, not just the fuel budget, hahaha!
As you can imagine (given my nerdom), I do track my gas mileage pretty closely. To some it may seem like a burden, but I view it as an easy way to keep tabs on the overall health of the Tacoma. A drop in MPGs is often the first indication that something isn't right.
Personally, I keep all the information in a spreadsheet, which I update each time I fill the tank with fuel. Here's a summary by year, for various types of driving. You'll note that I'm missing 2004-2011, as someone broke into the truck and stole the logbook out of the glove box. Of course, I wasn't driving it much then, so it doesn't really matter!
2023 isn't off to a great start, but that's just one trip from WA to Death Valley, where we had a stiff 20mph headwind almost the entire way down. Gah!
Happy to answer any more questions, and I'd love to hear what type of mileage you're getting on your truck!
The only thing good to hear about my mileage is that it's gonna make you feel a whole lot better about your mileage. Lol!
I have a 2021 Jeep Gladiator Rubicon. When I bought it, the window sticker said that it would get 17 city / 22 highway. With the factory setup, the best that I got on the highway was 19 mpg. I have since added accessories (winch, bed rack w/fuel and water cans, High lift Jack, air compressor, etc.) and I went from 33" tires to 35" tires.
Well needless to say, all this has affected my mileage. On a nice calm day cursing about 65-70, I get about 13 mpg and in a head wind I get about 10 mpg. I honestly haven't kept track of the mileage that I get off-roading, but taking it easy on the trails, it seems to do pretty good.
Hi I see big fuses being installed on a lot of other dual battery setups. Did you use a fuse for this set up? Didn't see one in your parts list but just wanted to see.
Hey Dab, I do not have a big fuse between the two batteries as the whole point is to have current flowing effortlessly between them at full amperage - i.e. I don't want a fuse to burn out there. That's why I've got such big wire - which can handle the high current without warming up. What I do have - and which acts the same way as a fuse - is the Blue Sea ML-ACR. By switching that off, it interrupts the current flow between the two batteries.