
If I've learned one thing over the last several years, it's that bumpy roads are a lot of fun. The problem - as anyone who knows them can attest - is that in time, all good things get destroyed by bumpy roads.
It is a conundrum. The key of course, is to replace the good things before they are destroyed. Preventative maintenance. The easiest kind - or the hardest, depending on your outlook.
Anyway, after nearly five years of service, I successfully bounced, rattled, flexed my heavy duty Alcan Spring leaf pack to death - breaking my first leaf on a trip to Mt. Patterson, and then breaking the main leaf on our last trip to Death Valley. Quite the stressful experience, I noticed that the main leaf had broken when we were as far from pavement as we'd be for the entire trip; it was only with a ton of luck and a strategically positioned ratchet strap, were we able to make it home to safety.

It's never a good thing when the main leaf - the only one securing the rear axle to the frame - breaks.
Once home, I knew I couldn't waste any time before replacing the broken leaf springs. I'd originally planned to replace them at the same time I swapped out my rear axle housing - also necessitated by rough terrain that'd caused it to crack on the passenger side. So far, my patch job on the housing has held up well, but I've been waiting for nearly six months for the new housing (which was supposed to be here in six weeks).
Clearly, I could wait no longer.
I'd already ordered and picked up new leaf packs from Alcan Spring in Grand Junction, Colorado, since we'd passed through on our way home from running the New Mexico Backcountry Discovery Route (NMBDR), so I was good to go from that perspective - no need to wait the 6-8 weeks that many are waiting these days!
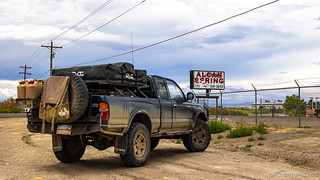
It was fun to visit the home of a product that I'd thoroughly enjoyed over the last several years.

The shop - expectedly - was full of spring steel and partially-complete leaf packs.
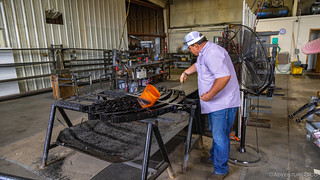
Lew - the new owner - had no problems getting his hands a bit dirty to put the finishing touches on my leaf pack when I showed up. Now that's what I call service!
While we were there, we chatted with Lew a bit - curious about his acquisition of Alcan from Bill, the previous owner. It turns out that they are doing quite well, having increased production by nearly 400%, while keeping prices and quality at the levels that everyone has come to expect out of Alcan. I admitted to him that I'd been a bit worried when I'd heard that the company had been sold - part of the reason I'd ordered the leaf packs when I did, in case Alcan wasn't in business - but Lew assured me that there was nothing to worry about... except for rising steel prices!
So, with the leaf packs already sitting in the garage, it was less than 10 hours after arriving home that I rolled the truck out of the garage to get started.
If you're looking to buy and install new leaf springs yourself, I've put together a step-by-step guide with photos on the process. The guide also includes several options for springs - at varying price points - for different situations.
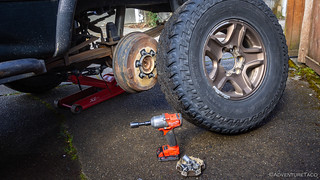
The first order of business was removing the rear wheel, and easy process with the Milwaukee M18 mid-torque impact wrench.

With the wheel removed, I got a good look at the situation. Sketchy, for sure!
Looking at the setup, I reflected on how lucky we were. With the main leaf broken, all the force from the front hanger was pushing down, resting on the very end of the second leaf. Luckily, that second leaf extended far enough forward - something that wouldn't have been true with the stock leaf springs - to support the weight. But that's not all. Even with the second leaf providing some support, the main leaf still wanted to pivot up in the rear, stopped only by the bolt that secured the leaf clamp halfway between the front hanger and the axle. Without that bolt - or if the axle had moved backwards another inch -the broken leaf could have easily rotated, dropping the truck to the ground. Only the ratchet strap I'd installed had kept the axle far enough forward to prevent total disaster!
After counting my blessings, I continued with the job at hand, supporting the frame of the truck as well as the rear axle with jack stands. It's important to remember on a job like this - the bit that usually connects the two components - the leaf spring - is being removed, so both need to be supported individually.

Use plenty of jack stands when swapping out leaf springs.

After supporting the truck, I jacked up the frame far enough to take all the pressure off of the leaf spring, in order to make removal much easier.
With the pressure off the leaf pack, I could press the broken leaf down in order to see how far out of position the rear axle was. Looks like about 3/8ths of an inch.
Next, it was time to remove the old leaf pack. This is a relatively straight forward process that entails removing the u-bolts at the rear axle, a single bolt at the front hanger, and two nuts at the rear shackle. With a bit of penetrating oil to loosen things up, I was done in no time.

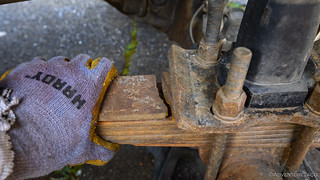
A breaker bar made quick work of the u-bolt nuts.

Zipping off the front hanger.

Removing two nuts allows the shackle to separate, and the leaf spring to slide off.
At this point, I inspected the old and new packs - partly out of curiosity, partly to ensure that the new pack would fit as I hoped. You see, the last time I'd ordered my packs from Alcan, I'd installed them to find that the rear axle was too far backward in the wheel well. After a conversation with the owner, we'd come to a compromise where he'd sent me a new main leaf and military wrap - interestingly, the two leafs that'd broken - that moved the center pin forward by 0.75", centering the rear axle in the opening.

Two leafs, broken at the same location - clearly there was a stress point there. Note the rusty area of the lower (main) leaf spring, where a crack had clearly existed for quite some time.
When ordering a new pack - now from the new owner, Lew - I'd been sure to specify the correct distance from the front eye to the center pin, and I'd also asked a bit of increased lift and carrying capacity: a 4" lift with 750lbs in the bed of the Tacoma (vs. my previous 3" lift with 600lbs).

The new pack has a bit more arch, as well as carrying capacity.
Installing the new pack was essentially the reverse of removal. The first order of business is to get the pack connected to the front hanger and rear shackle, and then use a ratchet strap to align the center pin on the bottom of the leaf pack with the center hole of the spring perch on the rear axle housing. This can take a bit of fiddling, but once aligned, a few pumps with the floor jack under the rear axle can push everything into place. Then, the u-bolts can be secured, the truck lowered to the ground, and everything torqued to spec.

With the reaf pack secured - but not torqued - to the front hanger and rear shackle, a ratchet strap is the perfect tool to align the rear axle housing.

With everything aligned, installation of u-bolts is straight forward. Note: You should never re-use u-bolts, as they deform when correctly installed.

With everything snugged up, reinstall the wheel and lower the truck to the ground. Since we are dealing with suspension components, only once the truck is sitting under its own weight should everything be torqued to spec.
Torque specs for this job:
- Front hanger: 116 ft-lbs
- Rear shackles (upper and lower nuts): 67 ft-lbs
- U-bolts (torque to spec, and then re-torque after 50, and 500 miles):
- Stock Tacoma: 90 ft-lbs
- 5/8" heavy duty u-bolts: 110 ft-lbs
- Lug nuts: 89 ft-lbs

")
")

Love my Alcan springs on my 1975 FJ40. Compliant, yet controlled. I find that keeping the springs lubricated with penetrating oil in-between the layers keeps them in good working order.
I couldn't have described them better - they really do have a great product for the value IMO. I like the tip on the penetrating oil as well, thanks for that ?!
Ever consider Deaver springs?
I've definitely considered Deaver. They have great springs as well. In fact, in my write-up on Step-by-Step Replacing Leaf Springs on a Tacoma, I mention Deaver as an option. I'm not sure they are making custom packs anymore, but their 10-leaf packs are great for the moderate/intermittent load scenarios. Probably the best option there, even though they are a bit pricier than the other packs in that category.
There are a couple of things that I've learned from 60 years of going off in the desert and hills: If something is going to break it will break at the greatest distance from the pavement (and town that has parts), and if when a small problem is noticed, fix it/replace it immediately or it will become a big problem at the worst possible time. We have experience bent axles, broken u-joint, plugged radiator, and electrical failures.
Well said John. The real questions though are: 1) How long did it take you to learn that? and 2) How long did it take you to actually start doing it? ? Surely in my adventuring lifetime I've learned it (#1), but I'd say I'm only about 50% on the doing it, still. I find myself prioritizing the "getting out" rather than wrenching, because that's where I get my real enjoyment. A slippery slope, for sure, and hopefully over the years, I get my number up from 50% to well over 95%! ?
After several really big problems in less than 5 years we learned to plan for problems and within the same period we learned to maintain and repair EVERYTHING. I would say that within 10 years all of us (10 of us that were doing the trips together with anywhere from 3 of us to 9 of us on each trip) weren't taking any chances on equipment. We always had extra food, water, and fuel in case we ended up stranded for up to 3 days in the boonies and that came in handy several times!
Ahh, yes. Food, water, and fuel are always in high supply on my trips - usually with at least twice what I need. Sounds like I still have a few more years to learn my lesson #2 if I follow in your footsteps. Right now, only the leaf spring is something that I knew I was postponing work on, so I'm doing reasonably well!
I think one of the most important things in maintaining a 4WD is carefully inspecting the vehicle frequently and detecting and identifying the cause of abnormal noises. This is absolutely critical starting several months before a major trip. What you don't know can really bite you hard.
I'm generally in agreement with you - maintaining a vehicle is critical to success. In my case, given the fact that I wander into the wilderness at least once - if not two or three times - per month, there is no "starting several months before a major trip," it is an ongoing process. And of course, there are tradeoffs and optimizations to be made for time, efficiency of work, etc. As an example - last weekend, I replaced my timing belt, water pump, thermostat, a bunch of idlers and seals, etc. While I was in there, I also decided to put in a new radiator and hoses. Not that mine had failed, but after 220K miles, it was just prudent from an efficiency perspective. I also replaced the clutch, which was original. Turns out, it had plenty of life left - like 30-40% - even after 22 years, but the new one went in and now I should get many, many more. Still, while preventative maintenance is important, it's not a 100% solution - things are always going to go wrong on the trail, sometimes in trip ending ways. It's just part of the adventure.