
If you've been following along for the last couple of months, you'll know that after 18 years of running my original halogen headlight bulbs, I finally had enough of running blind at night and replaced them with some LEDs - allowing me to see again!
Now, after a mere 6 weeks - and really, within two weeks of the switch - I'm changing it up again.
I knew as soon as I installed the BEAMTECH H4 LED Headlights that I had some reservations - mostly around the much-bluer-than-halogen light color that was emitted from the housings. It turns out, however, that color wasn't so much of an issue - in fact, the lighting performance of the LEDs was quite good! I reviewed them in a rig review after the trip, which I'll include here as well for completeness.
In good weather, the LEDs seemed very nice - significantly better than I'd expected after I'd seen the bright white light they emitted when I'd first turned them on in the garage. In fact, after about 8 hours of night driving on the first trip down to Death Valley, I was pretty sure I was going to keep the LEDs.
- While the light is a little white for me, their brightness is so much better than the stock bulbs that I actually REALLY liked them when we were driving for hours and hours at night and the weather was good.
- The cut-off seems really good. I never got flashed by oncoming traffic when the low-beams were on. Even with the cut-off shield, I was worried about whether it would work, and I'm really glad that it seemed to work well.
- The hi-beams seemed just OK. This surprised me bit - they were not dramatically brighter than the lows (though perhaps this indicates how good the lows are).
On the way back from Death Valley, we hit bad weather - snow. Heavy snow. Even though they didn't perform as well as they had in good weather, this wasn't enough to change my mind on the LEDs.
- The low-beams were darn good in snow, even the heavy snow. I didn't get too much glare and yet still got enough light to see well. We ran this way for nearly 12 hours on the way home - essentially from Bishop, CA to Eugene, OR.
- The hi-beams on the other hand were terrible. The light scatter with them on made the snow blinding - I literally couldn't see more than about 10 feet in front of the truck. Part of this was due to beam pattern, but a big part of it was due to light color. A yellower would be a lot better in this situation.
So, overall I was quite happy with them from a light performance perspective - happier than I thought I'd be, even with the poor weather, hi-beam situation. After all, I knew that I wouldn't be able to use the Hellas in the snow, and hi-beams seem somewhat similar.
But then - something I totally didn't expect. I noticed on the way home that when the headlights - low- or hi-beams - are on, my ham radio "busy" indicator is always on. Like full on. On both channels. So, the ham thinks that it's receiving a transmission all the time. So, the RFI the headlights put out is terrible. I don't think they are shielded at all. And, they are on a completely separate electrical system (air gapped) than my radio, so there's nothing I can do to fix it. ...And for that reason, I'm getting rid of these LEDs.

While I'd previously hoped that the LEDs would be a cheap way to solve my light problem, in the back of my mind, I knew it wasn't the right way to do things. After all, there were no LED headlights back in late 1999 when my truck was built, and the reflector housings for my lights were obviously designed to optimize performance of a thin halogen filament as opposed to a larger square diode. In fact, this design is likely a major factor in the less-than-stellar performance of the LED high beams. The right way to do things was to spend a bit more time with a multi-pronged approach:
- Clean the headlight lenses to make them clear again. I had only minor yellowing, but yellowing none-the-less.
- Install higher-wattage halogen bulbs. More power would mean more light output.
- Upgrade the wiring to the headlights. Necessary to support the additional power requirements of the higher wattage bulbs.
I'd also discover a fourth item - one that I think many overlook - and that was cleaning off the reflectors themselves in the housings. But I'll get to that a bit latter in the story.
To get started, I gathered everything I thought I'd need for the project. This included:
- To clean the headlight lenses:
- Sylvania Headlight Restoration Kit - this kit got really good reviews on Project Farm, so I figured it'd work for me.

- Higher-wattage blubs:
- OSRAM Super Bright H4 9003 90/100W bulbs - German made Bilux H4 100/90w bulb rated at 2900/1700 lumens, these are only available from the UK, but are still priced competitively, with free shipping. They outperform any state-side 55/60W bulb from other major manufacturers. Lastly, they don't have a blue coating on the bulb - another plus!
- I also purchased two Toyota OEM Headlamp Socket Covers (81139-16610) for the headlight assemblies, since I'd cut my originals in order to install LEDs.

- Heavier-duty wiring harness. Note: Because I already have a Bussmann installed with available relays, I was able to make a simple harness using the following parts. See below* for an off-the-shelf solution.
- H4 Ceramic Plug (female) - five in the pack, only two needed for the harness. Used to connect the heavier gauge wire to each of the headlights.
- H4/9003 plug (male) - two in the pack, only one needed for the harness. Plugs into the existing female H4 connector to trigger the relays for the heavier gauge wires that power the lights.
- 12 Gauge Wire Red & Black (100 ft each) - I only used about 7 feet of each, but this is good wire to have on hand.
- Heat Shrink Tubing (Glue Lined) - used as necessary over soldered connections and braided sleeve ends.
- 1/4 inch braided wire sleeve - to protect and organize wires in the harness.

* If you don't have a Bussmann, you can also purchase and pre-made wiring harness to power the headlights directly from your battery, while continuing to trigger them (on/off) using the existing controls on the steering column. You'll need to know if you have a:
- Conventionally switched headlights - Headlight Services H4 Headlight Harness (Conventionally Switched)
- Ground switched headlights - Headlight Services H4 Headlight Harness (Ground Switched)
Installing the Bulbs
With everything in hand, I set about the part of the project that I felt was more fun: building a new harness and installing the new bulbs. I won't go into too much detail on the harness construction as I suspect that most will purchase the pre-fabricated one, but mine was simply three lengths (lo-beam power, hi-beam power, ground) of 12 gauge wire that ran ~84 inches from my Bussmann to each of the headlights.

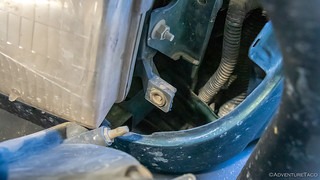
With the harness in hand, I routed it along the same location as the stock harness - between the core support and radiator - making sure that each of the connectors would reach their respective headlights, and that the end of the harness reached the Bussmann. Note: fitting the harness here required me to remove the four (4), 12mm bolts (accessed by removing the grill) that secure the radiator to the core support. Because the radiator is supported by metal clips, you can remove these bolts without worry, then lift the radiator slightly, and slide the harness in. No disconnection of the hoses, removal of the fan shroud, etc., necessary.

To make connections to the Bussmann a bit easier given the tight space in which it's installed, I removed it before plugging the lo- and hi-beam power wires from the harness into two of the 30A relays on the Bussmann.

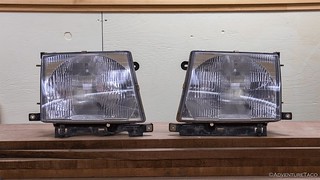
The next step was to replace the LED assemblies in the headlight housings with the new OSRAM halogen bulbs. Having just done the opposite a few weeks earlier, this was a simple process and I replaced the dust boots at the same time

The last order of business was triggering the lo- and hi-beam relays in the Bussmann whenever the headlights were turned on/off at the steering column. To do this, I plugged a male H4 connector into one of the (now unused) original female connectors, and ran two wires back to the Bussmann. This way, when power was sent to either the lo- or hi-beams from the steering column, that 12V signal would trigger the relay on the Bussmann, causing additional power to flow through the new harness I'd installed.
Note: the off-the-shelf harness works the same way, it simply connects to the battery for power and has its own relays, rather than relying on the Bussmann for that functionality.
Cleaning the Headlight Housings
My headlights were now "mo brighter baby" - a good thing - but the housings still needed some attention. I started with the Sylvania Headlight Restoration Kit, following the instructions on the package - essentially sanding, polishing, and applying a UV film to the plastic lenses in order to clean them up.
The cleaning process went smoothly, but as I was doing it, I noticed something interesting: not only were the outsides of the lenses in need of a cleaning, but there was a thin layer of dust on the inside of the housings as well. In fact, the entire reflector was covered with dust.

This is probably to be expected after 20 years - given that the headlight assembly is not sealed - but it wasn't something I'd thought about prior to starting down this path. Still, I decided that the right thing to do was to remove and clean the headlight assemblies - lest my work so far be for naught.
Removing the headlight assemblies isn't the most straight-forward process, but I'd done it for some A/C work earlier in the year, so I followed the same process to extract them from the truck. The process starts with removing the grill by releasing all the clips that hold it to the core support.

Next, it's necessary to remove the side marker light. First, remove a single Philips screw from the top of the light, and then pull the housing toward the front of the truck to remove it from the clip on the headlight housing.

Next, remove the small filler plate below the headlight. This is secured with a 10mm bolt, and a plastic clip. Remove the bolt first, then the clip. Note that the plastic clip is just barely visible poking through the bottom of the filler near the end closest to the outside of the truck. Carefully push it up with a flat head screwdriver, so the bottom edge of the filler can be slid forward over it, and then rotate the filler up and off of the top part of the clip.

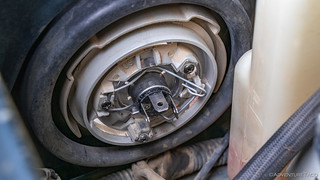
With the filler removed, removal of the headlight is easy. A 10mm bolt at the top inside corner, a 10mm bolt along the bottom of the headlight, and two 10mm nuts on the side of the headlight are all that hold it in place. As you remove the headlight assembly, don't forget to unplug the wiring harness from the rear.


With the headlight assembly removed, I removed the dust cover on the back and extracted the bulb from the housing before rinsing out (several times) and drying the housing for a couple days inside the house - I wanted to ensure that I didn't have water trapped in it that might cause condensation in the future.
Not so sealed it turns out.
Then, I reinstalled everything on the truck, my fingers crossed that my headlights would be better than ever.

Original low beams. Bleh.

OSRAM Super Bright Halogen lo-beams.

OSRAM Super Bright Halogen hi-beams + Hella 700 HIDs.
I was not disappointed. The lo-beams were terrific, and the hi-beams were great as well - though it's clear that the Hella 700 HIDs are above-and-beyond bright, since they almost completely overpower the OSRAMs in terms of color.
Still, compared to stock, and even to the LEDs I'd installed previously, the light output and color were much, much, better in my opinion! Note: this is not a perfect comparison, as I'm parked further away from the trees with the LEDs, giving them an advantage of distance to gain additional height, but it still shows a reasonable comparison of light quantity and color.

LED lo-beams (left), OSRAM Super Bright Halogen lo-beams (right).

LED hi-beams + Hella 700 HIDs (left), OSRAM Super Bright Halogen hi-beams + Hella 700 HIDs (right).
Plus, not only was I getting better light in all situations, there was no longer any interference with the ham radio. In fact, the only drawback of this setup - in my opinion - is that the bulbs are only rated for ~200 hours of use at full power. They're unlikely to burn out for many hours after that, but performance will begin to degrade at that time. Still, replacing bulbs is a small price to pay for the kind of visibility I have now!
2022-03 Update: I'm still really liking the higher powered halogen lights. I've also swapped out the HID-upgraded Hella 700FFs and installed some Diode Dynamics SS5 Pro pods, for two reasons:
- The HIDs - like the LEDs I had installed in the headlights - were causing RFI, enough to cause the car stereo to reboot, at times.
- As visible in the photo above, the HIDs have some significant hot spots in the beam pattern. This wasn't the end of the world, but I knew it could be better.
More Lighting Related Stories


")

")

")
")

")
")


Is changing the wiring a must? Can in just get the bulbs and use oem wiring?
Hey Chris, Yes, it is a must - the wiring that is in there is not up to the task of the higher wattage bulbs. But, it's pretty easy (and on the order of $30) to build a harness, or you can purchase one of the pre-made ones I linked to make it super simple (for ~$100; I'm not affiliated with them at all, but I've heard good things).
hello!
I improved my headlight too by relaying them. increase was HUGE from 11,1v to 12,8v and it shows on brithness on that halogen bulb. Good work!
I am Arpad from Austria and my Jeep is equipped LEDs. I have been happy so far. BUT, last Tuesday we had heavy snowfall and heavy cold winds like a blizzard. This effected, that a thick ice layer was growing on the head lights and the efficiency of the LED was going down. I could see only few feet. LEDs produce no heat compared to halogen, what is absolutely bad and in Austria we have in winter a lot of snow and ice. Thank you for your idea to change the LEDs to Halogens. Greetings from Garz in Austria.
This is a great comment Arpad, thanks for raising the issue! Heat for defrosting is definitely something to be concerned with when using LEDs, and anyone who drives in inclement weather definitely needs to look for LEDs with heaters for exactly the reason you mention! ? Glad to hear you've found the site, and I hope you're enjoying the trips, even if they are a bit far away to give you ideas of where to go! ?
Hi. The trips are not so far away for us. The last 4 years we came to US for such trips and for next year were planing to come for 3 months or so. And it is possible to bring our car with us ($1300 on direction). We are looking forward to be in the Death Valley again or somewhere else in the southwest. And we have friends in Kanab and in Escalante. Arpad
did you seal the headlights after cleaning.
No, the housings are designed to be unsealed, to allow expansion and contraction of the air they contain as the lights heat/cool and as elevation changes.
Do you still recommend the Sylvania Headlight Restoration Kit to restore headlights? My 2002 Tacoma headlights are original factory assemblies but faded, yellow and in dire need of restoration. I almost hit a lady in a parking lot as my Tacoma's headlights are done. I ordered wiring harness upgrade from the link you provided and bought new high watt bulbs too.
Should I order new headlight assemblies ($65) for my Tacoma or attempt to restore my factory originals? I was thinking of selling my Toyota factory headlight assemblies as it would cover my Tacoma lighting upgrade costs. I live in SoCal and they would sell fast.
I totally recommend the Sylvania kit for restoring the lenses. It’s reasonably cheap, and the factory assemblies have much better reflectors than any aftermarket assembly. At the very least, using the kit on your factory assemblies will make them worth more if you decide to sell them because they will have clear lenses. Just take your time and it is an easy process!
Thanks turbodb. I clicked on the Amazon link you provided and ordered the Sylvania Headlight Restoration Kit. I am excited to get my Tacoma's headlight assemblies restored. I also ordered Headlight Services Premium-Plus Ground-Switched Headlight Harness for 9003/H4 Bulb and Phillips RacingVision GT200 +200 9003/H4 bulbs. I will smile every time I turn on my Tacoma's headlights and can see while driving at night.
That’s an awesome write up. It has me thinking.
I have a 2004 Tundra 4X4 and it came with LED bulbs that caused weird humming noises from the passenger side headlight and only the high beams would work. I found a fix by replacing those LED bulbs with a H4/9003 Sealight LED bulbs and my low beams now work with my Baja Design LED fogs. I am thinking that high wattage halogen bulbs might do a lot better as you mentioned the headlight assemblies are made for halogen bulbs. I am wondering if the plug and play lighting wiring harness from Headlight Services would work for my first generation Tundra. I will reach out to them and see what they say.
Nice, glad it got you thinking Christian! I'm happy to answer any questions, and I'd love to hear whether the harness works for the Tundra. If it doesn't, it's not all that difficult to make your own, as long as you know whether your headlights are positive or negative switched.
Thought I would check in on this thread, see what your experience with these are so far.
Couple of questions other people might also be thinking about.
1. Have you been "flashed" by on-coming drivers , i.e. does the 100/90's appear as "brights" to on-coming traffic ? or do you think they are comparable to modern car high intensity lamps ?
2. What do you think about the heat given off the bulb ? I assume the harness with the ceramic socket can handle the electrical heat, but what about the plastic housing, and lens ? I wonder if they would melt out the plastic over time. Opinion ?
Thanks !
Eric , Tucson AZ (maybe too hot here for these bulbs ! 😉
Hey Eric, thanks for checking in - I should probably add an update to the end of the post, or do a rig review that covers how everything is working... I should note that I recently replaced my headlight housings, as the restoration/polishing only lasts a year or two before yellowing again.
1. Nope, no flashing from oncoming traffic. Despite the higher power, the beam pattern (since I'm still using the OEM housing) is still correctly aimed, so I just cruise along with more light. And of course, as with all these '98-00 Tacomas - more light is still less than a low-end vehicle of today (it seems to me)
2. I've had no issue at all with the heat, though admittedly, I'm not running them in super-high ambient temperatures. In fact, for me it's usually the opposite, and I like the fact that they melt snow/ice on the headlights (just like the original bulbs, and unlike LEDs).
Thanks for the update !
Indeed, I have restored my "butter's" a few times, each time lasts only a few months before the hazing/yellowing starts again. In the past, on another vehicle, I replace the lamp with an aftermarket option, and I must say, although not as durable or nice as OEM, they have been crystal clear and affordable enough to replace when they go bad. I guess it's a trade off.
I would imagine the OEM lamps (albeit 20+ years old) would still hold up in the extreme heat, as they already do here in AZ. The only thing I have noticed in opening old lamps (the rear tail lights) is the silver reflective coating starts to go bad and slough off , even to the touch. Some people spray the inside with silver paint.
I'm going to try the headlightservices.com harness and the 100/90 bulbs, but keep a close eye on them when it hits 100+F in July !
Keep up the great blogging !
I love all the writeups you’ve made about your taco, and this one is excellent as well. I’m thinking about making this modification to my son’s 02, and I’m installing relay blocks for various other things like flood lights, in-cab winch control, etc - and I’d really like to include this with the relay block. How did you wire this up? I’ve searched and searched and cannot find a writeup or video on how to do this!
Hey Joe, glad you've found the write-ups useful! You probably noticed the off-the-shelf wiring harnesses that you can purchase, but you're right that those will be standalone, and not work with the relay block you're installing.
Can I assume that you're familiar with how relays work, etc? I'm happy to describe exactly how I did this, but wondering how detailed to get.
I installed a stand-alone H4 harness in my 1st gen 4R, and I love the functionality of it, but I ended up installing a relay block for various other lights, switches, etc, and I just sort of grind my teeth every time I see those two headlight relays screwed to the inner fender.
I’m aware of what the signal, ground, power supply & output wires are for and where to send them from & to on simple pump, motor, and light circuits. However in my research (Google) I’m finding very little at all in the way of diagrams for this harness, and the one that I’ve found includes a diode.
I’m super glad that you’ve responded to my original comment, as I was just about resigned to the idea buying the harness and splicing it into the relay block I have on-hand - and I hate the idea of that as well lol
Thank you again for all you’ve done for all of us!
Sure thing; sorry for the delay, was out on a trip.
Awesome, that just makes it easier for me to explain since I'll describe what I did, rather than using an entire wiring diagram. Still feel free to shout if any of this doesn't make sense; I'm sure a diagram would be useful and perhaps something I should do for others anyway.
We'll start with the easy part - power + ground for the higher wattage lights.
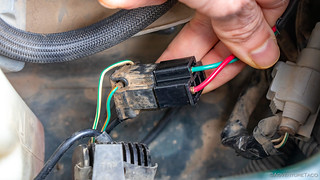
Note: I forget exactly which pins in the female H4 connector are which, but the three are: low beam power, high beam power, and ground. Once you unplug the stock H4 connector that connects to the bulb, you can use a multimeter between each contact and the frame to determine which is which as you turn on the low/high beams.
Now, the "interesting" part is where to get the supply power for the relays. By the way - you need two relays, one for the high beams and one for the low beams, since those are two separate circuits/filaments on our Tacoma's. Obviously, you want the low beam relay to activate when the normal headlights are on and the high beams to activate when the high beams are on. There's no better place to get this signal than on the stock low/high beam wiring. Luckily, once you connect the custom/higher gauge harness (parts) to the headlights, the original H4 female plug that was going into the back of the bulb is now just dangling there, and we know - since it was powering the bulb previously - that it's got the correct signals we need!
That's where the H4 male connector in the parts list comes into play. It has three contacts, but you need only two. As shown here, wire the:
That's it! It's that fact that we have that stock/original connector to use as our relay signal that makes this so easy/slick.
Hope that helps, shout if you have questions!
So, by this description, it sounds as if you have a conventionally switched headlight circuit? I do believe the circuit in my 02 is negatively switched, which is where all of my electrical prowess falls short.
Again, I do appreciate you taking time to answer my questions about this. If I ever get to the point that I fab up a harness, I’m going to blast pics and videos all over the forums to pay this forward!
I have to say, my knowledge on the negatively switched stuff is rather hazy as well. The important bit is to have power at the headlight (low or high) when the stalk is in the appropriate position, so to test/verify that, I'd do the following:
Use a multimeter to check the voltage between each contact in the OEM female H4 socket when the headlight stalk is in various positions. If,
I know that sort of skirts around the whole negative switching thing by sort of throwing my hands up and saying, "see what you've got," but that's how I'd approach it!
If you do give it a try, I'd love to hear the results!
When I was looking at the bulbs to buy them, it says they’re for off-road use and they’re not DOT approved for on road use. Is this really a concern?
It seems like so many headlights today are so bright compared to the stock 2001 4runner headlights. I’m sporting now.
As long as you're using the original (or OEM, not aftermarket) housings, you don't need to worry about the bulbs not being DOT approved, since the beam pattern will be determined by the housing. They might still, technically, not be DOT-compliant, but there's no way anyone will ever be able to tell what bulbs you're running once they are installed.