
October 16, 2021.
It's been nearly three years since I installed my ADS suspension on all four corners of the Tacoma. I did the rears first - twice, actually - relocating them for more travel. The fronts were installed not long after, and of course I've been battling the spherical bearings ever since. In that time, I've put 88,000 miles on the truck and I've known for a while that it was time to service the shocks.
For anyone who just wants a step-by-step guide on rebuilding shocks - as opposed to reading the story of my experience - I've created guides - with all the parts, tools, and pictures along the way - for various manufacturers. You're welcome to head that direction, though hopefully the story that follows here adds some nice color to the process.
")
")
In fact, serviceable shocks should generally get a going over every 50K miles or so - though I've heard that you can go to 100K if things seem to be working well. So, not only was I getting up there in mileage, but I also wanted to make a couple modifications to my existing setup - to change the valving a bit, and to move the reservoirs for the front shocks to a more convenient location - easily accessible in the wheel well, rather than mounted to the top of the frame horns.
Obviously, I started by procrastinating. There were a few reasons for my procrastination, which I'll list here only to make myself feel better. Or to give others in a similar situation a bit of solace.
- There are lots of (expensive) special tools needed for the job.
- I know exactly nothing about rebuilding - not to mention revalving - shocks.
- I knew that once the shocks were off the truck, I was out-of-commission for trips until I got them rebuilt and reinstalled. Hopefully, correctly.
Of the three issues, there was only one that I could easily solve - the first one. Frankly, it was just a matter of throwing money at the problem. And, as it turns out, I had two buddies - Mike @Digiratus and Dan @drr - who lived nearby and also wanted to learn how to rebuild shocks, so we pooled our funds and picked up the most expensive tools so they could sit in our shops for a while.

A press, nitrogen kit, and spring compressor.
It turns out that having the tools handy didn't actually solve the real problem - a complete lack of knowledge about what I needed to do. As is often the case, I needed to find someone willing to help. And so, almost a year passed.
Over the course of the year, I traded various bits of correspondence with two gentlemen who were critical in my rebuild. Tim @TMFF at 303 Shock Services was the first guy I got in touch with. Tim has a great service for the off-road community where he rebuilds shocks (and sells some of the easier-to-DIY parts) for folks like me. Ultimately I ended up describing to Tim what I wanted to do, and asked him if he'd assist me in gathering everything I'd need and then selling it to me.
It's here that I need to mention that I wasn't sure how he'd respond - after all, I was asking him to help me with something he usually charges for. In the end though, Tim seriously came through. Not only did he help me acquire the various seal kits, oil, and ADS-specific tools I'd need, but he also (for a fee, which I was happy to pay) put together some new compression and rebound shim stacks to revalve the shocks while I had them apart. (A bit) more on that later.

Tim is a rad dude, for sure.
I also reached out to Tyler over at ADS, and mentioned to him what I was up to. I was going to need his help gathering the hoses and mounting brackets to relocate my resis. As usual, he was super responsive and got exactly what I needed sent my direction, answering several questions along the way.

Always nice to work with someone like Tyler.
With most of what I would need now in hand, I was finding it harder - but never impossible - to procrastinate. And so, I started researching what it would take to do the actual rebuild. There is - at least in my opinion - relatively little info out there on rebuilding these higher end shocks. There is however, one great YouTube video from Ben at Shock Service LLC where he rebuilds a King shock. After watching the video, I sent Ben a few questions, and like Tim and Tyler, it was a pleasure interacting with Ben. He sure seems like a fun, happy, helpful dude.
I couldn't delay any longer, so I worked up the courage to coordinate a time with Dan and Mike that we could get together - Dan graciously offering his shop - where we could finally get down to business. And then - pretty quickly - I realized that could be a real problem. I mean, what if I hadn't actually gotten everything together that we needed, or if we ran into some snafu during the project?
I realized that I needed to bite the bullet and try a shock or two myself.

The first victim.
I'd already removed one of the rear shocks to patch up my cracked axle housing, so I figured that starting with the rears would probably be the easiest. And - at least if I totally screwed it up - the truck would still be drivable without it.
I set to work following a set of steps I'd put together from Ben's video, and for the most part things seemed to go well enough. Certainly there were differences between the King shock that I'd seen disassembled and what I was seeing with the expertly crafted piece of art on my workbench, but there wasn't anything that left me completely stumped as I set aside each part that I removed.

I was relieved that there was only a small pool of oil on the nitrogen side of the resi. I hadn't totally destroyed my shocks!

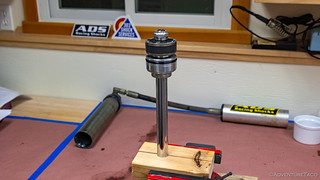
Smooth sailing from here - the shock shaft is the last part to come out.

That's a lot of engineering right there.
The first shock took be the better part of 4 hours to take apart. I was going slowly, double-checking myself, taking photos, and making notes about differences from what I'd seen online. I've gotta say, it was a great feeling to have everything spread out on the workbench, confident that I could certainly put it all back together again.
As often seems to be the case, the bulk of the work is necessary just to access the few little bits that need to be serviced. A shock rebuild is no different - the actual replacement of seals and o-rings is simple once you've got access to them.

There are four seals on this internal shaft retainer/wiper.

All the seals I replaced in one shock.
In addition to replacing the seals, it was also time for a revalve. My shocks have been mostly great with the stock valving from ADS, but I've always wanted to tweak a few things:
- On road - I want a slightly softer ride - to make the long highway stretches a little more comfortable.
- Off-road - I wanted a bit more dampening before I would hit my bump stops (slower compression of the shocks) as well as a little slower rebound as the shocks were re-extending. A little bit like trophy trucks that slowly rise out of their squat after a jump, I was hoping to change my down-up-down-up action to one that was simply, down-up.
This is where I had no idea what to do but where Tim's knowledge and experience really shined. With a bit more detail about my truck - what it weighed (5600-5800 lbs), the spring rates I had on the front coils (650 lbs) and leaf springs (+600 lbs over stock) - he sent me new compression and rebound shim stacks for each shock that would get me to the behavior I was looking for. Or, at the very least - since revalving is part-art and part-science - closer!

Old and new shim stacks.
With new seals and shims in place, reassembly of the first shock was lightning fast - when compared to teardown. At two hours, it took twice as long as the rest of the shocks, but I felt pretty good about it as I was filling the shock tube with the last bit of oil and securing the end cap!

Time for some pretty red oil.
Soon enough, I was done. I'd taken a bunch of notes - for the next three shocks - and photos, of course, and boy was I proud of myself. Trust me, @mrs.turbodb got an earful, that's for sure!
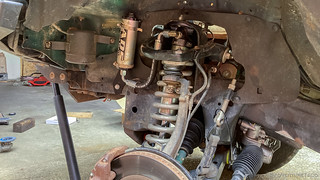
A couple days later, I got together with Mike and Dan to do the front coilovers. These would be easy, I thought - having wrapped up the second rear shock in just under two hours. Plus, it'd be super fun to show these two guys how to do something that none of us had done a week earlier - a reversal of roles as they are usually the ones educating me on our trucks!
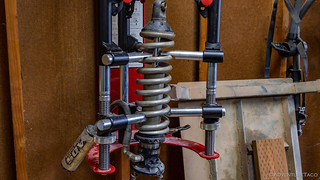
Gotta love the safety of a wall mounted spring compressor. The creaks and groans from the spring as it was compressed made every last one of us glad that we weren't using a rental tool from the parts store.
But, almost as soon as we got started, we ran into an issue - we couldn't figure out how to get the coil off of the shock. I'd expected it to work like Kings, but there was no gap in the bottom plate to slide over the shock shaft - and that plate needs to come off in order to remove the coil. Luckily, Mike was able to give Matt @M C M - another ADS expert - a call on Sunday morning and get a quick answer as to freeing up a retaining ring hidden under the bottom plate.

This little retainer is ingenious.
The rest of the rebuild went reasonably easily - though I probably over-explained everything because it ended up taking nearly four hours! Not unlike the time needed to read this story, I suppose.
Besides removing the coils, two things were a bit different than the rears - first was that I replaced the hoses between the shock and reservoir. A simple procedure, this would allow me to mount the resi in the wheel well - and that would make it easier to remove every time I have to service the spherical bearings.
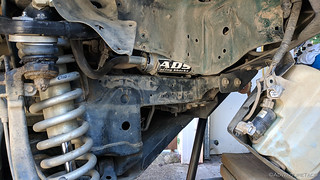
Original resi position on the top of the frame was always hard to access.

New hoses.
New resi location.
Second - since this was the first time I'd seen Dan and Mike since starting this project - we got to fill all four shocks with Nitrogen using the custom setup they'd pieced together. A simple process - with the right tool - and super fun to do!

The kit.

A quick zip and the shock is pressurized!
The only problem - if it can be considered that - was that my loquacious carrying-on during the rebuild meant that we only got one shock taken care of before we had to head our separate ways early in the afternoon. Luckily, Mike had brought along a couple old Bilstein 5100s from Zane @Speedytech7, and he and Dan quickly installed them on my truck as I cleaned up some of the mess we'd made during the day.

My first experience with 5100s. They were fabulous. I should have put these on the 4Runner instead of the OMEs I installed.
I wrapped up the last coilover once I got home, and with that, my first shock rebuild was done. Looking back, one of the coolest things about it was the team effort that went into the process. Really a cool community to have folks like Tim, Tyler, Ben, Mike, Dan, Matt, and Zane (in order of appearance, LOL) all around to pitch in and help any way they could. Thanks to every last one of you!
One more thing; an update of sorts.
So, one thing I noticed (and I suppose Mike and Dan noticed) when rebuilding the coilovers, was that the shock shafts had a couple of spacers on them, which was very different than the rear shafts. Pics for details:
Shock shaft from a smooth body shock.

Shock shaft from a coilover shock.
I was curious if these spacers could be removed. Doing so would allow the shock piston (the bit at the top with the pyramidal shim stack on it) to move further down toward the internal shaft retainer (the piece with the black o-ring, which is secured at the end of the shock body). This, in turn, would mean that the shock shaft was moving further (out of the body), giving more down travel/extension.
I have heard - third or fourth or fifth hand, mind you - that sometimes shock vendors have a "regular" and "extended travel" version of the same shock, and the difference is in some spacer. Are these the spacers, I thought?
So, I contacted Tyler over at ADS and asked. I always write my emails in green, a holdover from old habits that die hard.
Morning Tyler -
I noticed that in the front coilovers, there are two, ~3/4" spacers on the shock shaft between the internal shaft retainer and the piston (well, between the shaft retainer and compression shim washer, technically). That seems like it significantly limits droop/extension of the front - by 1.5" or so. Can you give me details on why those spacers are there, and whether I can remove them in a future rebuild?
Cheers,
Dan
Tyler got back to me as quickly as ever with this response:
Dan, the spacers are called stroke limiters they allow us to use the same shaft in many applications by just changing out different thicknesses of limiters we can change the stroke. Instead of having 100s of shafts we can narrow it down, if you remove them you will over extended your control arms, steering, and CV axles, they are opened up to the safe amount of travel for the application, and are all extended travel from a stock version.
Thank you
Tyler
All of that makes sense, obviously. It probably - technically - varies a bit from truck to truck. I know, for instance, that on my truck, my control arms allow more down travel (extension) than the shocks, which is why I went ahead and installed limit straps, but in general, I get what he's saying. Surely at full extension and full lock in a turn, a lot of stress would be on the CVs, and so keeping extension in a more "reasonable" range is - understandably - what ADS is going for.
I'd be very interested to see the internals of a King coilover in person. Or any other brand for that matter. Perhaps they too have the same spacers. Or maybe the shafts are shorter.


")

")


")

")
")
")
Sorry if I missed this somewhere, but did you get the ADS extended travel front coilovers? Thanks
Hy Reggie, I do have the ADS extended travel (not to be confused with Long Travel) front coilovers with remote resis. You can read about when I got them and installed them using the link in the suspension section of the Tacoma build page. Let me know if you have any questions about them!