Press "Enter" to skip to content

Rig Review - What worked and what didn't for the last five months?

September 2, 2022.

Overall, the Tacoma has been doing great since my last rig review back in March, so I haven't felt any need to write anything about it. Still, there have been a few things worth noting on the last several trips, so let's get down to it.

OMG, this review covers a lot of trips!

ADS Coilover Spherical Bearings (resolved)

TL;DR - I'm convinced that switching to extra tight stainless steel spherical bearings is the way to go, and I have numbers to prove it.

I've replaced my spherical bearings several times (I put a lot of miles on the truck) and there have been no shortage of posts covering the topic. Now, more than 120,000 miles after putting the first set on the Tacoma, I have what I feel is a conclusion: it is extremely important to use FK branded bearings, and they must have the F1 fit. F1 is the FK designation for an extra-tight fit (details).

For the curious, here's the overall timeline for spherical bearings in my lower front shock eye - the bearing that is subject to the most grit and grime of any bearing on the truck.

  • The first set (from the ADS factory, I have no idea what brand they were) lasted 22K miles
  • Second set of (as far as I know, unbranded, purchased from ADS) COM10T: 9K
  • Third set of (as far as I know, unbranded, purchased from ADS) COM10T: 7K
  • Fourth set of (as far as I know, unbranded, purchased from ADS) COM10T:10K
  • Fifth set of (as far as I know, unbranded, purchased from ADS) COM10T:9K
  • Sixth set of FKSSX10T-F1: 40K
  • Seventh set of FKSSX10T-F1: 15K so far, still "like new"

Over that time, I haven't had to replace the upper front or rear spherical bearings until the sixth set of bearings went into the lower front (97K miles).

There are two benefits of the FKSSX10T-F1. First is the stainless steel, which (obviously) does not rust. As such, there isn't rust eating away the Teflon. Second (and maybe more importantly) is the -F1 fit. That is a tighter bearing and as such, allows much less grit and grime from the trail into the bearing.

Personally, the lower eye on my front coilovers sees *way* more grime than the front uppers or rears (both lower and upper), so I'm now continuing to use the stainless steel in the front lowers. For all the rest, I'm using FKS10T-F1 (this is a hardened steel version vs. the COM10T which is just mild steel) and of course, with the -F1 fit. This saves money on 3 of the 4 spherical bearings. Frankly though, since I've only had to replace them after 97K miles, it probably doesn't matter what I use on those.

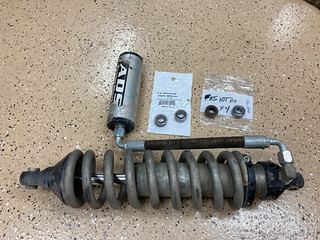
Replacing spherical bearings on the front coilover. Note that the (left) FKSSX10T-F1 bearings from the lower eye show almost no rust (since they are stainless steel) after replacement, while the (right) upper bearing FKS10T-F1 (hardened steel) shows significant rust.


Skid Plate "Fun" (ongoing)

TL;DR - While I think that Relentless armor is some of the best out there, the mounting of the skid plates could have been better and is causing me a bit of trouble over the years (because I lightly beat the truck).

I've quite enjoyed all of my Relentless armor on the truck, since I picked it up as one of my first modifications back in 2016. Early days, I had no skillset at the time and Eric @RelentlessFab did a great job. Since then, I've certainly beat on the skid plates, and the armor itself has held up well - only requiring the occasional persuasion to continue service.

The persuader.

However, attachment points to the frame have not held up well and could have been designed better in my opinion.

The Relentless skid plate system is comprised of two skids with several attachment points.

In the past, I've had trouble with the mid-skid attachment points to the frame rails as well as the transmission crossmember. After drilling out and re-tapping the frame rail holes several times, I finally replaced the self-tapping screws there with rivnuts using the Astro 1442 Rivnut Tool, which has worked out really well. At the transmission crossmember, I've consistently broken off the 3/16" steel ears on the skid plate. After welding them back on several times, I finally gave up and used a better solution - carriage bolts through the skid plate and through the crossmember.

The front skid plate has given me less trouble, and part of the reason for this - I believe - are the three 17mm bolts that secure it to the front bumper in a super-beefy way. In fact, those are the only three attachment points that I've never had a problem with. The other attachment points - to the front cross member and LCA tabs - have both needed work over the year. The LCA tabs broke off completely and had to be re-welded, and all four of the holes have needed to be drilled and re-tapped for larger bolts.

I'm at the point now where I've re-tapped all four of these holes to be 3/8"-16 thread - much larger than the OEM M8 bolts that used to secure each point - and one of the LCA mounts needs to be enlarged again to 7/16-14tpi. The captured nuts there only have so much meat, so I can't enlarge them indefinitely. So, I'm looking for a better solution. Weld the nut solid and re-drill? Some sort of insert? As yet, this is not resolved.


Front Bump Stops - More Durobumps

TL;DR - I've really liked all of the bump stops from Durobumps, so I've installed a second set on the front lower control arms!

Recently, I replaced a lot of the bushings on the front of my truck - the lower control arms (LCAs), steering rack, and front diff. When I did that, I also installed some Durobump bump stops on the LCAs, and an astute reader mentioned to me that I installed them in the wrong position, replacing the front OEM bump stops rather than the rear.

Thanks for noticing the screw-up, Andrew!

Anyway, while I didn't notice any problem with the bump stops in the front rather than the rear, I had a chat with the creator, Curtis. Technically, we were chatting about other products that he makes for Tacoma's - specifically the rear bump stops and u-bolt flip kits for 1st gens - both of which I installed and love, but that he no longer offers. Through the flow of that conversation, he mentioned that he was working on a set of bump stops for the front mount of the LCA, and asked if I wanted to give a set a try.

Liking his other products, I jumped at the opportunity, and had a set sent my direction. I've had them installed for several months now, and the cushioning of the ride up front has been fantastic.

1st gen Tacoma front LCA Durobumps. The bump on the left is for the front hole of the LCA; the angled bump on the right is for the rear.

A much nicer cushion than the stock hockey-puck style bump stops.


I Broke my Kartek Limit Straps, And Replacement

TL;DR - My dirver side limit strap in the front broke. I replaced it.

When I was up in Canada with Mike, I mentioned one day that it felt like I needed to (finally) adjust my limit straps because my side shock seemed to be bottoming out when I would go into full droop. Of course, that bottoming out is what can cause shock tower destruction - due to the enormous change in force - and was the reason I installed limit straps in the first place.

Turns out, adjustment wasn't what was needed.

I was surprised to see these straps break, but I suppose they are a wear item. Figuring that the passenger side might be ready to go soon as well, I ordered up three more 7" straps from Kartk - to amortize the cost of shipping - and installed a new strap in just a few minutes.

Ready to protect my shock towers, again.


Worn Upper Control Arm Bushings Leads to Updated SPC UCAs

TL;DR - the last time I got an alignment, the tech mentioned that the rear passenger side bushing on the upper control arm (UCA) was starting to get a bit loose. After some consideration, I decided to install completely new UCAs, with lifetime joints so I never have to worry about those bushings again.

It was more than three years and 120K miles ago that I installed SPC UCAs on the Tacoma. Shortly after installation, SPC came out with an improved design that was a single forged piece of material, with an entirely new type of joint. That joint - which they call the "X-Axis" joint - was essentially a sealed spherical bearing that replaces the polyurethane bushings where the UCA is mounted to the frame.

And so, when I took the truck in for an alignment and the alignment tech (a good one, which can be hard to find) mentioned that my UCA bushings were in need of replacement, I had some thinking to do.

My options - and full thought process - can be found in Replacing my SPC Upper Control Arms ...with SPC UCAs, but the short of the matter is that I ended up getting a great deal from Esteban at SPC and swapped out my existing UCAs for a new set with the X-Axis joint. I'm still a bit apprehensive about the lifetime nature of the X-Axis joint, but only time will tell. If they are a lifetime part, I will be a very happy camper!

Update October 17, 2022 (six weeks after install)

I'm very unhappy with these SPC X-Axis UCAs, and I was misled by SPC about them being a lifetime part. I've added a (long) detailed update to the original story.

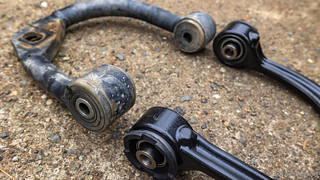
My original SPC UCAs with sleeved poly bushings on the left; new UCAs with the X-Axis joint on the right.


The Bed is Failing (Cracking)

TL;DR - The passenger front corner of the bed cracked all the way down to the bed floor. I've fixed it, for now.

On our first day of the trip to Plumas National Forest, on our way down to Poker Flat, we heard a new banging noise. It reminded me of the noise I'd heard when I'd broken a leaf spring, so I was out of the truck quickly to look for the problem. I wasn't able to isolate it entirely, but I was pretty sure that I found where the bed had split (more than in the past) in the passenger front corner - something I'd tried to avoid by replacing my bed rack. Luckily, it only seemed to rattle around on significant downgrades with rocky conditions, and I knew the bed liner would mostly keep things together, so we ignored it for the rest of the trip.

Once we got back, I was able to get the bed off. Sure enough, the entire corner had split. A bit of metal - and half a day later - I got it all buttoned up. Details on the process are covered in My Bed is All Cracked Up, and hopefully it'll be good to go for several more years. Really though, the bed has issues all around, so who knows - perhaps I'll need a replacement in the future.

That is certainly not supposed to look like it does.


New Lower Ball Joints (Normal Maintenance)

TL;DR - I replaced the lower ball joints (LBJs) as preventative maintenance after 75K miles.

I wasn't having any issues with my LBJs, but as a known weak point on 1st gen Tacomas, I figured that 75K miles - and a little less than two years - was long enough and I replaced them. I'll continue to check the new ones every time I do a tire rotation, but by and large I feel as though this part has served me well, despite the trouble it seems to give many.

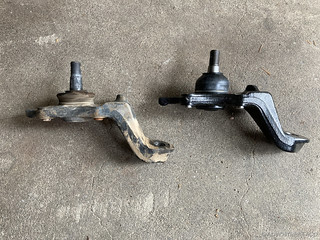
Out with the old, in with the new.


How are Those Expensive scheel-mann Seats Doing? (9-month review)

TL;DR - The new scheel-mann seats are doing fine. The jury is still out on whether they are worth it (and will be for several years, I think.

These seats are definitely the most expensive mod I've done to the Tacoma.

I don't often post photos of the interior of the truck, but when I do, people always ask me about the seats. I wrote up the entire saga of finding new seats - which, if you're looking for a more comfortable ride is probably worth reading - as well as the installation and my initial impressions of the scheel-mann Vario R seats that I currently have installed.

I've had the scheel-mann seats for nine months now, and I continue to like them conceptually. My previous impressions - both good and bad - continue to be true. I do find myself wondering - for two main reasons - if I should have tried re-foaming my original seats prior to buying the scheel-mann:

  1. I am worried about the lack of seat covers. The seats still appear to be in great condition, but I know that with all the dirt and dust that they are subjected to, covers extend the life by a good margin. Like, years.
  2. Cost. Even if the cost doesn't really matter for me from a budget standpoint, I still feel like the cost of these seats was so great that I have a hard time justifying it. I probably should have spent half the amount on a really good re-foaming - perhaps adding larger bolsters in the process - to the OEM seats, before I bought these.


Interesting Times with Cooper ST/Maxx

TL;DR - My Cooper ST/Maxx tires finally gave me a bit of trouble. Still, I'll probably buy a 5th set when these wear out because they've performed better than any other tire I've seen others run on the trail.

I had two flat tires on our recent trip to run the Plumas NF and Lassen NF trails in Northern California. The first wasn't really the tire's fault since I sheared off the valve stem; the second was a flat I got on the highway as we drove home.

That's not right, but at least the tire is fine!

That's not right either. After running on this for two miles or so at 65mph, even though it looks pretty normal, the tire is toast.

This is the first time - in more than 4 years and 19 (3 sets of 5 and a set of 4) Cooper ST/Maxx tires - that I've gotten a flat. Plus, in that time, I've only had one tear into a sidewall along Black Bear Pass in the Alpine Loop, so I'd say these are tough tires.

Luckily, for my most recent set of four tires - I only bought four this time because they'd increased in price by nearly $100/tire since my last purchase - I'd also bought the extended warranty, so SimpleTire replaced the freeway flat free of charge. For the valve stem, several folks mentioned a product I'd never heard of before, so I picked up a pair of Colby Valves that should allow me to repair a broken valve stem, should it ever happen again in the future!

Valve stems that insert from the outside!


Seemingly solved from previous Rig Reviews

  1. Front ADS Coilover Spherical Bearings

Unchanged / Still an issue from previous Rig Reviews

There are some things that have been featured in Rig Reviews that are - as yet - unchanged from when I originally reviewed them. Rather than highlight those things again, I'll simply link to them here.

  1. The Zipper on the CVT Tent is Shit
  2. My Suspension Squeaks


More Rig Reviews

One Comment

  1. JOHN MORAN
    JOHN MORAN October 16, 2022

    A lot of work there, interesting. I like that valve stem, pretty creative and I wonder why I haven't see someone making an item like that before.

Leave a Reply to JOHN MORAN Cancel reply

Your email address will not be published. Required fields are marked *